Table of Contents
Advertisement
Available languages
Available languages
Advertisement
Table of Contents

Subscribe to Our Youtube Channel
Related Manuals for Singer 4166


Summary of Contents for Singer 4166
-
Page 3: Table Of Contents
CONTENTS MAIN PARTS BLIND HEM STITCHING ACCESSORIES BUTTONHOLE SEWING MULTI-STITCH ZIGZAG OPENING THE ACCESSORY CASE ELASTIC STITCH SEWING REMOVING THE EXTENSION TABLE FEED DOG CONTROL OPENING THE ACCESSORY CASE PATCH WORK DUST COVER (OPTIONAL) CHANGING THE PRESSER FOOT APPLIQUE INSERTING ZIPPERS REMOVING THE PRESSER FOOT HOLDER INSERTING THE NEEDLE SCALLOP STITCH... -
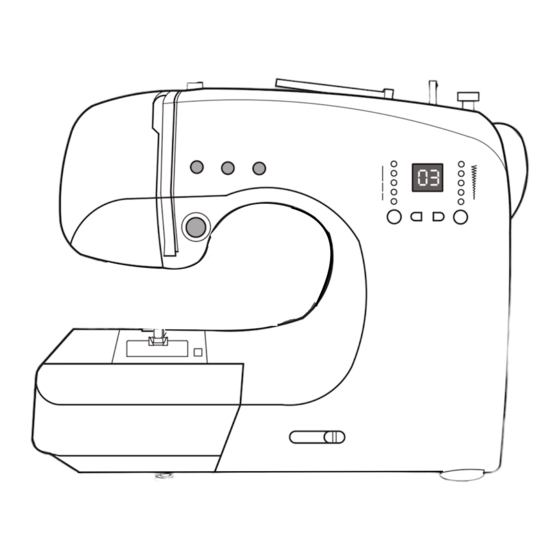
Page 4: Main Parts
MAIN PARTS 9 10 11 12 13 04 05 06 07 09 10 11 11 26 27 28 29 31 32 37 38 39 40 42 43 48 49 50 51 53 54 59 60 61 62 64 65 1.Face Plate 9.Thread Tension Regulator 2.Reverse Stitch Button 10.Spool pin... - Page 5 18.Carrying Handle 19.Thread guide for upper threading 20.Power switch 21.Air vent 22.Foot control plug 23.Plug socket 24.Power cord 25.Foot control 26.Lower thread guide 27.Needle threader lever 28.Needle threader 29.Buttonhole lever 30.Presser foot thumb screw 31.Needle plate 32.Bobbin cover 33.Bobbin cover release lever 34.Presser foot holder 35.Presser foot 36.Needle thread guide...
-
Page 6: Accessories
ACCESSORIES Some accessories are provided in the accessory case. 1.Needle set 2.Bobbins 3.Spool pin cap (large) 4.Spool pin cap (small) 5.Straight stitch foot 6.Needle plate screwdriver 7.Screwdriver 8.Buttonhole opener with brush 9.Oiler 10.Buttonhole Foot 11.Overcasting Foot 12.Zipper Foot 13.Blind hem Foot 14.Satin Foot OPENING THE ACCESSORY CASE To open the accessory case, lift up on the... -
Page 7: Removing The Extension Table
a.REMOVING THE EXTENSION TABLE Hook your finger to the bottom of extension table and slid to the left. To attach, insert to the right. b.OPENING THE ACCESSORY CASE Hook your finger to the left side of accessory case and pull toward you. DUST COVER Cover the machine with dust cover when it is not in use. -
Page 8: Changing The Presser Foot
CHANGING THE PRESSER FOOT The presser foot must be changed according to the stitch you sew, or work you do. CAUTION:To prevent accidents. Turn off the power switch before you change the presser foot. 1.Turn the hand wheel toward you until the needle is at its highest point. -
Page 9: Connecting The Machine
CONNECTING THE MACHINE Place the machine on a stable table. POLARIZED PLUG INFORMATION This appliance has a polarized plug (one 1.Connect the power line cord to the machine by inserting the 2-hole plug into blade wider than the other). To reduce the the terminal box. -
Page 10: Control Buttons & Drop Feed Lever
CONTROL BUTTONS & DROP FEED LEVER A.START / STOP BUTTON The machine will start running when the START / STOP button is pressed and will stop when pressed the second time. The machine will sew slowly the first 3 stitches sewn. B.SLIDE SPEED CONTROL LEVER When using the START / STOP button, the machine will sew faster when the slide speed control lever is moved to the right, and sew slower when the lever is moved to the left. -
Page 11: Foot Controller
FOOT CONTROLLER Use of foot controller will permit control of start, stop and speed with your foot. CAUTION: To prevent accidents. 1.Turn off the power switch. 2.Push foot controller plug into receptacle on machine. 3.Place foot controller at your feet and turn on power switch. Sew faster by increasing the pressure on the controller. -
Page 13: Bobbin Winding
BOBBIN WINDING REMOVING THE BOBBIN 1.Remove the slide cover by sliding the locker to right and push down the left corner of slide cover. At the same time. 2.Remove the bobbin from the machine. WINDING THE BOBBIN 1.Pivot spool pin into highest horizontal spool pin position. 2.Pass a spool of thread on the spool pin. -
Page 14: Inserting The Bobbin
INSERTING THE BOBBIN 1. Place bobbin into bobbin holder with the thread unwinding counter clockwise. 2. Draw thread into notch (A). 3. Pull thread toward the left and along the inside of spring (B) until it slips into notch (C) being sure that thread does not slip out of notch (A). -
Page 15: Threading The Machine
THREADING THE MACHINE THREADING THE UPPER THREAD 1.Raise the presser foot lifter. 2.Press the needle up/down button and set needle in up position. 3.Place a spool of thread onto spool pin and set the spool cap. 4.Pass thread through thread guide. 5.Pass thread along the arrow marks on machine. -
Page 16: Threading The Needle Eye
THREADING THE NEEDLE EYE 1.Lower the presser foot. 2.Set needle in up position. 3.Lower the threader slowly and draw thread through thread guide (A) and pull toward the right. 4.Lower the lever as far as it will go The threader will turn and the hook pin will go through the needle eye. -
Page 17: Starting To Sew
STARTING TO SEW The machine will be set at 01 automatically to sew straight stitches when power switch is turned on. CAUTION:To prevent accidents. While sewing, special care is required around the needle. The machine will automatically feed the fabric, do not pull nor push fabric, Simply guide the fabric to sew straight. -
Page 18: Reverse Stitching
REVERSE STITCHING Reverse stitching is used for reinforcing the ends of the seams. 1.Place the fabric in position where back stitching is to be made and lower the presser foot. 2.Press reverse stitch button and sew 4-5 stitches. (Using foot controller, press pedal with pressing reverse stitch button.) 3.Press start button and resume sewing. -
Page 19: Adjusting The Thread Tensions
ADJUSTING THE THREAD TENSIONS The thread tension must be properly balanced. If adjustment is required, it can be made by changing the upper thread tension. A. Correct Thread Tension Upper and bobbin threads should lock approximately in the middle of fabric. B.When bobbin thread appears on top side of fabric. -
Page 20: Fabric, Thread And Needle Table
Helpful Hint Like shown on drawing, stitches on top side of fabric are good but bottom side tends to have a bunch of thread, it usually means that the upper thread is not threaded correctly (especially threading of the upper thread tension regulator may not be correct.) Refer to page 14 for correct threading. -
Page 21: Straight Stitch Sewing
STRAIGHT STITCH SEWING Straight stitch patterns should be selected suit the type of fabric being sewn. START STOP 1.Position the fabric under the presser foot and lower it Hold the upper thread and bobbin thread loosely. START STOP 2.Press start button to start sewing. (When foot controller is used, press the pedal.) Place hand lightly on the fabric while sewing Place hand lightly on the fabric while sewing... -
Page 22: Zigzag Stitch Sewing
ZIGZAG STITCH SEWING Your machine can sew zigzag stitches of various widths and lengths by changing the settings of the stitch width and stitch length. Zigzag stitches are very good for joining two pieces of fabrics, applique and sewing various decorative patterns. -
Page 23: Overcasting-Overlocking
OVERCASTING-OVERLOCKING 17 36 06 12 USING THE OVERCASTING FOOT Press fabric against the guide plate of the overcasting foot so that needle falls near the edge of seam. A.(Width=6.5-5.0) is used for preventing ravelling of fabrics. B.can sew overcasting and regular stitches at the same time.Therefore it is convenient for sewing easy to ravel and stretch fabrics. -
Page 24: Blind Hem Stitching
BLIND HEM STITCHING This stitch will sew without stitches showing on right side of fabric. Overcasting 1. Fold the fabric as shown on drawing. Wrong Side Wrong Side 2. The guide (A) on the blind foot ensures even feeding of the fabric when blind hem stitch- ing. -
Page 25: Buttonhole Sewing
BUTTONHOLE SEWING This machine can sew 3 type buttonholes. 1.Mark position and lenght of buttonhole on fabric. 2.Set button on the base. * If button does not fit on the base, adjust slide on base to diameter of button plus thickness of button. - Page 26 7.Machine will sew the buttonhole in the order as shown and stop automatically after sewing. 8.Raise the presser foot and cut thread. To sew over same buttonhole, raise presser foot to return to original position 9.Cut center of buttonhole being careful not to cut stitches on either side.
-
Page 27: Multi-Stitch Zigzag
MULTI-STITCH ZIGZAG Used for sewing on elastic band and overcast stitching on knit fabrics. A.Elastic Band Sewing Pull elastic band in front and back of needle while sewing. B.Overcast Stitching Used for easy to ravel and knit fabrics. Needle should fall on extreme edge of fabric. -
Page 28: Feed Dog Control
FEED DOG CONTROL The feed dogs control the movement of the fabric that is being sewn. They should be raised for all general sewing purposes and lowered for darning, freehand embroidery and monogramming so that you, not the feed dogs, are moving the fabric. -26-... -
Page 29: Patch Work
PATCH WORK For additional decorative purposes, use different kind of materials. 1.Place two pieces of fabric right sides together and sew a basting stitch. 2.Press the seam open. 3.Be sure that stitches fall on both sides of fabric. APPLIQUE 1.Fix applique on fabric with fabric glue, fusible iron-on or basting stitches. - Page 30 INSERT ZIPPERS AND PIPING ZIPPERS Attach the zipper foot which can be snapped on to the right or the or left of the foot sew you can stitch close to the zipper on the right or left side. Illustration 1:Needle to the left of foot 2:Needle to the right of foot To insert zippers, consult the zipper package for instructions on how to prepare zipper placket and...
-
Page 31: Scallop Stitch
SCALLOP STITCH This stitch is used to sew edge on women and children`s wear and table cloths. SCALLOP HEM 1.Fold the fabric right sides together in and sew along the edge. 2.Cut the fabric along the seam leaving an allowance of 3mm (1/8") for seaming. Notch the allowance. -
Page 32: Caring For Your Machine
CARING FOR YOUR MACHINE To ensure the best possidle operation of your machine, it is necessary to keet the essential parts clean at all times. Always disconnect the machine from power supply by removing the plug from the socket-outlet. CLEANING THE FEED DOGS AND HOOK AREA 1.Raise the needle to its highest position. -
Page 33: Helpful Hints
HELPFUL HINTS CAUSE CORRECTION PAGE PROBLEM Machine not properly threaded. Re-thread machine. Upper thread Thread entwined around bobbin. Remove entwined thread. breaks Needle inserted incorrectly. Re-insert needle. Thread tension too tight. Readjust thread tension. Thread of incorrect size or poor quality.
Need help?
Do you have a question about the 4166 and is the answer not in the manual?
Questions and answers
Can I use Pfaff bobbins with this Singer 4166 machine? What number bobbin?