
Related Manuals for Zanussi TD4100


Summary of Contents for Zanussi TD4100
-
Page 1: Tumble Dryer
TUMBLE DRYER SECADORA SECADOR TD 4100 INSTRUCTION BOOKLET INSTRUCCIONES PARA EL USO INSTRUÇÕES DE UTILISAÇÃO 125994480... -
Page 2: Dear Customer
Dear customer, Please read these operating instructions carefully and pay particular attention to the safety notes indicated in the first pages. We recommend that you keep this instruction booklet for future reference and pass it on to any future owners. Transport damages After unpacking the machine please check it is not damaged. -
Page 3: Table Of Contents
Contents Important safety information Maintenance and Cleaning ....4 ....13 External cleaning ..........13 Disposal ............5 Cleaning the door..........13 Cleaning the filter ..........13 Tips for environmental protection Something not working? ....14 Description of the appliance ....6 Installation ............7 Positioning ............7 Fitting the vent hose ..........7-8 Door reversal ............8 Electrical connection ..........8 Stacking kit............8... -
Page 4: Important Safety Information
Contact your local Zanussi Service • If the machine is situated on a carpeted floor, Centre. Always insist on genuine Zanussi spare please adjust the feet in order to allow air to parts. -
Page 5: Disposal
Disposal • Packaging materials • Machine The materials marked with the symbol Use authorised disposal sites for your old appliance. recyclable. Help to keep your country tidy! This means that they can be recycled by disposing of them properly in appropriate collection containers. Tips for environmental protection To save energy and to help protect the environment, •... -
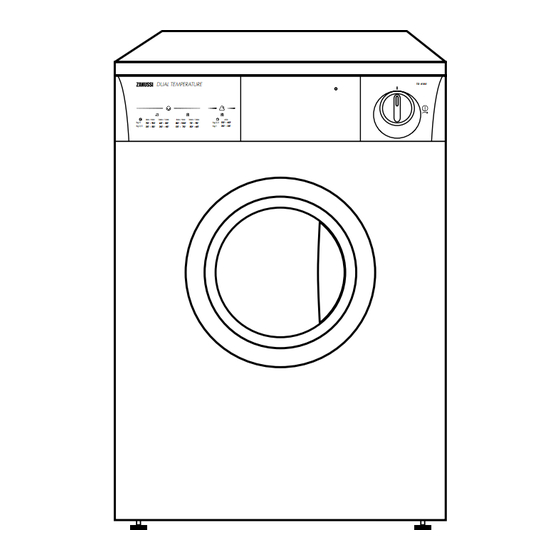
Page 6: Description Of The Appliance
Description of the appliance 1 Programme chart 2 Mains-On Light 3 Time Selector Dial 4 Rating Plate 5 Door Handle 6 Fluff filter 7 Adjustable feet 8 Side vent outlets 9 Ring nut 10 Rear vent outlet... -
Page 7: Installation
Installation Positioning Fitting the vent hose It is recommended that, for your convenience, the To simplify the installation, there is a choice of vent machine is positioned close to your washing outlets: one at the back, the others in the left and machine. -
Page 8: Door Reversal
- Refit the plastic plate (4) on the opposite side It is important not to connect the vent (Fig. B). hose to, for example, a cooker hood, or - Refit the door by screwing in the two screws (1) a chimney or flue pipe designed to carry which fasten the door to the cabinet (Fig. -
Page 9: Use
The control panel 1 Programme Chart Additional drying If at the end of the programme the laundry is still too This will help you to select the correct time for drying. damp, set the dial for a further period of drying (remembering to take into account the cooling 2 Mains-On Light period). -
Page 10: Drying Times
Drying Times Cotton and Linen Selector dial: up to 150 minutes Degree of spin given Quantity Drying times Degree of drying required mins 100-120 80-100 55-70 800/900 Store dry 1000/1200 95-115 75-95 50-65 90-110 70-90 35-50 800/900 Iron dry 1000/1200 85-105 65-85 30-45... -
Page 11: Operating Sequence
3. When drying is completed Operating sequence The machine stops automatically, the mains-on light Before starting up for the first time it is advisable lo goes out. load a few moist cloths into the dryer and to let it run If the laundry is still too damp, select a further brief for about 20 minutes. -
Page 12: Useful Hints
• Avoid drying dark clothes with light coloured fluffy Useful hints items such as towels as they could attract the fluff. • The laundry must be thoroughly spun before • Try to load to the maximum capacity of the tumble drying. machine as small loads are uneconomical. -
Page 13: Maintenance And Cleaning
Maintenance and Cleaning You must disconnect the appliance from the electricity supply, before you can carry out any cleaning or maintenance work. External cleaning Use only soap and water and then dry thoroughly. Important: do not use methylated spirit, diluents or similar products. -
Page 14: Something Not Working
Something not working? Before contacting your local Zanussi Service Centre, please make the following checks: Problem Possible cause • The dryer does not work: • The door is open. • The plug is not fitted into the wall socket. • There is no electricity supply from the wall socket.
Need help?
Do you have a question about the TD4100 and is the answer not in the manual?
Questions and answers