Table of Contents
Advertisement
Advertisement
Table of Contents

Summary of Contents for AvantaPure 269
- Page 1 Operations Manual Models: 269 Counter-Current Conditioner...
-
Page 2: Table Of Contents
Water Line Connection Drain Line Regenerant Line Connection Overflow Line Connection Electrical Connection Valve Camshaft (Green) Disinfection Of Water Conditioners AvantaPure Controller Display Icons Keypad — Buttons Things You Might Need to Know Programming Overview Level I Programming Level II Programming... -
Page 3: How To Use This Manual
How To Use This Manual This installation manual is designed to guide the installer through the process of installing and starting conditioners featuring the AvantaPure controllers. This manual is a reference and will not include every system installation situation. The person installing this equipment should have: •... -
Page 4: General Warnings And Safety Information
General Warnings And Safety Information Electrical There are no user-serviceable parts in the AC adapter, motor, or controller. In the event of a failure, these should be replaced. • All electrical connections must be completed according to local codes. • Use only the power AC adapter that is supplied. -
Page 5: System Operation Cycle Functions
• Working water pressure range is 20 to 120 psi (1.38 to 8.27 bar). In Canada the acceptable working water pressure range is 20 to 100 psi (1.38 to 6.89 bar). • Use only regenerant salts designed for water softening. Do not use ice melting, block, or rock salts. - Page 6 Cycle Water Flows From Regenerant To Regenerant Tank Tank SERVICE BRINE REFILL BRINE PREP BRINE/SLOW RINSE REPRESSURIZE BACKWASH FAST RINSE System Operation Cycle Functions Rev C...
-
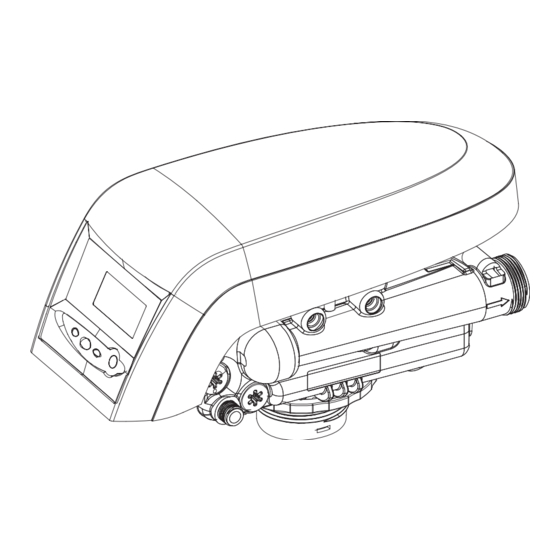
Page 7: Equipment Installation
Equipment Installation Valve Layout One Piece Valve Disc Spring Valve Discs Control Module Mount Refill Controller Injector and cap Regenerant Tube Connection Optical Sensor Camshaft Motor Outlet Drain Inlet Injector Screen Backwash Filter Drain Control Equipment Installation Rev C... -
Page 8: Control Layout
Control Layout AvantaPure Controller LCD Display x100 Down Button Manual Regen Button Set Button Up Button Chlorine Generator Outlet AC Adapter (low voltage) Input For Future Use Main Motor & Optical Sensor Connection Turbine Input or Dry Contact Signal Input... -
Page 9: Location Selection
Location Selection Location of a water treatment system is important. The following conditions are required: • Level platform or floor • Room to access equipment for maintenance and adding regenerant (salt) to tank. • Ambient temperatures over 34°F (1°C) and below 120°F (49°C). •... -
Page 10: Water Line Connection
return to normal. A protective cover should assist with high temperature applications. • Insects — The controller and valve have been designed to keep all but the smallest insects out of the critical areas. Any holes in the top plate can be covered with a metal foil ductwork tape. - Page 11 WARNING: The inlet water must be connected to the inlet port of the valve. When replacing non-Autotrol valves, the inlet and outlet may be reversed. It is also possible for the plumbing to be installed in an opposite order. Do not solder pipes with lead-based solder. WARNING: Do not use tools to tighten plastic fittings.
-
Page 12: Drain Line
Drain Line Drain Line Connection NOTE: Standard commercial practices are expressed here. Local codes may require changes to the following suggestions. Check with local authorities before installing a system. 1. The unit should be above and not more than 20 feet (6.1 m) from the drain. -
Page 13: Regenerant Line Connection
Regenerant Line Connection The regenerant line from the tank connects to the valve. Make the connections and hand tighten. Be sure that the regenerant line is secure and free from air leaks. Even a small leak may cause the regenerant line to drain out, and the conditioner will not draw regenerant from the tank. -
Page 14: Overflow Line Connection
Overflow Line Connection In the event of a malfunction, the regenerant TANK OVERFLOW will direct “overflow” to the drain instead of spilling on the floor. This fitting should be on the side of the cabinet or regenerant tank. Most tank manufacturers include a post for the tank overflow connector. - Page 15 Figure 6 Regenerant Tank Check Valve* * Furnished as an option from system manufacturer. Overflow Line Connection Rev C...
-
Page 16: Electrical Connection
The controllers are designed to be mounted on the valve or attached to a flat surface. Installations that do not provide easy access to the valve can have the controller mounted for remote operation. A remote mount connection, PN 1256257, is available for the AvantaPure controller. Electrical Connection... -
Page 17: Valve Camshaft (Green)
The number at the top indicates which regeneration cycle is currently in progress. Figure 7 Camshaft Front End for 269 Valve Bodies Treated Water Indicator (normal operation) Treated Water Slot The corresponding slot for the number is positioned at the optical sensor which is approximately 90 degrees out of phase. -
Page 18: Disinfection Of Water Conditioners
Valve Disc Operation Figure 8 - Performa Valve 6 Rinse Drain 4 Outlet Valve 2 Bypass Valve 7 Backwash Drain Valves 3 Inlet Valve 5 Refill Valve 1 Regenerant Valve Disinfection Of Water Conditioners The materials of construction of the modern water conditioner will not support bacterial growth, nor will these materials contaminate a water supply. - Page 19 Calcium Hypochlorite Calcium hypochlorite, 70% available chlorine, is available in several forms including tablets and granules. These solid materials may be used directly without dissolving before use. 1. Dosage A. Two grains (approximately 0.1 ounce [3 mL]) per cubic foot. 2.
-
Page 20: Avantapure Controller
AvantaPure Controller Power Loss Memory Retention The controllers feature battery-free time and date retention during the loss of power. This is designed to last a minimum of 8 hours depending on the installation. The controller will continue to keep time and day in dynamic memory while there is no AC power. -
Page 21: Display Icons
Display Icons Figure 9 x100 NOTE: In normal operation and during programming, only a few of the icons will actually be displayed. 1. Displays amount of conditioning capacity remaining. 2. "PM" indicates that the time displayed is between 12:00 noon and 12:00 midnight (there is no AM indicator). -
Page 22: Keypad - Buttons
4. Regen. Used to command the controller to regenerate. Programming Conventions The AvantaPure controller is programmed using the buttons on the keypad. The programming instructions will be described two ways whenever a section has keypad input. First, a table shows simplified instructions. Second, text follows that describes the action. -
Page 23: Things You Might Need To Know
If electrical power is not available, the camshaft can be rotated counterclockwise by hand if the motor is removed. • The AvantaPure controller sends commands to the motor for camshaft movement. However, water pressure/flow are required during the regeneration cycle for backwash, purge and refill, and brine draw to actually take place. -
Page 24: Programming Overview
Programming Overview The AvantaPure controller is designed to operate by setting the Time of Day, Day of the Week, and the Hardness. The remaining settings are set at the factory using a Model Number. The controller menu has three levels: Level I Basic —... - Page 25 • Setting Day of Week After setting the Time of Day the banner display will show the word “Day” followed by an abbreviated day of the week. SU = Sunday MO = Monday TU = Tuesday WE = Wednesday TH = Thursday FR = Friday SA = Saturday Use the UP or DOWN arrow buttons to change the flashing day of...
-
Page 26: Level Ii Programming
These are accessible by pressing and holding the UP and DOWN buttons until the display goes blank. Then release the buttons. Calendar Override is the first Level II parameter displayed. Level II program parameters include: 269 Conditioner Operation Type CALENDAR OVERRIDE SALT AMOUNT CAPACITY K GRAIN... - Page 27 • Viewing the Salt Amount The salt amount is selected by tyour AvantaPure Water Treatment Professional. • Setting Capacity Softener Default Capacity Setting The default capacity setting is accurately calculated when the model number is entered by the factory. The capacity can be changed.
- Page 28 Table 1 AvantaPure 269 Counter Current Valve Capacity/Salt Dosage Reference This table is for reference only. Your AvantaPure Water Treatment Professional selects the model numbers based on your specific application requirements. Model Tank Size Total Salt Total Capacity Injector Number Resin Cu.
- Page 29 Model Tank Size Total Salt Total Capacity Injector Number Resin Cu. Ft. Dosage lbs Kilograins Type 12 X 48 40,000 2.00 Ft3 13 X 54 26,000 2.50 Ft3 13 X 54 30,000 2.50 Ft3 13 X 54 49,000 2.50 Ft3 14 X 65 31,000 3.00 Ft3...
- Page 30 The controller calculates the Slow Rinse default time based on injector type, system size and salt dosage. The cycle times can be adjusted for custom applications. Please contact your AvantaPure Water Treatment Professional before attempting to adjust the Slow Rinse time.
-
Page 31: Level Iii Programming
Level III Programming Historical information can be retrieved from the controller be pressing the SET and DOWN buttons simultaneously, with the controller in the home position. Release both buttons when the controller displays MODEL NUMBER. Press the UP or DOWN buttons to navigate to each setting. The readout will scroll across the top of the display and the value will be displayed below the readout. -
Page 32: Placing Conditioner Into Operation
Placing Conditioner Into Operation Conditioner Start-Up After you have performed the previous initial power-up steps, you will need to place the conditioner into operation. Follow these steps carefully, as they differ from previous Autotrol valve instructions. NOTE: The control valve can be started-up even if power is not yet available to the controller. - Page 33 Function Display Text (269) Treated Water AvantaPure (269) Regeneration Brine Tank Refill Brine Prep Brine Draw/Slow Rinse Pause - Please Wait Backwash Fast Rinse 7. Fill the media tank with water. A. While the controller is in cycle (Backwash), open the water supply valve very slowly to approximately the 1/4 open position.
- Page 34 A. Slowly open the main water supply valve again, to the fully open position. Be sure not to open too rapidly as that would push the media out of the media tank. NOTE: As you advance through each cycle there will be a slight delay before you can advance to the next cycle.
-
Page 35: Performa Exploded View
Performa Exploded View Warning: Do not use the flow control ball with #10A. Performa Exploded View Rev C... -
Page 36: Performa Parts List
Valve 1001608 22-mm Copper Tube Adapter Kit 1242282 Cover, Valve, AvantaPure Controller 1001613 3/4-inch CPVC Tube Adapter Kit 1237402* Cam, AvantaPure Valve, STD, Green 1001614 1-inch CPVC Tube Adapter Kit Drain Control Assembly: 1001615 25-mm CPVC Tube Adapter Kit 1000212 No. 10 (2.5 gpm; 9.5 Lpm) 1001769 3/4-inch NPT Plastic Pipe Adapter Kit 1000213 No. -
Page 37: Troubleshooting
Troubleshooting AvantaPure Controller Troubleshooting Problem Possible Cause Solution ERR 1 is displayed. Program settings have been corrupted. Press any key and reset model number. ERR 3 is displayed. Controller does not know the position of Wait for two minutes for the controller to the camshaft. -
Page 38: System Troubleshooting
System Troubleshooting Problem Possible Cause Solution 1. Brine tank a. Uncontrolled brine refill flow rate. a. Remove brine control to clean ball and seat. overflow. b. Air leak in brine line to air check. b. Check all connections in brine line for leaks. Refer to instructions. - Page 39 9. Intermittent or a. Low water pressure. a. Set pump to maintain 20 psi at conditioner. irregular b. Defective injector. b. Replace injector. (Contact dealer.) regenerant draw. 10. No conditioned a. No regenerant in regenerant a. Add regenerant to regenerant tank. water after tank.
- Page 40 Troubleshooting Rev C...
- Page 41 A flashing 11 will now be displayed on the screen, which is a default model number. Press the UP or DOWN button until the desired model number is displayed. See Table 1 AvantaPure 269 Counter Current Valve Capacity/Salt Dosage Reference in Level II programming section. * Press and release the SET button to save the desired model number.
- Page 43 VIEWING AND SELECTING MODEL NUMBERS Rev C...
- Page 44 © Copyright 2006 General Electric Company Printed in USA P/N 3001122 Rev. C...
Need help?
Do you have a question about the 269 and is the answer not in the manual?
Questions and answers