
Summary of Contents for Go! Go! Elite Traveller Plus
- Page 1 ELITE TRAVELLER PLUS Including Models: Elite Traveller Plus and Elite Traveller Plus HD...
- Page 2 S A F E T Y G U I D E L I N E S An authorized Pride Provider or qualified technician must perform the initial setup of this scooter and must perform all of the procedures in this manual. The symbols below are used throughout this owner's manual and on the scooter to identify warnings and important information.
- Page 3 C O N T E N T S INTRODUCTION ........................4 SAFETY ............................5 III. YOUR TRAVEL SCOOTER ....................18 IV. BATTERIES AND CHARGING ..................22 OPERATION ..........................27 VI. COMFORT ADJUSTMENTS ....................29 VII. DISASSEMBLY AND ASSEMBLY ...................31 VIII. BASIC TROUBLESHOOTING ..................33 IX. CARE AND MAINTENANCE ....................35 WARRANTY ..........................38 APPENDIX I - SPECIFICATIONS ....................40...
- Page 4 I . I N T R O D U C T I O N SAFETY WELCOME to Pride Mobility Products Corporation (Pride). The product you have purchased combines state-of the-art components with safety, comfort, and styling in mind. We are confident the design features will provide you with the conveniences you expect during your daily activities.
- Page 5 I I . S A F E T Y PRODUCT SAFETY SYMBOLS The symbols below are used on the Travel Scooter to identify warnings, mandatory actions, and prohibited actions. It is very important for you to read and understand them completely. Read and follow the information in the owner’s manual.
- Page 6 I I . S A F E T Y Do not allow unsupervised children to play near the Travel Scooter while the batteries are charging. Do not remove anti-tip wheels. Do not use a cell phone, walkie/talkie, laptop, or other radio transmitter while operating.
- Page 7 I I . S A F E T Y Do not use batteries with different amp-hour (Ah) capacities. Do not mix old and new batteries. Always replace both batteries at the same time. Do not sit on the mobility product when it is being used in connection with any type of lift/elevation product.
- Page 8 I I . S A F E T Y GENERAL MANDATORY! Do not operate your new Travel Scooter for the first time without completely reading and understanding this owner’s manual. Your Travel Scooter is a state-of-the-art life-enhancement device designed to increase mobility. Pride provides an extensive variety of products to best fit the individual needs of the Travel Scooter user.
- Page 9 I I . S A F E T Y Perform the following inspections prior to using your scooter: Check for proper tire inflation. Maintain but do not exceed the psi/bar/kPa air pressure rating indicated on each tire if equipped with pneumatic tires. Check all electrical connections.
- Page 10 8° (14.1%) 8° (14.1%) ELITE TRAVELLER PLUS ELITE TRAVELLER PLUS HD Figure 1. Maximum Recommended Incline Angle WARNING! Any attempt to climb or descend a slope steeper than what is shown in figure 1 may put your Travel Scooter in an unstable position and cause it to tip.
- Page 11 I I . S A F E T Y When you approach an incline, it is best to lean forward. See figures 2 and 2A. This shifts the center of gravity of you and your Travel Scooter toward the front of the Travel Scooter for improved stability. NOTE: When negotiating ramps, if the throttle control lever is released while moving forward, the powered Travel Scooter may "rollback"...
- Page 12 I I . S A F E T Y OUTDOOR DRIVING SURFACES Your Travel Scooter is designed to provide optimum stability under normal driving conditions—dry, level surfaces composed of concrete, blacktop, or asphalt. However, Pride recognizes that there will be times when you will encounter other surface types.
- Page 13 I I . S A F E T Y INCLEMENT WEATHER PRECAUTIONS Exposure of your Travel Scooter to inclement weather conditions should be avoided whenever possible. If suddenly caught up in rain, snow, severe cold or heat while operating your Travel Scooter, proceed to shelter at the earliest opportunity.
- Page 14 I I . S A F E T Y ELEVATORS Modern elevators have a door edge safety mechanism that, when pushed, reopens the door(s). If you are in the doorway of an elevator when the door(s) begin to close, push on the rubber door edge or allow the rubber door edge to contact the Travel Scooter and the door will reopen.
- Page 15 I I . S A F E T Y MOTOR VEHICLE TRANSPORT Pride recommends that you do not remain seated in your Travel Scooter while traveling in a motor vehicle. The Travel Scooter should be stowed in the trunk of a car or in the back of a truck or van with the batteries removed and properly secured.
- Page 16 I I . S A F E T Y REACHING AND BENDING Avoid reaching or bending while driving your Travel Scooter. Bending forward creates the risk of accidental throttle control lever contact. Bending to the side while seated creates the risk of tipping. It is important to maintain a stable centre of gravity and keep the Travel Scooter from tipping.
- Page 17 I I . S A F E T Y ELECTROMAGNETIC AND RADIO FREQUENCY INTERFERENCE (EMI/RFI) WARNING! Laboratory tests have shown that electromagnetic and radio frequency waves can have an adverse affect on the performance of electrically-powered mobility vehicles. Electromagnetic and Radio Frequency Interference can come from sources such as cellular phones, mobile two-way radios (such as walkie-talkies), radio stations, TV stations, amateur radio (HAM) transmitters, wireless computer links, microwave signals, paging transmitters and medium-range mobile transceivers used by emergency vehicles.
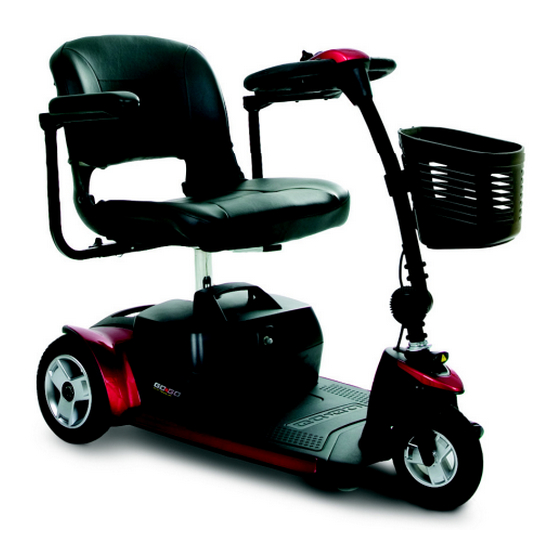
- Page 18 I I I . Y O U R T R A V E L S C O O T E R TILLER CONSOLE The tiller console houses all controls needed to drive your Travel Scooter, including the key switch, throt- tle control lever, horn button, speed adjustment dial, and the battery condition meter.
- Page 19 I I I . Y O U R T R A V E L S C O O T E R Horn Button MANUAL This button activates a warning horn. Your FREEWHEEL Travel Scooter must be turned on for the horn to LEVER be operational.
- Page 20 I I I . Y O U R T R A V E L S C O O T E R Motor/Transaxle Assembly BATTERY PACK HANDLE MAIN CIRCUIT BREAKER The motor/transaxle assembly is an electrome- (RESET BUTTON) chanical unit that converts electrical energy from your Travel Scooter’s batteries into the con- trolled mechanical energy that drives the Travel Scooter’s wheels.
- Page 21 I I I . Y O U R T R A V E L S C O O T E R OFF-BOARD BATTERY PLUGS INTO STANDARD CHARGER ELECTRICAL OUTLET The off-board battery charger, when plugged into the charger power cord receptacle (located on the battery pack) and a standard electrical outlet, charges the Travel Scooter’s batteries.
- Page 22 I V . B A T T E R I E S A N D C H A R G I N G Your Travel Scooter requires two long-lasting, 12-volt, deep-cycle batteries that are sealed and mainte- nance free. They are recharged by the supplied off-board charging system. Charge your Travel Scooter’s batteries for 8 to 14 hours prior to using it for the first time.
- Page 23 I V . B A T T E R I E S A N D C H A R G I N G Follow these easy steps to charge your batteries BATTERY TERMINAL safely: BATTERY 1. Position your Travel Scooter or battery CABLES pack close to a standard electrical outlet.
- Page 24 I V . B A T T E R I E S A N D C H A R G I N G How often must I charge the batteries? Two major factors must be considered when deciding how often to charge your Travel Scooter’s batteries: All day use on a daily basis.
- Page 25 I V . B A T T E R I E S A N D C H A R G I N G How do I change a battery in my Travel Scooter? MANDATORY! Battery posts, terminals, and related accessories contain lead and lead compounds.
- Page 26 I V . B A T T E R I E S A N D C H A R G I N G Why do my new batteries seem weak? Deep-cycle batteries employ a different chemical technology than that used in car batteries, nickel-cad- mium batteries (nicads), and other common battery types.
- Page 27 V . O P E R A T I O N BEFORE GETTING ONTO YOUR TRAVEL SCOOTER Have you fully charged the batteries? See IV. “Batteries and Charging.” Is the manual freewheel lever in the drive (rearward) position? Never leave the manual freewheel lever in the forward position unless you are manually pushing your Travel Scooter.
- Page 28 V . O P E R A T I O N NOTE: Your Travel Scooter’s reverse speed is slower than that of the forward speed you preset with the speed adjustment dial. GETTING OFF OF YOUR TRAVEL SCOOTER 1. Bring your Travel Scooter to a complete stop. 2.
- Page 29 V I . C O M F O R T A D J U S T M E N T S TILLER ANGLE ADJUSTMENT TILLER ADJUSTMENT KNOB WARNING! Remove the key from the key switch before adjusting the tiller or the seat.
- Page 30 V I . C O M F O R T A D J U S T M E N T S SEAT HEIGHT ADJUSTMENT The seat can be repositioned to different heights. UPPER SEAT POST See figure 18. LOWER SEAT POST 1.
- Page 31 V I I . D I S A S S E M B L Y A N D A S S E M B L Y DISASSEMBLY You can disassemble the Travel Scooter into five BASKET SEAT pieces: the seat, the front section, the rear section, the basket, and the battery pack.
- Page 32 V I I . D I S A S S E M B L Y A N D A S S E M B L Y ASSEMBLY NOTE: Before attempting assembly, tilt the rear half of the Travel Scooter slightly back on the anti-tip wheels as show in figure 23.
- Page 33 V I I I . B A S I C T R O U B L E S H O O T I N G Any electromechanical device occasionally requires some troubleshooting. However, most of the prob- lems that may arise can usually be solved with a bit of thought and common sense. Many of these problems occur because the batteries are not fully charged or because the batteries are worn down and can no longer hold a charge.
- Page 34 V I I I . B A S I C T R O U B L E S H O O T I N G What if the Travel Scooter’s batteries won’t charge? Check the fuse located on the battery pack. Replace if necessary. During the charging process, if the charger LED’s never indicate a full charge, check the fuse located on the battery pack.
- Page 35 I X . C A R E A N D M A I N T E N A N C E Your Travel Scooter requires a minimal amount of care and maintenance. If you do not feel confident in your ability to perform the maintenance listed below, you may schedule inspection and mainte- nance at your authorized Pride Provider.
- Page 36 I X . C A R E A N D M A I N T E N A N C E WIRING HARNESSES Regularly check all wiring connections. Regularly check all wiring insulation, including the charger power cord, for wear or damage. Have your authorized Pride Provider repair or replace any damaged connector, connection, or insula- tion that you find before using your Travel Scooter again.
- Page 37 I X . C A R E A N D M A I N T E N A N C E For prolonged storage, you may wish to place several boards under the frame of your Travel Scooter to raise it off of the ground. This takes the weight off the tires and reduces the possibility of flat spots devel- oping on the areas of the tires contacting the ground.
- Page 38 X . W A R R A N T Y FIVE-YEAR LIMITED WARRANTY For five (5) years from the date of purchase, Pride will repair or replace at our option to the original purcahser any of the following parts found upon examination by an authorized representative of Pride to be defective in material and/or workmanship: Structural frame components, including: Platform...
- Page 39 X . W A R R A N T Y There is no other express warranty. Implied warranties, including those of merchantability and fitness for a particular purpose, are limited to one (1) year from the date of original purchase and to the extent permitted by law. Any and all implied warranties are excluded.
- Page 40 3 in. (7.62 cm) at mid-frame Ground Clearance Weight Capacity Elite Traveller Plus: 300 lbs. (136 kg) Elite Traveller Plus HD: 325 lbs. (147.42 kg) Standard Seating Type: Foldable, Material: Black Vinyl Drive System Rear-wheel drive, sealed transaxle, 24 volt DC motor...
Need help?
Do you have a question about the Elite Traveller Plus and is the answer not in the manual?
Questions and answers
Battery removal