Table of Contents
Advertisement
Quick Links
Advertisement
Table of Contents

Subscribe to Our Youtube Channel
Related Manuals for Scion NSDA-W11U

Summary of Contents for Scion NSDA-W11U
- Page 1 NSDA-W11U...
- Page 2 Introduction Thank you for your purchase of the Navigation System. Please read this manual carefully to ensure proper use. Keep this manual in your vehicle at all times. The Navigation System is one of the most technologically advanced vehicle accessories ever developed. The system receives satellite signals from the Global Positioning System (GPS) operated by the U.S.
- Page 3 Please be aware that all current vehicle navigation systems have certain limitations that may affect their ability to perform properly. The accuracy of the vehicle’s position depends on the satellite condition, road configuration, vehicle condition or other circum- stances. For more information on the limitations of the system, refer to pages 270 through 272.
-
Page 4: Safety Instruction
Important information about this manual Safety Instruction For safety reasons, this manual indicates items requiring particular attention with the following marks. CAUTION This is a warning against anything which may cause injury to people if the warning is ignored. You are informed about what you must or must not do in order to reduce the To use this system in the safest possible... - Page 5 While driving, listen to the voice instruc- CAUTION tions as much as possible and glance at For safety, the driver should not the screen briefly and only when it is operate the navigation system safe. However, do not totally rely on while he/she is driving.
-
Page 6: Table Of Contents
Table of Contents Quick Your navigation system — Guide — Navigation system function index ····························10 — Quick reference··························································12 — “Destination” screen ·················································14 — “Menu” screen ···························································16 — “Setup” screen···························································17 Basic Functions <Basic information before operation> Display operation ·········································································· 20 Initial screen·················································································· 21 Touch screen operation ································································... - Page 7 Destination Search Destination search······································································ 42 Selecting the search area························································· 42 Destination search by Home ···················································· 44 Destination search by Quick access ········································ 45 Destination search by “Address” ·············································· 45 ∗ Destination search by “POI Name” ········································· 49 ∗ Destination search by “POI Category”...
-
Page 8: Descriptions Of Functions For More Effective Use
Advanced Functions <Descriptions of functions for more effective use > Suspending and resuming guidance············································· 86 Volume·························································································· 87 User selection ··············································································· 88 ® NavTraffic ············································································· 90 My Places····················································································· 96 Registering memory points ······················································· 97 Editing memory points ······························································ 98 Deleting memory points·························································· 102 Registering home ···································································... - Page 9 Audio/video System Quick reference ·········································································· 178 Using your audio/video system··············································· 179 Some basics··········································································· 179 Screen adjustment ································································· 191 Radio operation······································································ 193 CD player operation ······························································· 202 DVD player operation····························································· 210 USB player operation ····························································· 224 ® Bluetooth audio operation····················································· 231 AUX operation········································································...
-
Page 11: Your Navigation System
Your navigation system — — Navigation system function index <Map> Displaying maps Page Viewing the map screen Displaying the current vehicle position Viewing the current position vicinity map Changing the scale Changing the map orientation and configuration ∗ Displaying POIs Displaying the estimated travel/arrival time to the destination Selecting the dual map screen Deleting map screen touch screen buttons... -
Page 12: Useful Functions
During route guidance Page Suspending route guidance Adjusting route guidance volume Deleting the destination Displaying the entire route map <Useful functions> Memory points Page Registering memory points Marking icons on the map Information Page Displaying vehicle maintenance Displaying the calendar Hands-free system (for cellular phone) Page ®... -
Page 13: Quick Reference
— Quick reference North-up, heading-up or 2.5D “MAP” button map symbol Push this button to repeat a voice guid- This symbol indicates a map view with ance, cancel one touch scroll, start guid- north-up or heading-up orientation, or ance and display the current position. 2.5D. - Page 14 “Mark” Touch this touch screen button to regis- ter the current position or the cursor po- sition as a memory point..... 29 “Route” Touch this touch screen button to change the route......72, 75 “Map View” Touch this touch screen button to obtain information regarding the route to the destination and information about the POI (Points of Interest) on the map...
-
Page 15: Destination" Screen
— “Destination” screen The “Destination” screen allows you to search for a destination. To display the “Des- tination” screen, push the “DEST” button. “Previous” “Address” A destination can be selected from any A street address and a house number of the last 100 previously set destina- can be input by using the input keys. - Page 16 “Map” A destination can be selected simply by touching the location on the displayed map............. 57 “Intersection” The names of two intersecting streets can be entered. This is helpful if only the general vicinity, not the specific ad- dress, is known........58 “Freeway Ent./Exit”...
-
Page 17: Menu" Screen
— “Menu” screen The “Menu” screen allows effective use of the navigation system. To display the “Menu” screen, push the “NAVI” button. “Select User” “Suspend Guidance” and “Re- sume Guidance” Up to 3 different settings for different users can be memorized......88 Suspends or resumes guidance. -
Page 18: Setup" Screen
— “Setup” screen The items shown on the “Setup” screen can be set. To display the “Setup” screen, push the “NAVI” button and touch “Setup”. “Distance” “ Function” The distance units “km” or “miles” can The choice whether to display each be selected........ - Page 19 “Voice Guidance in All Modes” Voice guidance can be set in all modes............115 “Auto Voice Guidance” Automatic voice guidance can be set............115 “Pop-up Message” Selection of either “ON” or “OFF” to display the pop-up message is possible............116 “Calibration”...
-
Page 20: Basic Functions
BASIC FUNCTION SECTION BASIC FUNCTIONS Basic information before operation Display operation················································································ 20 Initial screen ······················································································· 21 Touch screen operation······································································ 23 Inputting letters and numbers/List screen operation ·························· 23 Function help ······················································································ 27 Map screen operation ······································································ 27 Current position display ··································································· 27 Screen scroll operation ····································································... -
Page 21: Display Operation
BASIC FUNCTION Display operation When visibility is affected by light from INFORMATION outside the vehicle, the screen can be The display can still be opened adjusted to three different angles. when tilted. When the display is Push the “ OPEN” button. closed it returns to its previous tilted position. -
Page 22: Initial Screen
BASIC FUNCTION Initial screen While the “CAUTION” screen is dis- played, the “DEST” or “NAVI” button cannot be operated. And if the “Lan- guage”, “Calendar” or “Maintenance” button on the “Information” screen are touched, the screen will show the “CAUTION” screen first, followed by the corresponding screen. - Page 23 BASIC FUNCTION Maintenance information Memo information This system informs the user about when This system notifies the user about a to replace certain parts or components memo entry. At the specified date, the and shows dealer information (if regis- memo information will be displayed when tered) on the screen.
-
Page 24: Touch Screen Operation
BASIC FUNCTION Inputting letters and numbers/List screen Touch screen operation operation This system is operated mainly by the When searching for an address or a touch screen buttons on the screen. name, or entering a memo, letters and numbers can be input via the touch To prevent damage to the screen, screen. - Page 25 BASIC FUNCTION To input letters To input numbers and symbols To display the number keys and symbol To display the alphabet keys, touch keys, touch “0-9”. “A-Z” or “ ”. Enter numbers and symbols by touching Enter letters by touching the alphabet the number keys and symbol keys di- keys directly.
- Page 26 BASIC FUNCTION To display the list List screen operation When a list is displayed, use the appro- priate touch screen button to scroll through the list. To search for an address or a name, touch “List”. Matching items from the database are listed even if the entered address or name is incomplete.
- Page 27 BASIC FUNCTION Sorting TYPE B The order of a list displayed on the screen can be rearranged. TYPE A “Dist. Sort”: To sort in the order of dis- tance from the current vehicle location. The distance from current vehicle posi- tion up to the destination is displayed to Touch “Sort by”.
-
Page 28: Function Help
BASIC FUNCTION Map screen operation — Function help — Current position display Explanations for the functions of the When starting the navigation system, the “Destination”, “Setup” “Menu” current position is displayed first. screens can be viewed. This screen displays the current vehicle position and a map of the surrounding local area. -
Page 29: Screen Scroll Operation
BASIC FUNCTION — Screen scroll operation (one−touch scroll) To set the cursor position as a When any point on the map is touched, destination that point moves to the center of the screen and is shown by the cursor mark A specific point on the map can be set as a destination using the one-touch scroll function. - Page 30 BASIC FUNCTION To register the cursor position as The registered point is shown by a memory point the map. Memory point registration enables easy To change the icon or name, etc., see access to a specific point. “ — Editing memory points” on page 98. Up to 106 memory points can be regis- tered.
- Page 31 BASIC FUNCTION To see information about the icon POI INFORMATION where the cursor is set When the cursor is set on a POI icon, the name and “Info.” are displayed on the top of the screen. To display information about an icon, set the cursor on it.
- Page 32 BASIC FUNCTION If there is already a set destination, “Add MEMORY POINT INFORMATION ” and “Replace ” are dis- When the cursor is set on a memory played. point icon, the name and “Info.” are displayed on the top of the screen. “Add to ”: To add a destination.
-
Page 33: Switching The Screens
BASIC FUNCTION — Switching the screens DESTINATION INFORMATION Any one of the screen configurations can be selected. When the cursor is set on a destination icon, the name and “Info.” are displayed on the top of the screen. Touch this touch screen button to display the following screen. - Page 34 BASIC FUNCTION Screen configurations Depending on the conditions, certain screen configuration buttons cannot be SINGLE MAP selected. This is a regular map screen. : To display the single map screen. While on a different screen, touching (See page 33.) will display the single map screen. : To display the dual map screen.
- Page 35 BASIC FUNCTION DUAL MAP COMPASS MODE A map can be displayed split in two. Current vehicle position is indicated with a compass, not with a map. While on a different screen, touching While on a different screen, touching will display the dual map screen. will display the compass mode screen.
-
Page 36: Map Scale
BASIC FUNCTION — Changing map — Map scale orientation and configuration ► North-up screen Touch to change the scale of the map display. The scale bar and indicator at the bottom of the screen indicates the map scale menu. scale range is 150 feet (50 m) to 250 miles (400 km). -
Page 37: Example Of Navigation System Operation
BASIC FUNCTION Example of navigation system operation — — Guiding the route North−up symbol Guidance to a destination occurs by specifying the destination using the “POI Regardless of the direction of vehicle Name”. travel, North is always up. Push the “DEST” button. Heading−up symbol The direction of vehicle travel is always up. - Page 38 BASIC FUNCTION Enter the name of the destination. Touch “Enter”. Every touch on a letter key narrows the The system starts route search and dis- selection. plays recommended routes. Letters that cannot be selected in the database are dimmed out. When there are four or fewer database items, these items are displayed in a list.
-
Page 39: Registering Home
BASIC FUNCTION — Registering home The home touch screen button on the “Destination” screen can be used if your home has been registered. (See “ — Destination search by Home” on page 44.) Push the “NAVI” button. Enter the street name. Every touch on a letter key narrows the selection. - Page 40 BASIC FUNCTION Enter the house number. If the same street exists in more than one city, the current screen changes to the city list screen. Select the city name. Touch “Enter”. Registration of home is complete and the “Memory Point” screen is displayed. Registered “Home”...
- Page 41 BASIC FUNCTION...
-
Page 42: Destination Search
DESTINATION SEARCH SECTION DESTINATION SEARCH Destination search ··········································································· 42 Selecting the search area ································································ 42 Destination search by Home···························································· 44 Destination search by Quick access················································ 45 Destination search by “Address”······················································ 45 ∗ Destination search by “POI Name”················································· 49 ∗ Destination search by “POI Category”············································... -
Page 43: Destination Search
DESTINATION SEARCH Destination search— —Selecting the search area Push the “DEST” button. SELECTING THE SEARCH AREA ON THE DESTINATION SCREEN Push the “DEST” button. You can use one of 13 different methods to search your destination. (See pages 44 through 60.) Touch “Change”... - Page 44 DESTINATION SEARCH SELECTING THE SEARCH AREA ON U.S.A. THE INPUT SCREEN States included in the Button Change the search area in order to set a search area destination from a different area by using Idaho “Address”, “POI Name”, “Intersection” or “US1”...
-
Page 45: Destination Search By Home
DESTINATION SEARCH — Destination search by Home U.S.A. Push the “DEST” button. Washington, D.C. Delaware Maryland “US9” New Jersey Pennsylvania Virginia West Virginia Florida Georgia “US10” North Carolina South Carolina Touch the home touch screen button on the “Destination” screen. “HI”... -
Page 46: Destination Search By Quick Access
DESTINATION SEARCH — Destination search by —Destination search by Quick access “Address” Push the “DEST” button. There are 2 ways to input a destination by address. Push the “DEST” button. Touch “Address” on the “Desti- nation” screen. Touch any of the quick access touch screen buttons on the “Desti- nation”... - Page 47 DESTINATION SEARCH (a) Inputting a street name Input the house number. Input the street name. If the house number list screen appears, an address range on that screen can be selected. Touch the touch screen button of the desired street name. If the same street exists in more than The screen changes and displays the one city, the current screen changes to...
- Page 48 DESTINATION SEARCH (b) Selecting a city to search INPUTTING THE CITY NAME Touch “Input City Name”. Touch “City”. Input the city name. To search by city, the following three methods are possible. Touch the touch screen button of 1. Input the city name the desired city name from the dis- played list.
- Page 49 DESTINATION SEARCH SELECTING FROM THE NEAREST 5 SELECTING FROM LAST CITIES CITIES Touch “Nearest 5 Cities”. Touch the touch screen button of the desired city name. Touch the touch screen button of If the navigation has never been used, the desired city name. no cities will be displayed on the screen.
-
Page 50: Destination Search By "Poi Name
DESTINATION SEARCH — Destination search by “POI Name” Push the “DEST” button. Touch “POI Name” on the “Des- tination” screen. Touch the touch screen button of the desired destination. If the same name exists in more than one city, a search can be performed Input the name of the Point of more easily with “City”... - Page 51 DESTINATION SEARCH (a) Selecting a city to search INPUTTING THE CITY NAME Touch “Input City Name”. Touch “City”. Input the city name. To search by city, the following three methods are possible. Touch the touch screen button of 1. Input the city name the desired city name from the dis- 2.
- Page 52 DESTINATION SEARCH SELECTING FROM THE NEAREST 5 SELECTING FROM LAST CITIES CITIES Touch “Nearest 5 Cities”. Touch the touch screen button of the desired city name. Touch the touch screen button of If the navigation has never been used, the desired city name. no cities will be displayed on the screen.
-
Page 53: Destination Search By "Poi
DESTINATION SEARCH — Destination search by “POI Category” (b) Selecting from the categories The destination can be set by selecting the search point and the POI category. Push the “DEST” button. Touch “POI Category” on the “Destination” screen. Touch “Category”. Set the search point by the fol- lowing method: 1. - Page 54 DESTINATION SEARCH INPUTTING THE CITY CENTER SETTING THE CURRENT POSITION AS THE SEARCH POINT Touch “Input City Center”. Touch “Current Position”. The search point is set at the current position, and the “POI Category” screen will be displayed. SETTING THE SEARCH POINT VIA THE MAP SCREEN Touch “Map”.
- Page 55 DESTINATION SEARCH SETTING THE SEARCH POINT FROM To search POIs near the search DESTINATIONS point When the search point is set, the “POI Touch the destination buttons, Category” screen will be displayed. numbered 1 through 5, at the bottom of the screen. (This function is only available when you already have at least one destination set.) Select the desired POI categories.
-
Page 56: Category
DESTINATION SEARCH — Destination search by “Emergency” Push the “DEST” button. Touch “Emergency” on the “Des- tination” screen. The display changes to a screen to select police stations, dealers, hospitals or fire stations. While driving, only nearby police stations, dealers, hospitals, or fire stations are shown. -
Page 57: Destination Search By "Memory
DESTINATION SEARCH — Destination search by “Memory” Push the “DEST” button. Touch “Memory” on the “Destina- tion” screen. To displays your list of registered mem- ory points. (To register or edit memory points, see “My Places” on page 96.) Touch the touch screen button of the desired destination. -
Page 58: Destination Search By "Previous
DESTINATION SEARCH — Destination search by — Destination search by “Previous” “Map” Push the “DEST” button. Push the “DEST” button. Touch “Previous” on the “Desti- Touch “Map” on the second page nation” screen. of the “Destination” screen. The previous starting point and up to 100 The screen changes and displays the previously set destinations are displayed map location that was previously dis-... -
Page 59: Destination Search By "Intersection
DESTINATION SEARCH — Destination search by “Intersection” Push the “DEST” button. Touch “Intersection” on the sec- ond page of the “Destination” screen. If the same two streets cross at more than intersection, screen changes and displays the menu to select Input the name of the two inter- the city name where the streets intersect. -
Page 60: Destination Search By "Freeway Ent./Exit
DESTINATION SEARCH — Destination search by “Freeway Ent./Exit” Push the “DEST” button. Touch “Freeway Ent./Exit” on the second page of the “Destination” screen. Touch the touch screen button of the desired entrance or exit name. The screen changes and displays the map location of the selected destination and the route preference. -
Page 61: Destination Search By "Coordinates
DESTINATION SEARCH — Destination search by — Destination search by “Coordinates” “Phone #” Push the “DEST” button. Push the “DEST” button. Touch “Coordinates” on the sec- Touch “Phone #” on the second ond page of the “Destination” screen. page of the “Destination” screen. Input the latitude and the longi- Input a telephone number. -
Page 62: Starting Route Guidance
DESTINATION SEARCH Starting route guidance After inputting the destination, the screen changes and displays the map location of the selected destination and the route preference. Current position Destination point Type of the route and the dis- tance When an arrow facing the desired Distance of the entire route point is touched, the map scrolls in To start guidance, touch “Guide”. - Page 63 DESTINATION SEARCH To change the route before start- INFORMATION ing guidance ROUTE PREFERENCE Guidance can be suspended or resumed. (See “Suspending and resuming guidance” on page 86.) If “Guide” is touched until a beep sounds, demo mode will start. Push the “MAP” button to finish demo mode.
- Page 64 DESTINATION SEARCH 3 ROUTES SELECTION Time necessary for the entire trip Distance of the entire trip To select the desired route from Toll road three routes, touch “3 Routes”. Freeway Ferry Touch “Quick1”, “Quick2” “Short” to select the desired route. “Quick1”: Recommended route.
- Page 65 DESTINATION SEARCH...
-
Page 66: Route Guidance
ROUTE GUIDANCE SECTION ROUTE GUIDANCE Route guidance screen······································································· 66 Typical voice guidance prompts ························································· 69 Distance and time to destination ························································ 71 Setting and deleting destination····················································· 72 Adding destinations·········································································· 72 Reordering destinations ··································································· 73 Deleting destinations········································································ 74 Setting route ····················································································· 75 Search condition ··············································································... -
Page 67: Route Guidance Screen
ROUTE GUIDANCE Route guidance screen During freeway driving During route guidance, various types of guidance screens can be displayed de- During freeway driving, this screen dis- pending on conditions. plays the distance to the next junction and exit, or POIs in the vicinity of the Screen layout freeway exit. - Page 68 ROUTE GUIDANCE When approaching a freeway exit When approaching an intersec- or junction tion When the vehicle approaches the exit or When the vehicle approaches an inter- junction, the guidance screen on the section, the intersection guidance screen freeway will be displayed. will be displayed.
- Page 69 ROUTE GUIDANCE Other screens ARROW SCREEN TURN LIST SCREEN On this screen, information about next turns on the guidance route can be On this screen, the list of turns on the viewed. guidance route can be viewed. Touching during guidance dis- Touching during guidance dis- plays the arrow screen.
-
Page 70: Typical Voice Guidance Prompts
ROUTE GUIDANCE Typical voice guidance prompts The voice guidance provides various messages approach 4.2 miles intersection, or other point where you 0.25 miles need to maneuver the vehicle. 4.7 miles 0.25 miles+α “Proceed about 4 miles to the traffic circle.” “In a quarter of a mile traffic circle ahead, then 3rd exit.”... - Page 71 ROUTE GUIDANCE One-way road One-way road *: The system indicates a U-turn if the The system announces the approach to distance between two one-way roads (of the final destination. opposite directions) is less than 50 feet “In a quarter of a mile your des- (15 m) in residential areas or 164 feet tination is ahead.”...
-
Page 72: Distance And Time To Destination
ROUTE GUIDANCE Distance and time to destination The distance, the estimated travel time and the estimated arrival time from the current position to the selected destina- tion are displayed. Estimated travel time is dis- played. Estimated arrival time is dis- played. -
Page 73: Setting And Deleting Destination
ROUTE GUIDANCE Setting and deleting destination — — Adding destinations Adding destinations and searching again for the routes can be done. Touch the desired “Add” to de- termine the arrival order of the addi- tional destination. Touch “Route”. Touch “Add” of “Destination”. Input an additional destination in the same way as the destination input. -
Page 74: Reordering Destinations
ROUTE GUIDANCE — Reordering destinations After selecting the destinations, When more than one destination is set, touch “OK”. you can change the arrival order of the destinations. The system searches for the guidance route again, and displays the entire route. Even if “OK”... -
Page 75: Deleting Destinations
ROUTE GUIDANCE — Deleting destinations To delete the destination(s), touch A set destination can be deleted. “Yes”. If “Yes” is touched, the data cannot be recovered. If “No” is touched, the previous screen will return. 5. If more than one destination is set, touch “OK”... -
Page 76: Setting Route
ROUTE GUIDANCE Setting route — — Search condition You can designate the road conditions of the route to the destination. The entire route from the starting point to the destination is displayed. “Guide”: To start guidance. Touch “Route”. “Route”: To change a route. (See pages 72 and 75.) Touch “Search Condition”. -
Page 77: Detour Setting
ROUTE GUIDANCE — Detour setting While the route guidance is operating, you can change the route to detour around a section of the route where a delay is caused by road repairs, or an accident, etc. Select the touch screen button below to select the desired detour distance. -
Page 78: Route Preference
ROUTE GUIDANCE — Route preference A number of choices are provided on the conditions which the system uses to de- termine the route to the destination. This picture shows an example of how Touch “Route”. the system would guide around a delay caused by a traffic jam. -
Page 79: Starting Route From Adjacent Road
ROUTE GUIDANCE — Starting route from Map view — adjacent road — Display POI icons You can start the route guidance from Points of Interest such as gas stations the adjacent road. and restaurants can be displayed on the map screen. You can also set their (ex. - Page 80 ROUTE GUIDANCE Selecting POIs to be displayed Touch “Other POIs” on the “Display POI Icons” screen. Up to 5 categories of icons can be dis- played on the screen. When a Point of Interest category is se- lected from either the limited list or the complete list, the screen will display symbols of those locations on the map screen.
- Page 81 ROUTE GUIDANCE To display the local POI list Points of Interest that are within 20 miles (32 km) of the current position will be listed from among the selected catego- ries. Select the desired POI categories from the list. The selected category icon appears on the top left of the screen.
-
Page 82: Route Overview
ROUTE GUIDANCE — Route overview To set a POI as a destination You can select one of the Points of In- terest icons on the map screen as a des- tination and use it for route guidance. Touch “Map View”. Directly touch the Point of Interest icon that you want to set as a destina- tion. -
Page 83: Route Preview
ROUTE GUIDANCE — Route preview You can scroll through the list of roads Touch “Map View”. by touching . However, not all road names in the route may appear on the list. If a road changes its name without requiring a turn (such as on a street that runs through two or more cit- ies), the name change will not appear on the list. -
Page 84: Route Trace
ROUTE GUIDANCE — Route trace It is possible to store the traveled route up to 124 miles (200 km) and retrace the route on the display. INFORMATION This feature is available on the map with more detailed map scale than 30 miles (50 km). - Page 85 ROUTE GUIDANCE “Record”: To start recording the route trace. “Stop”: To stop recording the route trace. If you touch “Stop”, the following screen will be displayed. Touching “Yes” stops recording and the route trace remains displayed on the screen. Touching “No” stops recording and the route trace is erased.
- Page 86 ADVANCED FUNCTIONS SECTION ADVANCED FUNCTIONS Descriptions of functions for more effective use Suspending and resuming guidance ·················································· 86 Volume································································································ 87 User selection ····················································································· 88 ® NavTraffic ··················································································· 90 My Places ·························································································· 96 Registering memory points ······························································ 97 Editing memory points ····································································· 98 Deleting memory points ·································································...
-
Page 87: Advanced Functions
ADVANCED FUNCTIONS Suspending and resuming guidance To suspend guidance To resume guidance Push the “NAVI” button. Push the “NAVI” button. Touch “Suspend Guidance”. Touch “Resume Guidance”. INFORMATION Without route guidance, the “Sus- pend Guidance” cannot be used. The screen will change to the current position map with route guidance. -
Page 88: Volume
ADVANCED FUNCTIONS Volume The voice guidance volume can be ad- INFORMATION justed or switched off. During route guidance, the voice Push the “NAVI” button. guidance continues even if the navigation screen is changed to other screens. “Adaptive Volume Control”: By turning “Adaptive Volume Control”... -
Page 89: User Selection
ADVANCED FUNCTIONS User selection To register The system can memorize the following settings for up to three users. Map direction Map scale Map configuration Guidance mode Setup Volume Language Touch “Memorize”. Route trace The confirmation screen will be dis- Travel time/arrival time played. - Page 90 ADVANCED FUNCTIONS To change user To delete user Touch “User number”. Touch “Delete”. The confirmation screen will be dis- played. The above message appears, then the map screen will be displayed. To delete, touch “Yes”. To re- turn to the previous screen, touch “No”...
-
Page 91: Xm ® Navtraffic
ADVANCED FUNCTIONS ® NavTraffic ® (a) Show XM NavTraffic information ® The XM NavTraffic service allows the navigation system to display traffic in- Push the “NAVI” button to display formation on the map if it is available and the “Menu” screen and touch the “XM if your satellite radio tuner can receive Traffic”. - Page 92 ADVANCED FUNCTIONS ® NavTraffic icon When any traffic information has been ® received, the XM NavTraffic icon will appear on the map screen. (See page 93.) ® NavTraffic flow information A color coded bar appears on the map to ® represent traffic flow when XM NavTraf- fic information is available.
- Page 93 ADVANCED FUNCTIONS (b) Auto avoid traffic INFORMATION ® Using XM NavTraffic information, the Due to the dynamic nature of traf- system automatically calculates a new fic events, traffic information from route. ® the XM NavTraffic may not match actual traffic conditions. Also, favorable routes that...
- Page 94 ADVANCED FUNCTIONS ® (c) Traffic voice guidance (d) XM NavTraffic text information ® When there are some traffic events on When you touch the XM NavTraffic icon the guidance route, the system will notify on the map, the “Traffic info.” bar ap- you via voice.
- Page 95 ADVANCED FUNCTIONS (e) Traffic on route Push the “NAVI” button to display the “Menu” screen and touch “XM Traffic”. The map around the traffic event is displayed. The type of traffic event is displayed at the top of the screen. Touch “Traffic On Route”...
- Page 96 ADVANCED FUNCTIONS (f) All traffic events Push the “NAVI” button to display the “Menu” screen and touch “XM Traffic”. Touch “Map” or “Detail”. (See page 94.) This “Detail” function is not available while driving. Touch “All Traffic Events” to dis- play the “All Traffic Events”...
-
Page 97: My Places
ADVANCED FUNCTIONS My Places — Points or areas on the map can be reg- istered. The registered points can be used on the “Destination” screen. (See “ — Desti- nation search by Home” on page 44 or “ — Destination search by Quick access” on page 45 and “... -
Page 98: Registering Memory Points
ADVANCED FUNCTIONS — Registering memory points Push the “NAVI” button. Touch “My Places” on the “Menu” screen. Touch “OK”. To edit registered information, see “ — Editing memory points” on page 98. Touch “Register”. INFORMATION Up to 106 memory points can be registered. -
Page 99: Editing Memory Points
ADVANCED FUNCTIONS — Editing memory points The icon, attribute, name, location and/or telephone number of a registered mem- ory point can be edited. Push the “NAVI” button. Touch “My Places” on the “Menu” screen. Touch the touch screen button to be edited. - Page 100 ADVANCED FUNCTIONS To change “Icon” SOUND ICONS When the vehicle approaches the mem- Touch “Icon” on the “Memory ory point, the selected sound will be Point” screen. heard. Touch “with Sound” “Change Icon” screen. Touch the desired icon. Turn the page by touching “Page 1”, “Page 2”...
- Page 101 ADVANCED FUNCTIONS To change “Quick Access” DELETING “Quick Access” It is possible to change attributes of the quick access points. Memory points with a set attribute can be used as a “Quick Access” or “Home” touch screen button. (See “ — Destination search by Home”...
- Page 102 ADVANCED FUNCTIONS To change “Name” To change “Location” Touch “Name” on the “Memory Touch “Location” on the “Memory Point” screen. Point” screen. Enter the name using the alpha- Touch the eight directional touch numeric keys. screen button to move the cursor to the desired point on the map.
-
Page 103: Deleting Memory Points
ADVANCED FUNCTIONS — Deleting memory points To change “Phone #” (telephone Push the “NAVI” button. number) Touch “My Places” on the “Menu” Touch “Phone #” on the “Memory screen. Point” screen. Touch “Delete”. Enter the number using numeral keys. Touch “OK”. The previous screen will be displayed. -
Page 104: Registering Home
ADVANCED FUNCTIONS — Registering home When registration of home is completed, If home has been registered, that infor- the “Memory Point” screen will be dis- mation can be recalled by using the played. “Home” touch screen button on the “Des- tination”... -
Page 105: Deleting Home
ADVANCED FUNCTIONS — Deleting home — Registering area to avoid Push the “NAVI” button. Areas you want to avoid because of traf- fic jams, construction work or other rea- Touch “My Places” on the “Menu” sons can be registered as areas to screen. -
Page 106: Editing Area To Avoid
ADVANCED FUNCTIONS — Editing area to avoid The name, location and/or area size of a registered area can be edited. Push the “NAVI” button. Touch “My Places” on the “Menu” screen. Touch the eight directional touch screen button to move the cursor to the desired point on the map. - Page 107 ADVANCED FUNCTIONS To change “Name” Touch “Name” on the “Edit Area to Avoid” screen. Touch the touch screen button to be edited. “Name”: To edit the name of the area to avoid. The names can be displayed on Enter the name using alphanu- the map.
- Page 108 ADVANCED FUNCTIONS To change “Location” To change “Area Size” Touch “Location” on the “Edit Touch “Area Size” on the “Edit Area to Avoid” screen. Area to Avoid” screen. Touch the eight directional touch Touch either screen button to move the cursor change the size of the area to be to the desired point on the map.
-
Page 109: Deleting Area To Avoid
ADVANCED FUNCTIONS — Deleting area to avoid — Deleting previous points Push the “NAVI” button. The previous destination can be deleted. Touch “My Places” on the “Menu” Push the “NAVI” button. screen. Touch “My Places” on the “Menu” screen. Touch “Delete”. Touch “Delete Previous Points”. -
Page 110: Setup
ADVANCED FUNCTIONS Setup Distance unit Setting the items shown on the “Setup” screen can be done. Distance unit can be changed. Push the “NAVI” button. Push the “NAVI” button. Touch “Setup” on the “Menu” screen. Touch “Setup”. Touch “km” or “miles” of “Dis- tance”... - Page 111 ADVANCED FUNCTIONS Estimated travel time INFORMATION The speed that is used for the calculation of the estimated travel time and the es- The displayed time to the destina- timated arrival time can be set. tion is the approximate driving time that is calculated based on Push the “NAVI”...
- Page 112 ADVANCED FUNCTIONS Input keyboard layout LAYOUT TYPE Keyboard layout can be changed. Push the “NAVI” button. Touch “Setup” on the “Menu” screen. ► “ABC” type Touch “ABC” or “QWE” of “Key- board Layout” to choose the key- board layout. ► “QWE” type The selected button is highlighted.
- Page 113 ADVANCED FUNCTIONS Time zone Screen layout function ( Function) Time zone can be changed. Each touch screen button and current Push the “NAVI” button. street name on the map screen can be Touch “Setup” on the “Menu” displayed or hidden. screen.
- Page 114 ADVANCED FUNCTIONS POI category change (Display POI Icons) Select from among the 6 icons displayed on the “Display POI Icons” top screen, so that setting of the icons to be displayed on the map screen can be done easily. Push the “NAVI” button. Touch “Setup”...
- Page 115 ADVANCED FUNCTIONS 3D landmark Notifying traffic restriction When the “3D landmark” feature is When the “Traffic Restrict. Notification” turned on, the system will display the 3D feature is turned on, the system notifies landmark on the map. you of traffic or seasonal restrictions. To turn the “3D landmark”...
- Page 116 ADVANCED FUNCTIONS Voice guidance in all modes Auto voice guidance When the “Voice Guidance in All Modes” When the “Auto Voice Guidance” feature feature is turned on, the voice guidance is turned on, the voice guidance can be in all modes can be heard. heard automatically.
- Page 117 ADVANCED FUNCTIONS Pop-up message When the “Pop-up Message” is turned off, the following messages will not be When the “Pop-up Message” is turned displayed. on, the pop-up message will be dis- played. To turn the “Pop-up Message” on: Push the “NAVI” button. Touch “Setup”...
- Page 118 ADVANCED FUNCTIONS Current position/tire change cali- POSITION/DIRECTION CALIBRATION bration When driving, the current vehicle posi- The current vehicle position mark can be tion mark will be automatically corrected adjusted manually. Miscalculation of by GPS signals. If GPS reception is the distance caused by tire replacement poor due to location, you can manually can also be adjusted.
- Page 119 ADVANCED FUNCTIONS TIRE CHANGE CALIBRATION The tire change calibration function will be used when replacing the tires. This function will adjust the miscalculation caused by the circumference difference between the old and new tires. If this procedure is not performed when the tires are replaced, the current vehicle position mark may be incorrectly dis- played.
-
Page 120: Other Functions
OTHER FUNCTIONS SECTION OTHER FUNCTIONS Maintenance information ······························································· 120 Maintenance information setting···················································· 120 Dealer setting················································································· 122 Calendar with memo ······································································ 124 Adding a memo·············································································· 126 Editing a memo ·············································································· 127 Memo list························································································ 127 Hands-free system (for cellular phone)········································ 129 ® Register a Bluetooth phone··························································... -
Page 121: Maintenance Information
OTHER FUNCTIONS Maintenance information — —Maintenance information setting When the navigation system is turned on, the “Information” screen displays when it is time to replace a part or certain com- ponents. (See page 22.) Push the “INFO” button. Touch the desired touch screen button. - Page 122 OTHER FUNCTIONS INFORMATION ITEMS “ENGINE OIL”: Replace engine oil “OIL FILTER”: Replace engine oil filter “ROTATION”: Rotate tires “TIRES”: Replace tires “BATTERY”: Replace battery “BRAKE PAD”: Replace brake linings “WIPERS”: Replace wiper blades Input the conditions. “LLC”: Replace engine coolant Notice of “Date”: The next maintenance “BRAKE OIL”: Replace brake fluid date can be input.
-
Page 123: Dealer Setting
OTHER FUNCTIONS — Dealer setting It is possible to register a dealer in the system. With dealer information regis- tered, route guidance to the dealer is available. Push the “INFO” button. Touch “Maintenance” on the “In- formation” screen. Touch “Set Dealer” on the “Main- tenance”... - Page 124 OTHER FUNCTIONS To edit “Dealer” or “Contact” To edit “Location” Touch “Dealer” or “Contact” on Touch “Location” on the “Edit the “Edit Dealer” screen. Dealer” screen. Enter the name using the alpha- Touch the eight directional touch numeric keys. screen button to move the cursor to the desired point on the map.
-
Page 125: Calendar With Memo
OTHER FUNCTIONS Calendar with memo — To edit “Phone #” It is possible to enter memos for particu- lar dates on the calendar. The system Touch “Phone #” on the “Edit informs you of the memo entry when the Dealer” screen. system is turned on. - Page 126 OTHER FUNCTIONS On this screen, the current date is high- Memos can be edited by touching the list lighted in yellow. button. (See “ — Editing a memo” on page 127.) : To change month. “Add Memo”: To add a memo. (See : To change year.
-
Page 127: Adding A Memo
OTHER FUNCTIONS — Adding a memo If a memo is added, the system informs of the memo entry when the system is started on the memo date. (See page 22.) Push the “INFO” button. Touch “Calendar” on the “Infor- mation” screen. Touch the date you want to add a memo on the “Calendar”... -
Page 128: Editing A Memo
OTHER FUNCTIONS — Editing a memo — Memo list The registered memo can be edited. It is possible to display a memo list by setting a condition. Push the “INFO” button. Push the “INFO” button. Touch “Calendar” on the “Infor- mation”... - Page 129 OTHER FUNCTIONS To display memos for a specified period of time Touch “Period” on the “Memo Search” screen. To delete and/or edit the memo, touch the desired memo button. “Delete All”: To delete all the displayed memos. A message will be displayed. Enter the period using the nu- meral keys.
-
Page 130: Hands-Free System (For Cellular Phone)
OTHER FUNCTIONS Hands−free system (for cellular phone) — Hands-free system allows you to INFORMATION make or receive a call without taking your hands off the steering wheel by In the following conditions, the connecting your cellular phone. system may not function. ®... - Page 131 OTHER FUNCTIONS Indicates the condition of the ® Bluetooth connection. ► Microphone “Blue” indicates an excellent connection ® to Bluetooth You can use the microphone above “Yellow” indicates a bad connection to when talking on the phone. ® Bluetooth , resulting in possible deterio- The other party’s voice outputs from the ration of voice quality.
- Page 132 OTHER FUNCTIONS ® Indicates the level of reception. The Bluetooth connection utilizes ® the Bluetooth antenna. The indica- ® tion of the Bluetooth connection may Too bad Excellent turn yellow and the system may not The level of reception does not always ®...
- Page 133 OTHER FUNCTIONS NOTE: This equipment has been FCC ID: XEMNA08A02 tested and found to comply with the IC ID: 8192A-NA08A02 limits for a Class B digital device, pur- MADE IN JAPAN suant to part 15 of the FCC Rules. These limits are designed to provide This device complies with Part 15 reasonable protection against harmful of the FCC Rules and RSS−210 of...
-
Page 134: Register A Bluetooth ® Phone
OTHER FUNCTIONS ® — Register a Bluetooth phone CAUTION: Radio Frequency Radiation To use the hands-free system, you need to enter your phone into the Exposure system. Once you have registered it, This equipment complies with FCC you can make a hands-free call. radiation exposure limits set forth for uncontrolled equipment and meets the Push the “INFO”... - Page 135 OTHER FUNCTIONS Touch “Register” to connect your When the connection is com- cellular phone to the system. pleted, this screen is displayed. You do not need to enter the phone in case of using the same one. When this screen is displayed, input the passcode displayed on the screen into the phone.
- Page 136 OTHER FUNCTIONS ® Connecting a Bluetooth phone Vehicles without smart entry and start system— AUTOMATICALLY When the engine switch is in ACC or ® ON position, the selected Bluetooth phone will be automatically con- nected and the connection result is displayed.
- Page 137 OTHER FUNCTIONS ® MANUALLY Reconnecting Bluetooth phone When the auto connection failed or turned off, you have to connect Blue- Vehicles with smart entry and start sys- ® tooth manually. tem— ® If the Bluetooth phone is discon- nected with a poor reception from the ®...
-
Page 138: Call On The Bluetooth ® Phone
OTHER FUNCTIONS ® — Call on the Bluetooth phone ® By phone book After you enter the Bluetooth phone, you can call by using hands-free sys- You can call by phone book data tem. You can call using the 6 meth- which is transferred from your cellular ods described below. - Page 139 OTHER FUNCTIONS By dialed numbers You can call by dialed number. The system memorizes up to 5 dialed numbers. If there are more than 5, the oldest number is deleted. This cannot be operated while driving. When you call by phone book, the name (if registered) is displayed.
- Page 140 OTHER FUNCTIONS By received calls You can call by received calls. When a call is received, the system memo- rizes up to 5 numbers. If there are more than 5, the oldest number is deleted. This cannot be operated while driving. When a telephone number regis- tered in the phone book is received, the name and the number are dis-...
- Page 141 OTHER FUNCTIONS By speed dial By POI call You can call by registered telephone number which you selected from a phone book, dialed numbers and re- ceived calls. (See “(a) Registering the speed dial” on page 144 for regis- tering the speed dial.) You can call by touching when it is displayed on the screen from navi-...
-
Page 142: Receive On The Bluetooth ® Phone
OTHER FUNCTIONS ® — Receive on the — Talk on the Bluetooth ® Bluetooth phone phone When a call is received, this screen is While you are talking on the phone, displayed with a sound. Touch this screen is displayed. You can do to talk on the phone. - Page 143 OTHER FUNCTIONS If the continuous tone signal is regis- Touch the desired number to input the tered in a phone book, this screen key. appears. (If not registered, “Send” To hang up the phone: and “Exit” are not displayed.) Touch the on-hook button ( ) on Confirm the number displayed on the the screen.
-
Page 144: Change The Settings Of The Bluetooth ® Phone
OTHER FUNCTIONS — Change the settings of ® the Bluetooth phone Sending a tone by the speed tone You can send a tone by the speed tone. (For registering the speed tone, see “(b) Registering the speed tone” on page 146.) Touch “Settings”... - Page 145 OTHER FUNCTIONS (a) Registering the speed dial You can register the desired tele- phone number from phone book, di- aled numbers and received calls. Up to 17 speed dial numbers can be reg- istered. The 6th entry is the speed dial for redial- ing.
- Page 146 OTHER FUNCTIONS Deleting the speed dial individu- Deleting all of the speed dial ally You can delete “01” - “17” of the speed dial individually. If you delete them all at once, all of 17 numbers are deleted. Touch “Delete All” of “Speed Dial”.
- Page 147 OTHER FUNCTIONS (b) Registering the speed tone You can register the desired tone number. Up to 6 speed tone numbers can be registered. Touch the desired touch screen button you want to register in. Touch “Register” “Speed Tone”. If you select a touch screen button you registered before, this screen is displayed.
- Page 148 OTHER FUNCTIONS Editing the speed tone You can edit the speed tone. Use the software keyboard to in- put the name. Touch “Edit” of “Speed Tone”. Input the number and touch “OK”. Touch the touch screen button you want to edit.
- Page 149 OTHER FUNCTIONS Deleting the speed tone individu- Deleting all the speed tone ally You can delete “1” to “6” of the speed tone. If you delete them all at once, all of 6 numbers are deleted. Touch “Delete All” of “Speed Tone”.
- Page 150 OTHER FUNCTIONS (c) Setting the volume Automatic volume settings for high speed You can set the volume one step up when the speed is over 50 mph (80 km/h). (When it is under 43 mph (70 km/h), previous volume is back.) Each time you touch “Adaptive Volume Control”, you can switch on or off.
- Page 151 OTHER FUNCTIONS Initializing the settings (d) Setting the screen You can initialize the settings. Touch “Screen” to display the “Screen Settings” screen. Touch “Default”. Do the detail settings of the Touch “Yes”. screen and touch “OK”.
- Page 152 OTHER FUNCTIONS Receiving call display Auto answer You can select the method of the re- When a call is received, the display ceiving call display. automatically changes to the talking screen and you can start to talk on the phone (without touching any but- ton) after the preset time.
- Page 153 OTHER FUNCTIONS ® The Bluetooth connection status Initializing the settings at startup You can initialize the settings. Vehicles with smart entry and start sys- Touch “Default”. tem— When the “ENGINE START STOP” switch is in the ACCESSORY or IGNITION ON mode and the Blue- ®...
- Page 154 OTHER FUNCTIONS (e) Setting the phone book Transferring a telephone number You can register phone numbers in You can transfer the telephone num- ® the phone book. bers in your Bluetooth phone to the system. Up to 1000 person’s data (up to 2 numbers a person) can be registered in the phone book.
- Page 155 OTHER FUNCTIONS Registering the phone book data You can register the phone book data. Transfer the phone book data to ® the system using the Bluetooth phone. Touch “Register” “Phone This screen appears while transferring. Book”. To cancel it, touch “Cancel”. If the transferring is interrupted on the way, the phone book data transferred until then...
- Page 156 OTHER FUNCTIONS Editing the name Editing the phone number When you don’t input the name, the You can register the phone number in number is displayed. “TEL1” and “TEL2” separately. Up to 2 numbers a person can be regis- tered. Touch “Name”.
- Page 157 OTHER FUNCTIONS Selecting the group Adding the data to the phone book You can set a group for a contact (for example: “Family”, “Friends”, “Of- You can add data to the phone book. fice”...). It will then be easier for you to find this contact when needed, by using the group display.
- Page 158 OTHER FUNCTIONS Editing the data You can edit the registered data. Touch the desired touch screen button. When you edit the data, touch “OK”. Touch “Edit”. When you also touch “Edit” on this Select the data you want to edit. screen, you can edit it.
- Page 159 OTHER FUNCTIONS Deleting the data You can also delete it in the following way. You can delete the data. When you release your car, delete all your data on the system. Touch “Phone Book”. Touch “Delete” of “Phone Book”. Select the desired data. Touch the desired touch screen button.
- Page 160 OTHER FUNCTIONS Deleting all the phone data Touch “Yes”. Touch “Delete All” of “Phone Book”. Select the deleting method. “Group Data” ..Deleting all the phone data in group. “All Contact Data” ..Deleting all the phone data. When you select “Group Data”, the “Select Group”...
- Page 161 OTHER FUNCTIONS You can also delete it in the following way. Select the desired group. Touch “Phone Book”. Touch “Yes”. Touch “Delete All”. Touch “Yes”.
- Page 162 OTHER FUNCTIONS Registering a group name Selecting a group icon You can register 20 groups. “No group”, “Group 01” - “Group 19” is registered by default. You can change “Group 01” - “Group 19” into desired names. Touch “Icon”. Touch “Register”...
- Page 163 OTHER FUNCTIONS Editing a group name Deleting a group name You can delete the group names indi- vidually or all at once. If you delete a group name, that group will return to the default setting (excluding “No group”). Touch “Name”. Touch “Delete”...
- Page 164 OTHER FUNCTIONS Deleting all the group name Deleting the log data You can delete the log data individu- ally or all at once. When you release your car, delete all the data on the system. INDIVIDUALLY Touch “Delete All” of “Group Name”.
- Page 165 OTHER FUNCTIONS ALL AT ONCE (f) Setting the security When you set the security, you can prevent people from using some functions of the hands-free system. It is useful when you leave your car with the hotel or you don’t want others to see the data you registered.
- Page 166 OTHER FUNCTIONS Changing the security code The security code is 4 digits and the default is “0000”. Change a new code that is hard for other people to know. When you change the security code, don’t forget the code. The dealers cannot unlock the security when you forget it.
- Page 167 OTHER FUNCTIONS Phone book Lock When you set the phone book lock, you can have the following functions locked. Display of the phone book screen and transferring, registering, editing, deleting the phone book data. Display of speed dial screen, regis- tering, deleting the speed dial and speed dialing.
-
Page 168: Set A Bluetooth
OTHER FUNCTIONS ® — Set a Bluetooth phone ® Initializing the security code Selecting a Bluetooth phone You can initialize the settings. In case you register more than one ® Bluetooth phone, need choose a favorite one. Touch “Default”. Touch “Settings” to display the “Settings”... - Page 169 OTHER FUNCTIONS ® ® You can select the Bluetooth phone When another Bluetooth phone is trying from a maximum of 6 numbers. to connect, this screen is displayed. “Empty” is displayed when you have not ® registered a Bluetooth phone yet. ®...
- Page 170 OTHER FUNCTIONS ® Displaying Bluetooth information You can see or set the information of ® the Bluetooth phone on the system. “Device Name” ® ..The name of Bluetooth phone which displayed screen. You can change it into a desired name. ∗...
- Page 171 OTHER FUNCTIONS ® Changing a device name Changing the Bluetooth settings You can change a device name. If you You can change the display and settings ® change a device name, the name reg- of Bluetooth information on the system. istered in your cellular phone is not The information displays the following changed.
- Page 172 OTHER FUNCTIONS When you change the device name or passcode, do the followings. Use the software keyboard to in- put the device name. ∗ You can input up to 20 characters. Touch “Bluetooth ”. Input a passcode with 4 - 8 digits. Touch “Change”...
- Page 173 OTHER FUNCTIONS ® ® Initializing the Bluetooth settings Deleting a Bluetooth phone You can initialize the settings. ∗ Touch “Delete” of “Bluetooth Telephone”. Touch “Default”. Select the telephone you want to Touch “Yes”. delete and touch “OK”. Touch “Yes”. ∗ : Bluetooth is a registered trademark of Bluetooth SIG.
-
Page 174: Screen Adjustment
OTHER FUNCTIONS Screen adjustment The brightness and the contrast of the Displaying the information of the ® screen can be adjusted depending on Bluetooth phone you delete the brightness of your surroundings. You can display the information of the You can also turn the display off. ®... -
Page 175: Settings
OTHER FUNCTIONS Settings (a) Screen priority Push the “INFO” button. You can select a function that enables automatic return to the navigation screen from the audio screen. Touch “Settings”. Select “Navi” or “Audio” and then touch “OK”. “Navi”: The navigation screen auto- matically returns from the audio screen 20 seconds after the end of audio screen operation. - Page 176 OTHER FUNCTIONS (b) Beep type (c) Switch color The beep sound type can be changed or You can select the color of the touch switched off. screen buttons. Select “Off”, “1”, “2” or “3” and then Select “Amber” or “Green” and then touch “OK”.
-
Page 177: Select Language
OTHER FUNCTIONS Select language Rear view camera system The language of the touch screen A commercially available rear view buttons, pop−up messages and the camera can be used by connecting it voice guidance can be changed. to the RCA Relay Cable's RCA termi- nals. - Page 178 AUDIO/VIDEO SYSTEM SECTION AUDIO/VIDEO SYSTEM Quick reference ················································································ 178 Using your audio/video system ···················································· 179 Some basics ·················································································· 179 Screen adjustment ········································································· 191 Radio operation·············································································· 193 CD player operation ······································································· 202 DVD player operation····································································· 210 USB player operation····································································· 224 ® Bluetooth audio operation ····························································...
-
Page 179: Audio/Video System
AUDIO/VIDEO SYSTEM Quick reference Function button display screen “AV” button Touch the touch screen buttons dis- Push this button to display the “AV played on the screen to control the Menu” screen. For details, see radio, CD/DVD player, USB player, page 181. -
Page 180: Using Your Audio/Video System
AUDIO/VIDEO SYSTEM Using your audio/video system — — Some basics Vehicles with smart entry and start sys- CAUTION tem— Part 15 of the FCC Rules Your audio/video system works when the FCC Warning: “ENGINE START STOP” switch is in the ACCESSORY or IGNITION ON mode. - Page 181 AUDIO/VIDEO SYSTEM Turning on the power Inserting or ejecting disc Vehicles with smart entry and start sys- tem— The “ENGINE START STOP” switch must ACCESSORY IGNITION ON mode. Vehicles without smart entry and start system— The engine switch must be set at ACC or ON position.
- Page 182 AUDIO/VIDEO SYSTEM EJECTING A DISC Switching between functions Push the “ OPEN” button. Push the “AV” button. Touch “Disc ”. The disc will be ejected. A disc can then be inserted. Touch the desired mode touch screen button. Touch these touch screen buttons if you want to switch from one mode to an- other.
- Page 183 AUDIO/VIDEO SYSTEM OPERATION SCREEN The selected audio mode will display on ► AM radio mode the screen. The touch screen button of the currently selected audio mode is highlighted. Push “AV” button touch “AUDIO” to display the respective audio mode operation screen. You can turn off the CD/DVD player by ejecting the disc.
- Page 184 AUDIO/VIDEO SYSTEM ► USB mode ► DVD mode ® ► Video mode ► Bluetooth audio mode ► AUX mode ► iPod mode...
- Page 185 AUDIO/VIDEO SYSTEM The touch screen buttons for radio, Sound menu screen display ® CD/DVD player, USB player, Bluetooth The sound quality inside the cabin will be audio, AUX, iPod and Video operation altered greatly by such factors as the are displayed on the function button dis- type of media or music used, and the play screen when the audio operation vehicle body type.
- Page 186 AUDIO/VIDEO SYSTEM P.EQ (Parametric Equalizer) ad- justments The parametric equalizer can be ad- justed to the preferred sound quality based on a variety of music genres and sources. ADJUSTING THE SOUND QUALITY The currently set equalizer curve can be selected and set to the preferred sound quality.
- Page 187 AUDIO/VIDEO SYSTEM ADJUSTING AND STORING THE EQ Repeat steps 1 to 4 for each band CURVE from “A” to “E”. Allows the equalizer curve to be adjusted Touch the switch to be stored in to a sound quality other than the cur- the memory from “EQ 1”...
- Page 188 When SSP has been determined, the system is automatically set to the opti- For more details, please visit the SCION mum EQ value. Web site at http://www.scion.com/. Touch “SSP”...
- Page 189 AUDIO/VIDEO SYSTEM Auto volume adjustment Sound travel time adjustment (Auto Volume) (Focus) The volume can be set to increase It is possible to offset the variations in automatically to match road noise, which sound travel time that occur due to dif- varies based on the driving speed.
- Page 190 AUDIO/VIDEO SYSTEM Volume balance adjustments Subwoofer settings (FAD BAL) The preferred output level for the audio By individually adjusting the volume bal- when a subwoofer is connected can be ance for the front, rear, left, and right set. speakers, it is possible to enhance the Touch “Sub Woofer”...
- Page 191 AUDIO/VIDEO SYSTEM Your CD/DVD player External amplifier When you insert a disc, insert it with the A commercially available external label side up. The CD/DVD player will amplifier can be connected to the RCA Relay cable's RCA terminal to play from track 1 through to the end of enable the use of subwoofers etc.
-
Page 192: Screen Adjustment
AUDIO/VIDEO SYSTEM — Screen adjustment You can adjust the brightness, contrast, tone and color of the screen. You can also turn the display off, and change the screen to either day or night mode. Brightness and contrast adjust- ment The brightness and contrast of the screen can be adjusted depending on the brightness of your surroundings. - Page 193 AUDIO/VIDEO SYSTEM Tone and color adjustment Changing between day mode and night mode The tone and color of the screen can be adjusted while a DVD video, iPod Video Depending on the position of the head- file or Video is being played. light switch, the screen changes to the day mode or night mode.
-
Page 194: Radio Operation
AUDIO/VIDEO SYSTEM — Radio operation Listening to the radio Presetting a station Push the “AV” button. Tune in the desired station. Touch these touch screen buttons Touch one of the channel selector to choose either an AM or FM station. touch screen buttons (1 —... - Page 195 AUDIO/VIDEO SYSTEM Selecting a station Listening to HD Radio Broadcasts Tune in the desired station using one of the following methods. Preset tuning: Touch the channel se- lector (1 — 8) for the station you want. The touch screen button is highlighted and the station frequency appears on the screen.
- Page 196 AUDIO/VIDEO SYSTEM Using iTunes Tagging INFORMATION iTunes Tagging is compatible with iTunes version 7.4 or later. compatible iPods iPhones, see “● Supported iPods” on page 255. If the Tag data cannot be moved to your iPod or iPhone, reconnect your iPod or iPhone and try again. iPod and iTunes are trademarks Touch “TAG”.
- Page 197 AUDIO/VIDEO SYSTEM — Radio operation ® Satellite Radio broadcast) Satellite tuner technology notice: To listen to a satellite radio broadcast in your vehicle, an additional genuine Toyota’s satellite radio tuners Toyota satellite receiver and antenna awarded Type Approval Certificates from ®...
- Page 198 AUDIO/VIDEO SYSTEM Listening to satellite radio Changing the band Push the “AV” button. The band changes each time “SAT2”, “SAT3”, and “SAT1” is touched. Touch “SAT”. The band changes sequentially between Push “AV” button touch “SAT1”, “SAT2”, and “SAT3”. “AUDIO” to display the satellite radio operation screen.
- Page 199 AUDIO/VIDEO SYSTEM Channel category Presetting a channel Tune in the desired channel. Touch either “CAT ” or “CAT ” to go to the next or previous category. Touch one of the channel selector touch screen buttons and hold it until a beep is heard.
- Page 200 AUDIO/VIDEO SYSTEM Selecting a channel Tune in the desired channel using one of the following methods. Preset tuning: Touch the channel se- lector button for the channel you want. The touch screen button is highlighted and channel number appears on the screen.
- Page 201 AUDIO/VIDEO SYSTEM If the satellite radio tuner malfunctions ® When problems occur with the XM tuner, a message will appear on the display. Re- ferring to the table below to identify the problem, take the suggested corrective action. ® ® The XM antenna is not connected.
- Page 202 AUDIO/VIDEO SYSTEM INFORMATION NOTICE ® This XM tuner supports “Audio This equipment has been tested and Services” (Music and Talk) of only found to comply with the limits for a ® Satellite Radio and “Text In- class B digital device, pursuant to formation”* linked to the respective Part 15 of the FCC Rules.
-
Page 203: Cd Player Operation
AUDIO/VIDEO SYSTEM — CD player operation (a) Playing a disc The CD player can play audio CDs, CD text, WMA discs, MP3 discs. Audio CD, CD text ....203 MP3/WMA disc...... 205 For appropriate discs for this player, see “Audio/video system operating hints” on page 259. - Page 204 AUDIO/VIDEO SYSTEM (b) Operating an audio CD Selecting a desired track Playing an audio CD Push the “AV” button and touch “AUDIO” to display this screen. “ ” or “ ” button of “TRACK/TUNE”: CD text only — The album title, track title Use for a direct access to a desired and artist name will appear on the track.
- Page 205 AUDIO/VIDEO SYSTEM Searching for a desired track Other functions While the disc is playing, touch “REPEAT”: Use it for automatic repeat “SCAN” briefly. of the track you are currently listening to. The player will play the next track for 10 While the track is playing, touch “REPEAT”...
- Page 206 AUDIO/VIDEO SYSTEM (c) Operating a MP3/WMA DISC Selecting a desired folder “UP”: Touch this touch screen button to Playing a MP3/WMA disc go to the next folder. “DOWN”: Touch this touch screen but- ton to go to the previous folder. “LIST”: The desired folder can be se- lected in a list.
- Page 207 AUDIO/VIDEO SYSTEM Selecting a desired file “File”: The desired file can be selected in a list. Touch “File”. The file list is displayed. “ ” or “ ” button of “TRACK/TUNE”: Use for direct access to a desired file. Push the “ ” or “ ” button of “TRACK/TUNE”...
- Page 208 AUDIO/VIDEO SYSTEM Searching for a desired file Touch the desired file number. The player will start playing the selected While the disc is playing, touch file from the beginning. “SCAN” briefly. : By touching this touch screen button, “SCAN” appears on the screen. the list moves up by 5 file groups.
- Page 209 AUDIO/VIDEO SYSTEM Searching for a desired folder Other functions “DETAIL”: Details of the file currently While the disc is playing, touch playing is displayed. “SCAN” hold until “F.SCAN” appears on the screen. “REPEAT”: Use it for automatic repeat The program at the beginning of each of the file or folder you are currently lis- folder will be played for 10 seconds.
- Page 210 AUDIO/VIDEO SYSTEM “RANDOM”: Use it for automatic and (d) If the player malfunctions random selection of the folder or the disc If the player malfunctions, your audio which you are currently listening to. system will display following messages. Playing the files in one folder in ran- If “Check Disc”...
-
Page 211: Dvd Player Operation
AUDIO/VIDEO SYSTEM — DVD player operation (a) Operating a DVD video disc The DVD player can play DVD video discs. NOTE: The playback condition of some For appropriate discs for this player, see DVD video discs may be determined by “Audio/video system operating hints”... - Page 212 AUDIO/VIDEO SYSTEM Playing a DVD video disc Displaying DVD controls Insert a DVD in the disc slot to auto- matically turn on the power and play the DVD. The DVD can also be played by pushing the “AV” button with a DVD in the disc slot and then touching “Disc”.
- Page 213 AUDIO/VIDEO SYSTEM Description of DVD controls Selecting a menu item PAGE VIDEO The menu stored on the disc can be op- CONTROLS erated. “Return”: Touching this will return to the For details, see the manual that comes predetermined scene and start playing with the DVD video disc provided sepa- from there.
- Page 214 AUDIO/VIDEO SYSTEM Operating with the touch screen but- ton — Touch Touch “Key”. The disc menu items will vary depending on the disc. Furthermore, discs are played based on the disc content and therefore there may be times when the selected operation does not function as expected.
- Page 215 AUDIO/VIDEO SYSTEM SEARCHING BY MENU NUMBER Searching for desired footage The desired video footage can be Touch searched for by title, chapter, or menu number (number used to separate the disc content). Touch “Code” to display the menu number input screen. SEARCHING BY CHAPTER When you push the “...
- Page 216 AUDIO/VIDEO SYSTEM Changing the subtitle language Changing the audio language Each time you touch “Subtitle”, the Each time you touch “Audio”, the lan- language is selected from the ones guage is selected from the ones stored in the discs and changed. stored in the discs and changed.
- Page 217 AUDIO/VIDEO SYSTEM Changing the angle Selecting screen size Touch “Setup”. The angle can be selected for discs that are multi−angle compatible when the Touch “Wide Mode” to display the angle mark appears on the screen. wide mode optional screen. Each time you touch “Angle”, the an- gle changes.
- Page 218 AUDIO/VIDEO SYSTEM Default setting NOTICE Touch “Setup” There are no issues regarding the viewing of visual material in wide− screen format provided that it is for personal use. However, compress- ing or enlarging the screen for commercial purposes, or to make material available for public viewing, may infringe upon the rights of the author as protected by copyright...
- Page 219 AUDIO/VIDEO SYSTEM AUDIO LANGUAGE ANGLE ICON You can change the audio language. The multi−angle mark can be turned on or off on the screen while the disc which Touch “Audio Lang.”. multi−angle compatible being Touch the language you want to played.
- Page 220 AUDIO/VIDEO SYSTEM CHANGING THE VIDEO OUTPUT Enter language code The screen size changes each time If you touch “Other” on the “Select au- “Screen Aspect” is touched. dio language” screen, “Select subtitle language” screen or “Select menu lan- “16:9”: The screen displays in the nor- guage”...
- Page 221 AUDIO/VIDEO SYSTEM 0101 Afar 0704 Scots−Gaelic 0102 Abkhazian 0712 Galician 0106 Afrikaans 0714 Guarani 0113 Amharic 0721 Gujarati 0118 Arabic 0801 Hausa 0119 Assamese 0809 Hindi 0125 Aymara 0818 Croatian 0126 Azerbaijani 0821 Hungarian 0201 Bashkir 0825 Armenian 0205 Byelorussian 0901 Interlingua 0207...
- Page 222 AUDIO/VIDEO SYSTEM 1309 Maori 1914 Shona 1311 Macedonian 1915 Somali 1312 Malayalam 1917 Albanian 1314 Mongolian 1918 Serbian 1315 Moldavian 1919 Siswati 1318 Marathi 1920 Sesotho 1319 Malay 1921 Sundanese 1320 Maltese 1923 Swahili 1325 Burmese 2001 Tamil 1401 Nauru 2005 Telugu 1405...
- Page 223 AUDIO/VIDEO SYSTEM (b) If the player malfunctions (c) DVD player and DVD video disc information If the player malfunctions, your au- dio/video system will display following DVD video discs messages. This DVD player conforms to NTSC color If “Check Disc” appears on the dis- TV formats.
- Page 224 AUDIO/VIDEO SYSTEM Marks shown on DVD video discs: DVD video disc glossary DVD video discs: Digital versatile Disc Indicates NTSC that holds video. DVD video discs have format of color TV. adopted “MPEG2”, one of the world standards of digital compression tech- nologies.
-
Page 225: Usb Player Operation
AUDIO/VIDEO SYSTEM — USB player operation Audio: This DVD player can play liner The USB player can play USB memory PCM, Dolby digital and MPEG audio devices. format DVD. Other decoded type cannot Some USB memory devices may not be played. operate properly. - Page 226 AUDIO/VIDEO SYSTEM (a) Plugging or unplugging a USB Unplugging a USB memory device memory device Push the “INFO” button. Setting a USB memory device Touch “Remove USB Device”. Plug a USB memory device into the USB port. After insertion, the set USB memory de- vice is automatically loaded.
- Page 227 AUDIO/VIDEO SYSTEM (b) Playing a USB memory device (c) Operating a USB memory device Playing a USB memory device Push the “AV” button and touch “USB” if a USB memory device is al- Push the “AV” button and touch ready loaded in the USB player. “AUDIO”...
- Page 228 AUDIO/VIDEO SYSTEM Selecting a desired folder Selecting a desired file “UP”: Touch this touch screen button to go to the next folder. “DOWN”: Touch this touch screen but- ton to go to the previous folder. “LIST”: The desired folder can be se- lected in a list.
- Page 229 AUDIO/VIDEO SYSTEM Touch the desired file number. The “File”: The desired file can be selected USB player will start playing the se- in a list. lected file from the beginning. Touch “File”. The file list is displayed. : By touching this touch screen button, the list moves up by 5 file groups.
- Page 230 AUDIO/VIDEO SYSTEM Searching for a desired file Searching for a desired folder While the USB memory device is While the USB memory device is playing, touch “SCAN” briefly. playing, touch “SCAN” and hold it until the “F.SCAN” appears on the “SCAN”...
- Page 231 AUDIO/VIDEO SYSTEM Other functions “RANDOM”: Use it for automatic and random selection of the folder or the USB memory device which you are cur- rently listening to. Playing the files in one folder in ran- dom order — While the USB memory device is playing, touch “RANDOM”...
-
Page 232: Bluetooth Audio Operation
AUDIO/VIDEO SYSTEM ® —Bluetooth audio operation ® (d) If the player malfunctions The Bluetooth audio system enables users to enjoy music played on a If the player malfunctions, your audio portable player from vehicle system will display following messages. speakers via wireless communication. If “USB device is not connected.”... - Page 233 AUDIO/VIDEO SYSTEM INFORMATION In the following conditions, the system may not function. Bluetooth is a trademark owned by The portable player is turned off. Bluetooth SIG. Inc. The portable player is not con- nected. CAUTION The portable player has a low Use a portable player or connect the battery.
- Page 234 AUDIO/VIDEO SYSTEM ® The Bluetooth connection utilizes ® the Bluetooth antenna. The indica- ® tion of the Bluetooth connection may turn yellow and the system may not ® function when you use the Bluetooth portable player in the following condi- tions: Your portable player is hidden be- hind the display (behind the seat or...
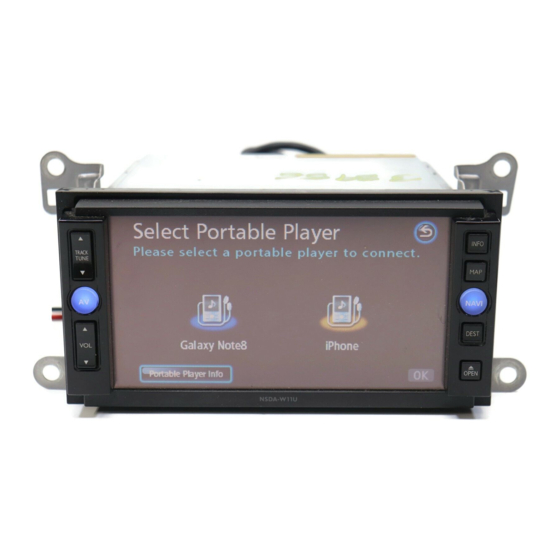
- Page 235 AUDIO/VIDEO SYSTEM ® (a) Enter a Bluetooth audio player ® To use the Bluetooth audio system, you need to enter your portable player into the system. Once you have reg- istered it, you can enjoy your music on the vehicle’s audio system. A maximum of two portable players can be registered.
- Page 236 AUDIO/VIDEO SYSTEM When the connection is complete, When this screen is displayed, follow the this screen is displayed. guidance on the screen to try connecting again. You do not need to enter the portable player in case of using the same one. INFORMATION The passcode is used to register the portable player in the vehi-...
- Page 237 AUDIO/VIDEO SYSTEM Vehicles without smart entry and start Connecting a portable player system— The portable player can be connected When the engine switch is in the ACC to the audio system either automati- or ON position, the selected Blue- cally or manually. ®...
- Page 238 AUDIO/VIDEO SYSTEM ® Reconnecting the Bluetooth dio player Vehicles with smart entry and start sys- tem— ® If the Bluetooth audio system is dis- connected with a poor reception from ® the Bluetooth network when the “ENGINE START STOP” switch is in the ACCESSORY or IGNITION ON mode, the system automatically re- When the connection is complete, this...
- Page 239 AUDIO/VIDEO SYSTEM ® ® (b) Playing a Bluetooth audio (c) Operating Bluetooth audio player ® Playing a Bluetooth audio Push the “AV” button and touch ∗ ® “Bluetooth Audio” Bluetooth connection has already been com- Push the “AV” button and touch pleted for your portable player.
- Page 240 AUDIO/VIDEO SYSTEM Selecting a desired track Selecting a desired album “UP”: Touch this touch screen button to select the next album. “DOWN”: Touch this touch screen button to select the previous album. “ ” or “ ” button of “TRACK/TUNE”: Use for direct access to a desired au- dio track.
- Page 241 AUDIO/VIDEO SYSTEM ® Other functions (d) Change the Bluetooth audio set- tings Selecting a portable player If you register a second portable player, either one can be selected for connection. “REPEAT”: Use this control to auto- matically replay the track you are cur- rently listening to.
- Page 242 AUDIO/VIDEO SYSTEM Displaying portable player infor- Changing a device name mation You can change a device name. If you You can see the information of the change a device name, the name reg- portable player on the system. istered in your portable player is not changed.
- Page 243 AUDIO/VIDEO SYSTEM ® Changing the connection method Displaying the Bluetooth audio settings The connection method can be se- ® lected. You can see the Bluetooth audio information settings on the system. From Portable Player: Connect the portable player to the audio system. “Device Name”...
- Page 244 AUDIO/VIDEO SYSTEM Changing the device name or passcode Input a Passcode with 4-8 digits. When you touch , the input num- ber is deleted. Touch “BT Audio Settings”. Touch “Edit” at “Device Name” or “Passcode”. Use the software keyboard to in- put the device name.
- Page 245 AUDIO/VIDEO SYSTEM ® Initializing the Bluetooth audio Deleting a portable player settings You can initialize the settings. Touch “BT Audio Settings”. Touch “Default”. ∗ Touch “Remove” at “Bluetooth Settings”. Touch “Yes”. Select the portable player you want to delete and touch “OK”. ∗...
-
Page 246: Aux Operation
AUDIO/VIDEO SYSTEM — AUX operation Music stored on commercially available portable audio devices can be played back by connecting the devices to the audio system. When using portable audio devices with the audio system, please read over the portable audio device’s manual carefully and ensure that the device is fully com- patible prior to use. - Page 247 AUDIO/VIDEO SYSTEM (a) Connecting (disconnecting) port- INFORMATION able audio devices Disconnecting or connecting the portable audio device while in AUX mode may lead to distortion and speaker damage. Always ensure to turn off the audio sys- tem power or switch to another mode prior to disconnecting or connecting.
-
Page 248: Ipod Operation
AUDIO/VIDEO SYSTEM — iPod operation (b) Playing a portable audio devices iPod music files can be played by con- necting your iPod to the audio system. Turn ON the portable audio device Furthermore, it is also possible to per- power and playback music. form such operations as selecting tracks Refer to the manual provided with the from the play list and changing the shuf-... - Page 249 AUDIO/VIDEO SYSTEM (a) Connecting or disconnecting your Disconnecting your iPod iPod Connecting your iPod USB port Your iPod USB port Dock Connector to USB Cable Disconnect the Dock Connector to Dock Connector to USB Cable USB Cable from the USB port. Connect your iPod with the Dock Con- nector to USB Cable.
- Page 250 The iPod may become deformed, dio system and iPod are connected. discolored, or damaged due to heat if left exposed to direct “SCION” displays at the iPod when sunlight for long periods of time. connected to the audio system. Store away from direct sunlight Please note that operation cannot when not in use.
- Page 251 AUDIO/VIDEO SYSTEM (b) Playing your iPod Vehicles with smart entry and start system— The connected iPod will be turned off about two minutes after the “ENGINE START STOP” switch is turned off. Vehicles without smart entry and start system— The connected iPod will be turned off about two minutes after the en- gine switch is turned to the LOCK Push the “AV”...
- Page 252 AUDIO/VIDEO SYSTEM (c) Operating your iPod INFORMATION Playing your iPod Depending on the number of mu- sic files stored on your iPod, and the software version, there may be times when the system does not respond immediately or func- tion properly when performing operations operation screen.
- Page 253 AUDIO/VIDEO SYSTEM Selecting a desired music file “TRACK LIST”: When “TRACK LIST” is touched, the list of files in which the music files currently being played back is displayed. The music file currently being played back displays at the top. Touch a music file to play back the se- “...
- Page 254 AUDIO/VIDEO SYSTEM Searching for the desired music file from the Music menu The desired music file can be searched for by displaying the track play list from the Music menu. Touch “MUSIC MENU”. Touch to return to the iPod op- eration screen.
- Page 255 AUDIO/VIDEO SYSTEM Searching for the desired music Other functions files from play mode INFORMATION Played back music files can be changed If your iPod is disconnected while in various individual modes. “TRACK REPEAT”, “TRACK SHUFFLE”, or “ALBUM SHUFFLE” is set, the iPod will switch to the repeat or shuffle setting.
- Page 256 AUDIO/VIDEO SYSTEM Supported iPods The table below shows the tested iPods and iPhones. Depending on its condition, the iPod or iPhone may not operate properly. Model Software version iTunes tagging compatibility iPod 5th generation – iPod classic 1.1.2 iPod classic (2008) 2.0.1 iPod classic (2009) 2.0.4...
-
Page 257: Video Operation
AUDIO/VIDEO SYSTEM — Video operation Viewing the Video Push the “AV” button. Audio left (White) Audio right (Red) Video cable Video (Yellow) To play a video from a commercially Touch “Video In”. available Video device, connect the de- vice to the Video cable’s RCA terminals. Using an Apple Composite AV Cable allows iPod video to be played. -
Page 258: Audio/Video Remote Controls
AUDIO/VIDEO SYSTEM Audio/video remote controls — — Steering switches Selecting screen size Touch “Wide”. Some parts of the audio/video system can be adjusted with the switches on the steering wheel. Depending on the model or grade, steering wheel switches may not be available. - Page 259 AUDIO/VIDEO SYSTEM DVD player Volume control switch To fast-forward or reverse: Push “+” side to increase the volume. The volume continues to increase while Push and hold the “ ” or “ ” switch the switch is being pressed. until after you hear a beep. Push “–”...
-
Page 260: Audio/Video System Operating Hints
AUDIO/VIDEO SYSTEM Audio/video system operating hints NOTICE Fading and drifting stations — Gener- ally, the effective range of FM is about To ensure correct audio/video sys- 25 miles (40 km). Once outside this tem operations: range, you may notice fading and drifting, Be careful not to spill beverages which increase with the distance from over the audio/video system. - Page 261 AUDIO/VIDEO SYSTEM MP3/WMA files Playable bit rates MP3 files: MP3 (MPEG Audio Layer 3) and MPEG1 LAYER3—32 to 320 kbps WMA (Windows Media Audio) are audio compression standards. MPEG2 LAYER3—8 to 160 kbps MPEG2.5 LAYER3—8 to 160 kbps The MP3/WMA player can play MP3 WMA files: and WMA files on CD-R and CD-RW discs.
- Page 262 AUDIO/VIDEO SYSTEM CD-R and CD-RW discs CD-R/CD-RW discs that have not been subject to the “finalizing proc- 001.mp3 ess” (a process that allows discs to 002.wma be played on a conventional CD Folder 1 player) cannot be played. 003.mp3 It may not be possible to play Folder 2 CD-R/CD-RW discs recorded on a 004.mp3...
- Page 263 AUDIO/VIDEO SYSTEM Caring for your CD/DVD player and CD player discs Your CD/DVD player is intended for use with 12 cm (4.7 in.) discs only. Audio CDs Extremely high temperature can keep your CD/DVD player from working. On hot days, use air con- ditioning to cool the vehicle interior before you listen to a disc.
- Page 264 AUDIO/VIDEO SYSTEM ► Special shaped discs ► Labeled discs NOTICE special shaped, transparent/translucent, low qual- ity or labeled discs such as those shown in the illustrations. use of such discs may damage the player, or it may be impossi- ble to eject the disc. This system is not designed for use of Dual Disc.
- Page 265 AUDIO/VIDEO SYSTEM ► Correct ► Wrong To clean a disc: Wipe it with a soft, Handle discs carefully, especially lint-free cloth that has been dampened when you are inserting them. Hold with water. Wipe in a straight line from them on the edge and do not bend the center to the edge of the disc (not in them.
- Page 266 AUDIO/VIDEO SYSTEM Files in a USB memory device If there are many files other than MP3 or WMA files in the USB memory device, it may take time to search for an MP3 or WMA file, adversely affecting the smooth operation of the device.
- Page 267 AUDIO/VIDEO SYSTEM USB memory device The table below shows the tested USB memory devices. Depending on its condition, the USB memory device may not operate properly. Model Manufacturer Serial No. Capacity JetFlash V30 1GB Transcend 505024-2172 JetFlash V10 8GB Transcend 201061-2998 DataTraveler 1GB Kingston...
- Page 268 AUDIO/VIDEO SYSTEM TERMS MP3— Packet write— MP3 is an audio compression standard determined by a working group (MPEG) of This is a general term that describes the the ISO (International Standard Organiza- process of writing data on-demand to tion). MP3 compresses audio data to CD-R, etc., in the same way that data is about 1/10 the size of that on conventional written to floppy or hard discs.
- Page 269 AUDIO/VIDEO SYSTEM...
-
Page 270: Appendix
APPENDIX SECTION APPENDIX Limitations of the navigation system ················································ 270 Map database information and updates······································· 272 Confirming the database version and SD memory card coverage area···················································· 273 Changing the map SD memory card ············································· 273 Specifications ··················································································· 275... -
Page 271: Limitations Of The Navigation System
APPENDIX Limitations of the navigation system This navigation system calculates the current vehicle position using satellite signals, various vehicle signals, map data, etc. However, the accurate po- sition may not be shown depending on the satellite condition, road con- figuration, vehicle condition or other circumstances. - Page 272 APPENDIX (a) Accurate current vehicle position (b) Inappropriate route guidance may may not be shown in the following occur in the following cases: cases: When turning at an intersection off When driving on a small angled the designated route guidance. Y-shaped road.
-
Page 273: Map Database Information And Updates
APPENDIX Map database information and updates — After replacing a tire, implement the In order to provide you with as accurate operation described in the “TIRE map information as possible, we are CHANGE CALIBRATION”. (See page always gathering information such as on 118.) road repairs and carrying out on-site investigations. -
Page 274: Confirming The Database Version And Sd Memory Card Coverage Area
APPENDIX — Confirming the database version and SD memory — Changing the map SD card coverage area memory card Push the “NAVI” button. Touch “Map SD”. Push the “ OPEN” button. Confirm the database version on this Touch “Open”. screen. The display can also be opened by To display the SD memory card cover- pushing the “... - Page 275 APPENDIX CAUTION Do not place anything on the opened display, as such items may be thrown about and possi- bly injure people in the vehicle during sudden braking or in an accident. To reduce the chance of injury in the case of an accident or sudden stopping while driving, keep the display closed.
-
Page 276: Specifications
APPENDIX Specifications <GPS antenna> Dimensions 26.0 x 30.0 x 12.9 (mm) Weight 50 (g) Power supply voltage 4.0 to 5.0 (V) Power consumption 10 to 30 (mA) Usage temperature -30 to +90 (°C) Storage temperature -40 to +110 (°C) <Display> Liquid crystal panel 7”... - Page 277 APPENDIX <Common component> Rated output More than 14 W x 4 (test voltage 14.4V) Maximum output More than 20 W x 4 (test voltage 14.4V) Suitable load impedance 4Ω (each channel) Power consumption ● 1 W x 4 output time about 4.1 A ●...
-
Page 278: Index
INDEX INDEX For navigation system function, please also refer to the “Navigation system function index” on page 10. - Page 279 INDEX Change “Area Size”......107 Numbers/Symbols Change “Icon” ........99 ? button ........14,16,17 Change “Location”......101,107 2.5D map........... 12,35 Change “Name”......101,106 2.5D map symbol....... 12,35 Change “Phone #” ........ 102 3 Routes selection ........63 Change “Quick Access”......100 3D landmark ........
- Page 280 INDEX Deleting area to avoid......108 Editing the speed tone......147 Deleting destinations ......74 Eject OPEN button .....20,178,180,273 Deleting home ........104 Emergency button ........14 Deleting memory points ......102 ® Enter a Bluetooth audio player.... 234 Deleting previous points ....... 108 Enter language code ......
- Page 281 INDEX Intersection guidance screen..... 32,67 iPod operation ........247 Names of areas to be avoided....106 iTunes Tagging........195 NAVI button........12,16,17 Nearest 5 Cities......... 48,51 North-up ..........12,35 North-up symbol........ 12,35 Keyboard layout....... 17,111 Numbers and symbols......24 Last 5 cities ........48,51 OFF function .......12,17,112 Limitations of the navigation system ..
- Page 282 SCAN button..194,199,204,207,208,229 Speed dial ........140,144 Screen adjustment......173,191 Speed tone........143,146 Screen configuration touch screen SSP (SCION Sound Processing) button..........12 settings ..........187 Screen layout function ......112 Starting route from adjacent road ... 78 Screen off ..........191 Starting route guidance ......
- Page 283 INDEX ® Talk on the Bluetooth phone ....141 Time zone........17,112 Tire change calibration ......118 Title ......... 194,203,214,223 Tone ............. 192 Touch screen operation ......23 TRACK LIST button......252 Traffic Restrict. Notification....17,114 Traffic voice guidance......93 Transfer data ........
- Page 284 99400-00405...
Need help?
Do you have a question about the NSDA-W11U and is the answer not in the manual?
Questions and answers