
Related Manuals for Z Microsystems ZX3

Summary of Contents for Z Microsystems ZX3
- Page 1 USer ManUal ZX3 : ZX SerieS Server rugged rack Mounted Workstations & Servers for deployed applications Z Microsystems, Inc. · 9820 Summers Ridge Road, San Diego, CA 92121 · T: 858.831.7000 · F: 858.831.7001 · www.zmicro.com...
-
Page 2: Regulatory Information
REGULATORY Regulatory Information WARNING TO PREVENT FIRE OR SHOCK HAZARDS, DO NOT EXPOSE THIS UNIT TO RAIN OR MOISTURE. ALSO, DO NOT USE THIS UNIT’S POLARIZED AC PLUG WITH AN EXTENSION CORD RECEPTACLE OR OTHER OUTLETS UNLESS ALL THREE PRONGS CAN BE FULLY INSERTED 1. -
Page 3: Table Of Contents
8.0 Appendix ..................................20 8.1 Technical Specifications for the ZX3 Station ..................... 20 8.2 Mechanical Outlines for the ZX3 Station ......................21 8.2.1 ZX3 Station ............................21 8.2.2 ZX3 Station Rear View (w/ AC & DC Power Supply) ................. 22 Contents Setup Configurations... -
Page 4: Product Overview
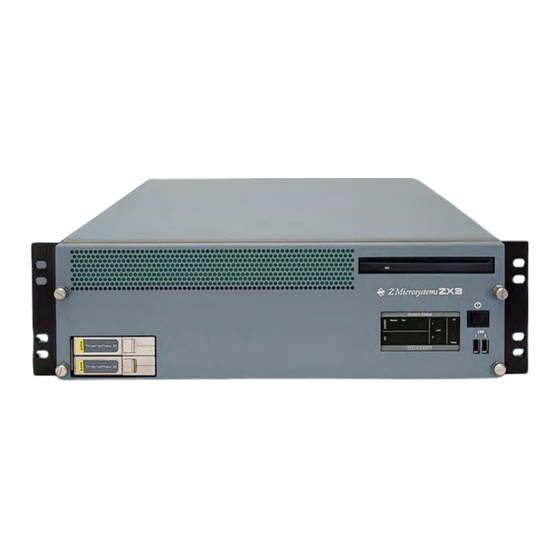
New Section Necessary Tools Necessary Hardware Additional Assistance for the ZX3: ZX Series Server, or other server configurations can be found on the Z Microsystem’s website along with highly customizable integration options for a wide range of platforms and applications. - Page 5 Z Microsystems’ engineers are experts in the design of systems that reduce the risk, cost and failure caused by harsh environmental conditions. Designed to exceed MIL-STD 167 for vibration and MIL-STD 461 for EMI, ZX3 Stations are a robust solution for mission–ready applications. Enhanced military options such as EMI filtered power supplies with Mil-Circular connectors, locking security panels, environmental cooling units (ECU) may be available.
- Page 6 Power Supply Options 2.1 ShIPMENT CONTENTS Ensure all of the following parts are included in the package received from Z Microsystems. NOTE: For the fastest and easiest installation Verify that no parts have not been damaged during shipment. If any of the parts are missing or of the ZX3 Server, follow the Installation Guide damaged, immediately contact Z Microsystems Customer Service at 858-831-7040.
-
Page 7: Rear View
KEYBOARD PORT NETWORK ETHERNET PORT USB 2.0 PORTS **Other ZX3 Server configurations available. Above is a sample configuration with a Supermicro X7DA8 motherboard and dual redundant military power supplies with EMI filter. ZX3 PowER SUPPly oPTioNS Multiple power supply configurations are available for Z Microsystem’s ZX3 Server Stations. A typical dual- redundant removeable AC power supply jack is pictured in the full ZX3 configuration above. - Page 8 • Philips Screwdriver In preparation to any configurations change • Removing/Re-installing ZX3 Top Cover to the ZX3, turn off the electrical power to • the ZX3 serve and your computer. Changing/Re-installing a PCI card • Removing/Re-installing a Power Supply Module 3.1 REMOvING TOP COvER OF ZX3 STATION...
-
Page 9: Setup
CONFIGURATIONS 3.3 REMOvING/INSTALLING MEMORY dIMM 4. Install the new Memor y DIMM by 5. Carefully push the Memory DIMM in 6. Secure the Memory DIMM by pulling carefully aligning the Memor y DIMM using your thumbs. the locking latches towards the Memory parallel to the slot and then gently but DIMM. -
Page 10: Re-Installing Top Cover Of Zx3 Station
4. Using a Philips screwdriver, unfasten the rear fan cover. 6. Disconnect the fan connector from the circuit board. 3.6 RE-INSTALLING TOP COvER OF ZX3 STATION 1. Place cover loosely onto 2. Using one hand, push slightly 3. Use both hands to push the 4. -
Page 11: Removing A Power Supply Module
Module, firmly push the module into the docking bay. 4. Using your fingers, twist to refasten 3. Push the unit all the way into the ZX3 the security screws of the Power Supply station and verify the rear of the Power module to the ZX3 station. -
Page 12: Removing The Lockable Face Plate Cover
CONFIGURATIONS 3.9 REMOvING ThE LOCkABLE FACE PLATE COvER 1. Using the provided key, turn to the 2. Using your fingers, twist to release the 3. Pull the right side of the face plate cover attachment screws on the left side of the right to unlock the face plate cover. -
Page 13: Powering On The Zx3 Station
“Troubleshooting” in the Appendix. 4.2 ZX3 STATUS INFORMATION & INdICATORS The ZX3 features status lights to effectively monitor the activities of the product: Fan LED – (LED with “Fan” text and fan symbol) Power On LED 1. -
Page 14: Removing The Tranzpak2 Storage Module
OPERATIONS 4.3 REMOvING ThE TRANZPAk2 STORAGE MOdULE 1. Slide the locking catch towards the right 2. The locking handle will swing out. 3. Push the locking handle to the lef t. to allow the locking handle to spring open. This will disconnect the TranzPak2 from the rear connector. - Page 15 Unplug the ZX3 server from the power outlet before cleaning. WARNING • To clean the surface of the ZX3, lightly dampen a soft, clean cloth with water or mild detergent and wipe the surface gently. It is recommended that users do not CAUTION: Do not use benzene, thinner, service the server.
-
Page 16: Troubleshooting The Zx3 Station
Troubleshooting Topics In the event that the ZX3 Server experiences technical problems please refer to the following troubleshooting topics for potential resolution. For our trained Z Microsystems Customer Service and Support Technicians to better serve you during this recovery stage, we recommend that you take a moment to observe and make a preliminary diagnosis so that we may expedite this process. -
Page 17: Customer Support
6. System BIOS version number 7. Operating System and version number 8. Display driver version number 9. Video Adapter Type documentation Assistance If you are unable to find documentation for your specific product, contact Z Microsystems at: Phone: (858) 831-7039 Email: ZDoc@zmicro.com Customer Feedback We value feedback on our products, their performance, problems found, and welcome all suggestions. -
Page 18: Replacing Parts For The Zx3 Station
Z Microsystems calculates the expiration of the warranty period from the date the product is shipped. This means that the ship date on y our invoice is your product ship date unless Z Microsystems informs you otherwise. During the warranty period, Z Microsystems will provide warranty service under the type of warranty purchased for the product. -
Page 19: Technical Specifications For The Zx3 Station
APPENdIX 8.0 APPENDIX 8.1 TECHNICAL SPECIFICATIONS FOR THE ZX3 STATION The ZX Series Servers are meticulously engineered to be adaptable and suited for an array of field operations and applications. These are standard ZX Series specifications. Other configurations may cause specifications to vary. -
Page 20: Mechanical Outlines For The Zx3 Station
APPENdIX 8.2 MECHANICAL OUTLINES FOR THE ZX3 STATION 17.15 NOTES: UNLESS OTHERWISE SPECIFIED 1. APPROXIMATE WEIGHT (WITHOUT HARD DRIVES): 33 LBS 8.2.1 ZX3 STATION 17.15 NOTES: UNLESS OTHERWISE SPECIFIED 1. APPROXIMATE WEIGHT (WITHOUT HARD DRIVES): 33 LBS 20.64 20.64 FRONT ISO VIEW FRONT ISO VIEW 17.15... - Page 21 APPENdIX MOUNTING HOLES (SLIDE RAILS NOT INSTALLED 8.2.2 ZX3 STATION - REAR VIEW (AC/DC POWER SUPPLY) 20.00 UNLESS OTHERWIS DIMENSIONS ARE TOLERANCES DECIMALS FRACTIONS XX = 1/32 XXX = .005 DO NOT SCALE D MATERIAL: FINISH: REAR VIEW DUAL REDUNDANT AC POWER...
- Page 22 San Diego, CA 92121 Phone: (858) 831-7000 Fax: (858) 831-7001 Website: www.zmicro.com Copyright 2012 Z Microsystems, Inc. All Rights Reserved Z Microsystems, Inc. · 9820 Summers Ridge Road, San Diego, CA 92121 · T: 858.831.7000 · F: 858.831.7001 · www.zmicro.com...
Need help?
Do you have a question about the ZX3 and is the answer not in the manual?
Questions and answers