Advertisement
Quick Links
Advertisement

Related Manuals for Polaroid SP 350


Summary of Contents for Polaroid SP 350
- Page 1 SP 350 User Guide...
- Page 2 C C o o n n t t e e n n t t s s 1. Introduction.................. 2. Unpacking..................3. System Diagrams................ 4. Connecting Up................5. Loading Film................6. Lighting Techniques..............7. Printer Settings................8. Capturing The Customers Image..........9.
- Page 3 This guide describes all the features of the Polaroid SP350. It takes you from unpacking the boxes to setting up the system through any trouble-shooting problems you may have.
- Page 4 3 3 . . S S y y s s t t e e m m D D i i a a g g r r a a m m s s 1. Preview screen 2. Hot shoe 3. CS mount access cover 4.
- Page 5 16 17 11. Power switch 23. Power supply 12. Film holder 24. Video out (CVBS) 13. Locking mechanism 25. S-Video out (Y/C) 14. PC switch 26. PC parallel connector 15. Print format switch 27. Video in (CVBS) 16. Film switch 28.
- Page 6 4 4 . . C C o o n n n n e e c c t t i i n n g g U U p p Use the diagram below to connect up the SP 350 system optional external...
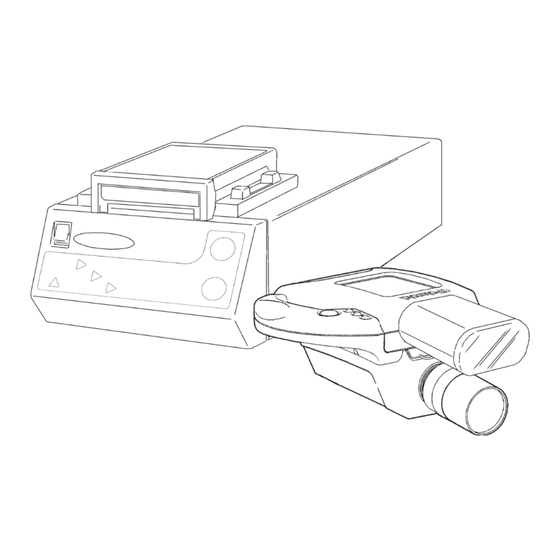
- Page 7 Important: Switching on the printer with the travel bracket in place may damage the printing mechanism. Ensure the travel bracket has been removed from the printer as described on page 3 before powering up the system The camera can either be tripod mounted or hand held, as shown below.
- Page 8 Important: The SP350 system is not designed for use with the Thermoback or Thermobox product. Loading A Fresh Film Pack c. Use only Studio Polaroid colour and / or Polapan Pro 100 black & white film. d. Open the film holder by pulling down the ends of the latch and lifting the cover.
- Page 9 g. Close the film holder making sure the black paper tab is outside the film holder. h. Pull the black paper tab out of the film holder, keeping the tab horizontal at all times. Important: Be sure to remove the dark slide (22) before trying to take pictures. page 9 of 28...
- Page 10 6 6 . . L L i i g g h h t t i i n n g g T T e e c c h h n n i i q q u u e e s s Lighting Set-Up To obtain the best possible results from the SP350 system, it is essential to set up studio lighting correctly.
- Page 11 If using the on board strobe unit provided, insert the batteries provided pressing locking knob and opening the compartment cover as shown opposite. Place the batteries as illustrated in the compartment and replace the compartment cover. Tilt up the preview screen (1) before sliding the on board strobe unit on to the hot shoe (2) as shown opposite.
- Page 12 Exposure Freeze an image by toggling the live / freeze button (5). If exposure correction is needed see below If image is too dark If image is too light Use a larger lens aperture Use a smaller lens aperture Move lights closer to subject Move lights away from subject Increase light output Decrease light output...
- Page 13 1up, 2up, 4up, 5up, 6up or 9up print format (15) - this allows you to specify whether your print will be a 1up, 2up, 4up, 5up, 6up or 9up arrangement. The print format button (6) on the camera performs the same function. Film switch (17) - this switch has the same function as the film button (8) on the camera and allows you to choose whether your image is printed out on to colour or black &...
- Page 14 8 8 . . C C a a p p t t u u r r i i n n g g T T h h e e C C u u s s t t o o m m e e r r ’ ’ s s I I m m a a g g e e a.
- Page 15 f. The printer beeps and the pull tab indicator (18) flashes green indicating that the print cycle is complete. Pull the white film tab keeping it horizontal to ensure that the film in the film holder remains aligned. g. Pull the tab marked with arrows straight out in one uninterrupted motion as shown above.
- Page 16 1 1 0 0 . . I I m m p p r r o o v v i i n n g g T T h h e e F F o o c c u u s s S S e e t t t t i i n n g g The lens range markings can be used to focus the image if the subject distance is known.
- Page 17 1 1 2 2 . . D D i i s s p p l l a a y y S S c c r r e e e e n n A A d d j j u u s s t t m m e e n n t t It is recommended that the brightness of the camera preview screen (1) matches the brightness of the printed photograph.
- Page 18 To set up for calibration, make the following checks: a. Ensure your lighting is set up as for normal operation (see section 5 for further details) b. Calibration is best carried out with the camera mounted on a tripod as shown below. minimum 1.3m grey card c.
- Page 19 f. Peel back the securing tabs on calibration overlay position over the front panel of the printer. g. Ensure the the overlay is aligned with the printer switches and press the tabs to hold in place. h. Reset the colour compensation colour compensation controls controls (30) on the rear panel of the printer if they have been...
- Page 20 Press button 3 on the calibration overlay to select the lighting mode which corresponds to your lighting set up. ambient strobe Aperture Adjustment c. Press button 4 on the calibration overlay until indicator A is lit as shown. d. Zoom the camera in on the grey card by turning the middle lens ring fully anti - clockwise as shown.
- Page 21 Colour Check Press button 4 on the calibration overlay until indicator B is lit as shown. j. Tilt the camera preview screen up to gain access to the four white balance controls. Note that if you strobe ambient are using strobe lighting you will be adjusting C1 and D1 and if you are using flood lighting you...
- Page 22 n. Press button 2 on the calibration overlay twice and look again at indicators E , F , and G . o. Repeat steps m and n until F lights. p. Press button 5 on the calibration overlay until indicator D lights on the printer as shown.
- Page 23 Polaroid office for further assistance. 1 1 4 4 . . F F i i l l m m Important: Use only Studio Polaroid colour and Polapan Pro 100 black & white film. Removing A Spent Film Pack: a.
- Page 24 Unlock the film holder by sliding the retaining bars (13), as shown in the illustration opposite and on the labels on the locks themselves. c. Remove the film holder by lifting it off the printer. Cleaning the rollers Open the door of the film holder (12).
- Page 25 1 1 5 5 . . T T r r o o u u b b l l e e s s h h o o o o t t i i n n g g This troubleshoot should help you correct the most common problems that you may encounter with the system. If the problem persists unplug your unit and contact your nearest Polaroid office. Symptoms Checklist System will not power on Check all connections are made.
- Page 26 Symptoms Checklist Repeated white spots on Caused by dirt on the film holder film rollers - clean rollers, see section 14. Curtain shaped mark or Caused by hesitation during pulling of streak on film film tab - always pull the tab out in one uninterrupted motion.
- Page 27 Polaroid has built a service infrastructure to ensure a rapid response to any issues that you encounter. Polaroid always aims to produce products of the highest quality and to support them with the service you need to keep your business running smoothly.
- Page 28 8. The use of accessories other than those recommended may cause risk of fire, electric shock or injury. PLEASE KEEP THESE INSTRUCTIONS. “Polaroid” and “Studio Polaroid” are registered trademarks of the Polaroid Corporation. Printed in Great Britain. (V)PE3-350E-M-PB 05 English...
Need help?
Do you have a question about the SP 350 and is the answer not in the manual?
Questions and answers