Table of Contents
Advertisement
Quick Links
DVD / CD WRITER
DVR-A09
Thank you for buying this Pioneer product. Please read through these operating instructions
so you will know how to operate your unit properly. After you have finished reading the
instructions, put them away in a safe place for future reference.
IMPORTANT
The lightning flash with arrowhead symbol,
within an equilateral triangle, is intended to
alert the user to the presence of uninsulated
"dangerous voltage" within the product's
enclosure that may be of sufficient
magnitude to constitute a risk of electric
shock to persons.
NOTE: This equipment has been tested and found to comply with the limits for a Class B digital device, pursuant to
Part 15 of the FCC Rules. These limits are designed to provide reasonable protection against harmful interference in
a residential installation. This equipment generates, uses, and can radiate radio frequency energy and, if not
installed and used in accordance with the instructions, may cause harmful interference to radio communications.
However, there is no guarantee that interference will not occur in a particular installation. If this equipment does
cause harmful interference to radio or television reception, which can be determined by turning the equipment off
and on, the user is encouraged to try to correct the interference by one or more of the following measures:
– Reorient or relocate the receiving antenna.
– Increase the separation between the equipment and receiver.
– Connect the equipment into an outlet on a circuit different from that to which the receiver is connected.
– Consult the dealer or an experienced radio/TV technician for help.
This Class B digital apparatus complies with Canadian ICES-003.
Cet appareil numérique de la Classe B est conforme à la norme NMB-003 du Canada.
Information to User
Alteration or modifications carried out without appropriate authorization may invalidate the user's right to operate
the equipment.
CAUTION
RISK OF ELECTRIC SHOCK
DO NOT OPEN
CAUTION:
TO PREVENT THE RISK OF ELECTRIC
SHOCK, DO NOT REMOVE COVER (OR
BACK). NO USER-SERVICEABLE PARTS
INSIDE. REFER SERVICING TO QUALIFIED
SERVICE PERSONNEL.
is a trademark of DVD Format/Logo Corporation.
- 1 -
Operating instructions
XLA
XLB
XLC
The exclamation point within an equilateral
triangle is intended to alert the user to the
presence of important operating and
maintenance (servicing) instructions in the
literature accompanying the appliance.
D3-4-2-1-1_En-A
D8-10-1-2_En
D8-10-1-3_EF
D8-10-2_En
Advertisement
Table of Contents

Related Manuals for Pioneer DVR-A09XLC


Summary of Contents for Pioneer DVR-A09XLC
-
Page 1: Operating Instructions
DVD / CD WRITER DVR-A09 Thank you for buying this Pioneer product. Please read through these operating instructions so you will know how to operate your unit properly. After you have finished reading the instructions, put them away in a safe place for future reference. - Page 2 DRW2247 - A D3-4-2-1-8_A_En IMPORTANT NOTICE – RECORD THE MODEL NUMBER AND SERIAL NUMBERS OF THIS EQUIPMENT BELOW. THE NUMBERS ARE ON THE REAR. MODEL NO. DVR-A09XLA, DVR-A09XLB, DVR-A09XLC SERIAL NO. KEEP THESE NUMBERS FOR FUTURE USE. D1-4-2-6-2_En - 2 -...
-
Page 3: Safety Instructions
POWER SOURCES - Operate this product from the type of power source indicated on the marking label. If you are not sure of the type of power available, consult Authorized Pioneer Dealer. OVERLOADING - DO NOT overload wall outlets and extension cords. Doing so can result in fire or electric shock. - Page 4 • Specific application program(s) that support above format(s) required. • Supported media required for specific DVD & CD writing speeds. • To perform DVD writing at 12x or 16x speeds, use Pioneer-designate disc media. For details, consult information available on Pioneer’s website.
-
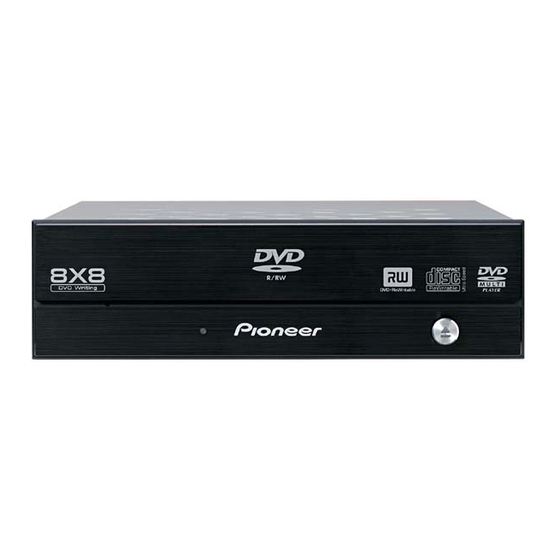
Page 5: Front View
INTERFACE FRONT VIEW REAR VIEW 1 Forced Ejection Hole 6 Device Configuration Jumper Insert a stiff rod into the hole and push to Switch goes ON when short socket is put eject the tray when the tray doesn’t unload by pressing the Eject button. In the normal Make sure the power of the drive is off operation, the eject button should be used before changing jumper setting. -
Page 6: Installation
INSTALLATION 1 Turn off the power of the personal computer and remove the power cord from the AC outlet, then remove the cover or the front panel. 2 Remove the blank panel installed on the front of the 5.25 inch slot. 3 Install the fixing slide rails on the drive. -
Page 7: Specifications
SPECIFICATIONS [Setting] This drive is Horizontal and Vertical Use. [Disc Size] 12 cm (4.72”) / 8 cm (3.15”)* * 8 cm (3.15") discs cannot be used at upright position. [Data Transfer Rate] Data Read (Sustained) Max. 22.16 MBytes/sec. Max. 6.14 MBytes/sec. (17.1 –... - Page 8 1925 East Dominguez St. Long Beach, CA 90810, U.S.A. TEL: 800-872-4159 PIONEER EUROPE NV Multimedia Division: PIONEER House, Hollybush Hill STOKE POGES, SLOUGH SL2 4QP U.K. TEL: +44-1753-789-789 PIONEER ELECTRONICS OF CANADA, INC. Industrial Products Department: 300 Allstate Parkway, Markham, Ontario L3R OP2, Canada TEL: 905-479-4411 PIONEER ELECTRONICS AUSTRALIA PTY.
Need help?
Do you have a question about the DVR-A09XLC and is the answer not in the manual?
Questions and answers