Table of Contents
Advertisement
Advertisement
Table of Contents

Summary of Contents for Pinnacle VIDEO TRANSFER
- Page 1 Pinnacle Video Transfer EU – 8420-00974-01 © 2003-2008 Pinnacle Systems, Inc.
- Page 2 All brand or product names are trademarks or registered trademarks of their respective holders. This manual is printed on chlorine-free, bleached paper using solvent-free ink. Pinnacle Systems, Inc. has written this manual to the best of its knowledge, but does not guarantee that the programs/systems will fulfill the users’ intended applications.
-
Page 3: Table Of Contents
Connections – Rear Side ................7 Operating Buttons ..................7 Step by Step......................8 Connect Power Supply and Turn Pinnacle Video Transfer On or Off....8 Connecting a Video Source ................9 Connecting the USB Device ................10 Special Features of the Various USB Devices..........10 Setting the Recording Quality................ - Page 4 Pinnacle Video Transfer Tips and Tricks....................19 Firmware Update ..................... 19 Resetting Pinnacle Video Transfer ..............20...
-
Page 5: Safety Instructions
Safety Instructions Please read and follow these instructions for your own safety, and to ensure that your device functions properly. Power Cable and Plug Please be sure to follow the following instructions in order to prevent the device from malfunctioning and to prevent electrical shock, fires, and injuries: You need to remove the power plug to completely disconnect the power. -
Page 6: Problems With Other Devices
Accessories Use only the accessories included with or recommended for the device in order to minimize the risk of fire, electrical shock or interference. CAUTION: Pinnacle Video Transfer may only be used with the mains adaptor supplied. -
Page 7: Copyrights
The CE and FCC declarations of conformity and identical construction for this product can be downloaded from http://www.pinnaclesys.com/compliance. Possible changes or additions which could no longer be included in the printed documentation are described in the readme file on the Pinnacle Internet site at http://www.pinnaclesys.com/support. Disposal and Recycling Do not dispose of electric components in the garbage. -
Page 8: Overview
Overview Welcome to Pinnacle Video Transfer Dear customer, We would like to thank you for choosing a Pinnacle product. You have made an excellent decision. You now have all the options you need for recording your favorite movies or TV shows from an analog video source directly onto your mobile USB mass storage device so that you can watch them later. - Page 9 USB Flash memory sticks External USB hard drives Files recorded on a USB Flash memory stick or an external USB hard disk with the aid of Pinnacle Video Transfer can be transferred to the following devices via iTunes®: Apple® iPod® touch Apple®...
-
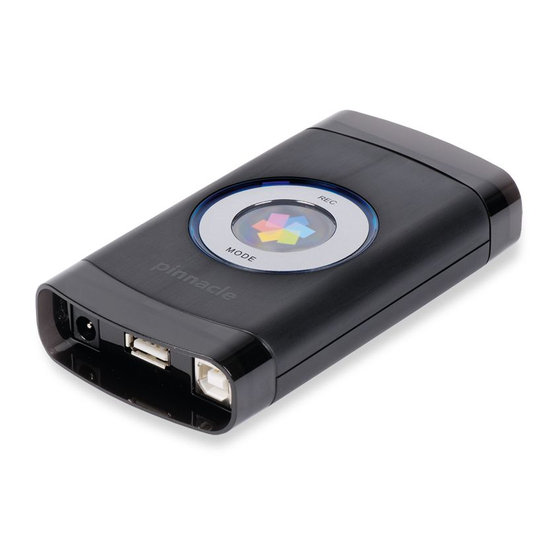
Page 10: Connections And Operating Controls On Pinnacle Video Transfer
Power adapter connector When the external power supply unit contained in the package is connected to Pinnacle Video Transfer and turned on, any connected USB device, for example, your iPod®, is also powered or charged. For this to work properly, the connected USB device must also support this function. -
Page 11: Connections - Rear Side
Overview Connections – Rear Side The video source connections are located on the rear side of Pinnacle Video Transfer. Audio input left Audio input right Composite video input S-video input Operating Buttons ON / OFF / MODE For starting and stopping a recording... -
Page 12: Step By Step
Connect Pinnacle Video Transfer to a power source using the power unit included in the box. To turn Pinnacle Video Transfer on, briefly press the MODE button. All the blue LEDs on Pinnacle Video Transfer should then briefly light up. -
Page 13: Connecting A Video Source
Step by Step Connecting a Video Source To connect the video source to Pinnacle Video Transfer, you need to use the cable included in the box (composite video cable and stereo-audio cable (RCA)). Connect the video and audio outputs on the video source to the corresponding video and audio inputs on Pinnacle Video Transfer. -
Page 14: Connecting The Usb Device
Pinnacle Video Transfer Connecting the USB Device Connect the storage device you are using to the USB-A 2.0 port on Pinnacle Video Transfer. The device recognition process begins and the USB port LED constantly glows red. If this process takes longer, a running light formed by the three quality LEDs starts up in addition to the constantly glowing red light. -
Page 15: Setting The Recording Quality
Good, Better and Best. The best recording quality is achieved if the input signal is clear and without noise and hissing, and if the Pinnacle Video Transfer S-Video input is used. The currently selected quality is indicated by the LEDs beneath the MODE... - Page 16 Select the next lower recording quality on the Pinnacle Video transfer device Use a better quality USB device for the recording, for example an external USB hard disk.
-
Page 17: Practical Tips For The Selection Of The Recording Quality
Step by Step Practical tips for the selection of the recording quality Since Pinnacle Video Transfer supports numerous formats and resolutions for your video recordings here are some practical tips regarding the respective recording qualities. „Best“ Quality Recording on USB sticks and USB hard disks with Best quality provides pictures in the highest possible resolution (technically known as "Full D1"), that... -
Page 18: Meaning Of The Led Displays
LED running light A device or signal recognition process is running. Please do not disconnect the affected inputs and USB devices from the Pinnacle Video Transfer device. LED blinking red The start of the recording was not successful or the recording was canceled due to an error, for example: The video signal was interrupted for more than 10 seconds during recording. -
Page 19: Recording
Note that recording can begin only if: The connected USB device has been detected by Pinnacle Video Transfer; in other words, the LED at the USB port must be constantly lit blue. A valid video signal is detected; in other words, the LED at the video input must be constantly lit blue. -
Page 20: Forced Recording Mode
Pinnacle Video Transfer Forced Recording Mode If you press the REC button longer than two seconds, forced recording mode is started. As opposed to normal recording mode: Any file with the same name already on the USB device will be overwritten by the recording procedure. -
Page 21: Where Are The Recordings Saved
Step by Step Where are the Recordings Saved? Recording Directories on PSP™, USB Flash Memory Sticks and External USB Hard Drives The recordings are stored in the VIDEO directory located in the main directory. If this directory does not yet exist on your USB device, it will be automatically created when recording starts. -
Page 22: Recording Directory On The Apple® Ipod
REC button for more than two seconds. The file already on the device is now overwritten. In the iPod® playlist, files recorded using Pinnacle Video Transfer are displayed formatted as "Pinnacle video xxxx", where "xxxx" stands for the consecutive 4-... -
Page 23: Tips And Tricks
Download the corresponding file from the Pinnacle Web site http://www.pinnaclesys.com/support, unpack it and then follow the instructions in the Readme file that came with the download. Do not turn off Pinnacle Video Transfer while updating the firmware and do not remove the power cable. -
Page 24: Resetting Pinnacle Video Transfer
If unexpected malfunctions occur (for example, the desired functions are no longer executed, the LED display is defective, the device no longer reacts), it may be necessary to reset Pinnacle Video Transfer. To do this, turn on the device, remove the power cable and then reconnect the power cable.
Need help?
Do you have a question about the VIDEO TRANSFER and is the answer not in the manual?
Questions and answers