HHB Portadisc MDP500 Operating Instructions Manual
Portadisc hhb portable
Hide thumbs
Also See for Portadisc MDP500:
- Service manual (49 pages) ,
- Brochure & specs (6 pages) ,
- Quick reference manual (2 pages)
Table of Contents
Advertisement
Quick Links
OPERATING
INSTRUCTIONS
La versión en español del manual de operaciones la encontrará en la web de HHB – www.hhb.co.uk
La version Française de ce manuel d'utilisation est disponible sur le site web de HHB à www.hhb.co.uk
Eine deutsche Version dieser Bedienungsanleitung ist im Internet unter der Adresse www.hhb.co.uk erhältlich.
Advertisement
Table of Contents

Related Manuals for HHB Portadisc MDP500

Summary of Contents for HHB Portadisc MDP500
- Page 1 OPERATING INSTRUCTIONS La versión en español del manual de operaciones la encontrará en la web de HHB – www.hhb.co.uk La version Française de ce manuel d’utilisation est disponible sur le site web de HHB à www.hhb.co.uk Eine deutsche Version dieser Bedienungsanleitung ist im Internet unter der Adresse www.hhb.co.uk erhältlich.
-
Page 3: Table Of Contents
CONTENTS PORTADISC MDP500 MiniDisc Recorder INTRODUCTION ......4 Setup Menu ......17 One Touch Setup Main Features . -
Page 4: Introduction
PORTADISC MDP500 MiniDisc Recorder Thank you for purchasing the HHB PORTADISC MDP500. This manual explains in detail how to use the MD recorder and also contains important advice on how to use it efficiently and safely. We recommend that you read this manual first before you start using the PORTADISC. -
Page 5: Precautions
PRECAUTIONS PORTADISC MDP500 MiniDisc Recorder The HHB PORTADISC is simple to use but, like all • Disconnect the AC adaptor and remove the batteries electrical equipment, care must be taken to ensure when cleaning. reliable, safe operation. The following points should always be observed in order to reduce the risk of fire •... -
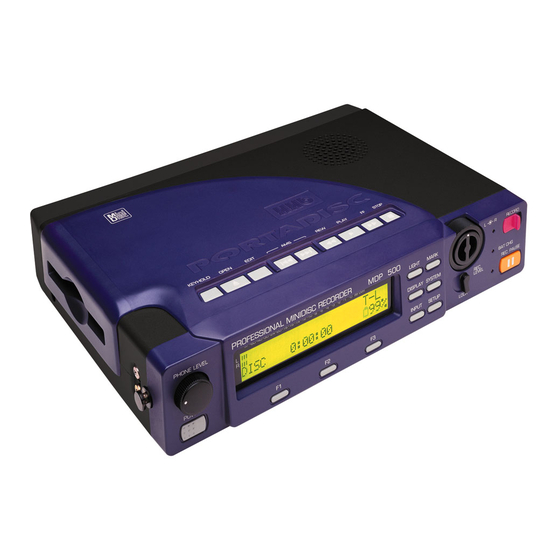
Page 6: Top Panel
TOP PANEL PORTADISC MDP500 MiniDisc Recorder BATTERY COMPARTMENT REWIND This cover slides off (from right to left in this Rewinds the track during playback. view) and underneath is the battery caddy, holding 8 x AA batteries. PLAY Use this button to start playing back the track. -
Page 7: Front Panel
FRONT PANEL PORTADISC MDP500 MiniDisc Recorder PHONE LEVEL REC LEVEL Adjusts the volume level for the headphones and Adjusts the analog recording level manually for mic monitor speaker. The control will pop out if you and line inputs. This control does not affect the press it. -
Page 8: Side Panels
SIDE PANELS PORTADISC MDP500 MiniDisc Recorder PHONES SOCKET USB CONNECTOR 1/4" jack socket for headphone connection. USB interface port for a compatible computer. LINE OUT LEFT AND RIGHT CONNECTORS OPTICAL I/O CONNECTORS (Unbalanced RCA phono.) To send analog output (TOSlink.) SPDIF digital optical connectors. -
Page 9: Lcd Display
LCD DISPLAY PORTADISC MDP500 MiniDisc Recorder 42-3 LEVEL INDICATOR DISPLAY MODE INDICATOR The bar meter shows the audio level in playback Displays the track number, record/play time, and record. (42) left hand channel (43) right remaining time, total recorded time, level hand channel. -
Page 10: Preparation
PREPARATION PORTADISC MDP500 MiniDisc Recorder BATTERY LIFE INDICATOR POWER SUPPLY When the PORTADISC is operated with batteries, the AC ADAPTOR battery icon will be shown in the bottom right hand corner of the display. The PORTADISC will automatically Use the AC mains power supply to operate the power down if there is insufficient battery life remaining. -
Page 11: Date And Time Setting
DATE AND TIME SETTING INITIALISING 1. Press the SETUP button until ‘CLOCK/DATE SETUP?’ appears. If functions on the PORTADISC behave abnormally at any time, it is a good idea to initialise the unit. 2. If you press F2, the current set-up date and time will be displayed. -
Page 12: Connections
PREPARATION cont. PORTADISC MDP500 MiniDisc Recorder SENDING DIGITAL AUDIO TO EXTERNAL DIGITAL CONNECTIONS EQUIPMENT VIA COAXIAL OR OPTICAL OUTPUTS ONE COAXIAL OR CONNECTING MICROPHONES TO THE XLR INPUT OPTICAL CABLE (Both outputs If you use a stereo microphone, connect it to the XLR indicated with arrows) mic inputs. -
Page 13: Lcd Display
DISPLAY DURING PLAY MODE LCD DISPLAY With the PORTADISC in play mode, the following The PORTADISC can display information about the information will be displayed each time you press the track, record/playback time, total recorded tracks plus DISPLAY button: time, disc space remaining, level margin, date and time in the display window. -
Page 14: Display Back Light
PREPARATION cont. PORTADISC MDP500 MiniDisc Recorder DISPLAY BACK LIGHT Press LIGHT to turn on the display back light for 5 seconds or, if you press and hold the LIGHT button, the light will stay on permanently. NOTE – We recommend minimal use of the display light when the PORTADISC is powered by batteries. -
Page 15: Recording
RECORDING PORTADISC MDP500 MiniDisc Recorder BASSCUT mode Bass cut setting RECORDING FROM A MICROPHONE 75Hz Attenuate below 75Hz 1. Press the INPUT button once to recall ‘SOURCE’ 150Hz Attenuate below 150Hz mode in order to select the correct input source settings. -
Page 16: Recording From Line Sources
RECORDING cont. PORTADISC MDP500 MiniDisc Recorder 2. Press F1 or F3 to choose ‘INTMIC’. Then press F2 RECORDING FROM LINE SOURCES to set-up. 1. Press the INPUT button once to recall ‘SOURCE’ The internal mono microphone is suitable for use identing mode. -
Page 17: Setup Menu
• RECORD Start recording HOW TO SAVE • PAUSE, RECORD Record pause followed by PAUSE Start recording 5 user memories are available, named ‘USER 1’ to ‘USER 5’. 4. Adjust the recording levels so that the peak level meters do not go beyond 0dB (marked ‘OVR’ in the 1. -
Page 18: Input Monitor Function
RECORDING cont. PORTADISC MDP500 MiniDisc Recorder 5. Press the PAUSE button to enter record pause 4. Press PAUSE, then select the track that you want to mode. Or press STOP to stop recording. record over using the AMS buttons. INPUT MONITOR FUNCTION NOTE –... -
Page 19: Auto Increment Function
AUTO INCREMENT FUNCTION When using the auto-start/cut function with a digital input, the threshold level setting will default to -80dBFS, The function enables new tracks to be created as illustrated below (with auto-start/cut on): automatically during recording. 1. Press SYSTEM until ‘TRACK-INCREMENT?’ is displayed. -
Page 20: Playback
PLAYBACK PORTADISC MDP500 MiniDisc Recorder REPEAT A-B NORMAL PLAYBACK You can repeatedly play back a certain portion within a 1. Load the MD disc to be used for playback into the track. disc opening. 1. Press the SYSTEM button until ‘REPEAT MODE ?’... -
Page 21: Editing
EDITING PORTADISC MDP500 MiniDisc Recorder The PORTADISC operates in four editing modes – erase, 1. Press the EDIT button until ‘ALL ERASE ?’ is divide, combine and move. In addition, you can also displayed. label a disc or individual tracks. These different editing... -
Page 22: Combine Function
EDITING cont. PORTADISC MDP500 MiniDisc Recorder 3. The display will repeatedly show the following 3. The display will now show the following messages: messages one after another: one after another: Rehearsal ! Rehearsal ! TRK002 EXIT TRK001+000 EXIT Track OK ! -
Page 23: Editing
2. Press the F1 button until the track number that you want to move is displayed. Then, press the F3 button to choose the destination track number of the move function. In the example given in point 1, ‘TRK003’ will move to the ‘TRK002’ position. 3. -
Page 24: Other Functions
OTHER FUNCTIONS PORTADISC MDP500 MiniDisc Recorder HEADPHONE MONITOR 1. Press the SYSTEM button until ‘HEADPHONE MONITOR’ is recalled. HEADPHONE MONITOR STEREO EXIT 2. Press F1 to select from ‘STEREO’, ‘MONO-L’, ‘MONO-R’ or ‘BOTH’ and then press F2 to confirm. Press F3 to exit. -
Page 25: Usb Installation
USB INSTALLATION PORTADISC MDP500 MiniDisc Recorder Universal Serial Bus (USB) audio transfer is provided for easy exchange of audio with a compatible computer. The format of the transfer is streaming audio – the software you are using on the computer will control the stored file format of the audio data. -
Page 26: Menu Operation
MENU OPERATION PORTADISC MDP500 MiniDisc Recorder These diagrams show the basic menu operations. Changing a page displays the current settings, with the three functions keys (F1, F2 and F3) selecting the parameters. When a parameter is flashing, pressing ‘SET’ will action this choice. -
Page 28: Display Messages
DISPLAY MESSAGES PORTADISC MDP500 MiniDisc Recorder The PORTADISC may show the following messages while No Disc! No MD disc is loaded. operating. No Track! The disc has been named but there are no tracks recorded. Blank Disc! Nothing has been recorded on the MD... -
Page 29: Md System Information
MD SYSTEM INFORMATION PORTADISC MDP500 MiniDisc Recorder The MD has a different recording system from compact cassette or DAT. Because of this, there may be circumstances when the following situations occur during operation. It should be noted that these are not faults. - Page 30 NOTES PORTADISC MDP500 MiniDisc Recorder...
-
Page 31: Technical Data
TECHNICAL DATA PORTADISC MDP500 MiniDisc Recorder GENERAL Unbalanced line output Format ....MiniDisc digital audio system Connector type ......RCA phono Disc . - Page 32 Visit HHB online at www.hhb.co.uk HHB Communications Ltd · 73-75 Scrubs Lane, London NW10 6QU, UK Tel: 020 8962 5000 · Fax: 020 8962 5050 · E-Mail: sales@hhb.co.uk HHB Communications USA LLC · 1410 Centinela Avenue, Los Angeles, CA 90025-2501, USA Tel: 310 319 1111 ·...
Need help?
Do you have a question about the Portadisc MDP500 and is the answer not in the manual?
Questions and answers