Table of Contents
Advertisement
Advertisement
Table of Contents

Summary of Contents for Cannon Security Products RadioVault
- Page 1 RadioVault Owner’s Manual REV 1 (4/12)
-
Page 2: Table Of Contents
Table of Contents Control, Indicators, and Display…………………………………………………………………………………………………..Pg. 2 Setting Up the Radio……………………………………………………………………………………………………………………….…Pg. 4 Connect the Power Source Installing/Replacing the Batteries Setting the Time and Date using the iPhone/iPod Time Sync Setting the Time and Date Manually Using the Radio………………………………………………………………………………………………………………………………… Pg. 5 Setting the Alarm Arming, Disarming, and Reviewing the Alarm (Alarm On and Off) Snooze Operation... -
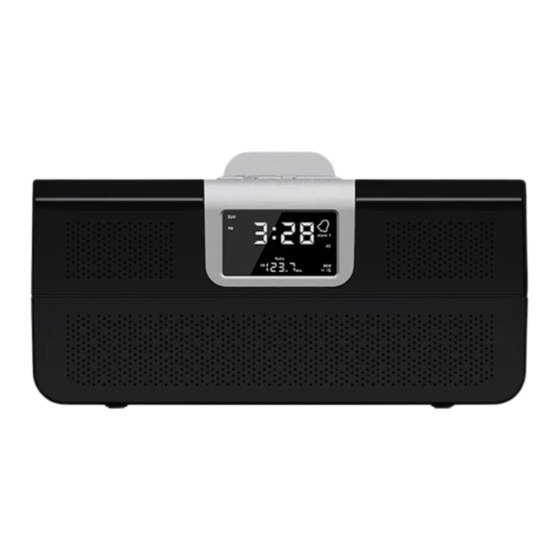
Page 3: Control, Indicators, And Display
Display, Controls, and Indicators... - Page 4 Display, Controls, and Indicators...
-
Page 5: Setting Up The Radio
Set Up the Radio Connect the Power Source The DC adapter must be plugged in for the unit to fully function. Plug the DC adapter cable into the standard 120v wall socket and the DC adapter jack on the back of the unit. Installing/Replacing the Batteries The unit requires a 9v battery be installed to provide continuous alarm, clock, and biometric operations. -
Page 6: Using The Radio
Using the Radio Setting the Alarms This unit has dual alarms that can be set to different times and different sources (Buzzer, Radio, iPhone/iPod). The frequencies of each alarm can be set to Daily, Weekdays, and Weekend. The unit must be in the OFF position. ... -
Page 7: Charging Your Iphone/Ipod
Using the Radio Charging Your iPhone/iPod Gently place the iPhone/iPod into the dock station. While docked with the DC power connected, the iPhone/iPod will recharge until full. Listening to iPhone/iPod Important: The DC adapter must be plugged in to listen to the iPhone/iPod. ... -
Page 8: Using The Aux Input
Using the Radio Using the AUX Input This unit can play any portable audio device with a standard 3.5mm headphone jack. Plug one end of a standard audio patch cord into the line-out or headphone jack on your device and the other end of the cord in the AUX in jack on the back of the unit. -
Page 9: Setting Up The Biometrics
Setting Up the Biometrics Getting Started Important: Set your keys to the side. Don’t lock them inside the safe! Make sure to remove the backup key from the unit before use and secure them. The key is for emergency use only to unlock the case in the event of fingerprint failure. ... -
Page 10: Enrolling Additional Users
Setting Up the Biometrics Enrolling Additional Users Press the ENROLL button and swipe the administrator fingerprint from Position 1 to Position 2 (Figure C) and you will hear three (3) beeps indicating the additional fingerprint is ready for enrollment. ... -
Page 11: Warning And Maintenance
Warnings and Maintenance FCC Notification for Class B Digital Device or Peripheral NOTE: This equipment has been tested and found to comply with the limits for a Class B digital device, pursuant to Part 15 of the FCC rules. These limits are designed to provide reasonable protection against harmful interference in a residential installation. - Page 12 Notes...
- Page 13 Notes...
-
Page 14: Warranty
Warranty 1. Cannon Security Products, LLC (the “Company”) warrants to the original consumer (the “Purchaser’) that this product (the “Product”) will be free from defects in workmanship and materials for a period of one (1) year from the date of purchase. These warranties are not assignable or transferable to any other person. - Page 16 WWW.CANNONSECURITYPRODUCTS.COM...
Need help?
Do you have a question about the RadioVault and is the answer not in the manual?
Questions and answers