
Related Manuals for Public Bike


Summary of Contents for Public Bike
- Page 1 Bike Owner’s Manual and Assembly Guide Ali Valentova PUBLIC Employee: Operations www.publicbikes.com +1 888 450 0123...
- Page 2 What if car drivers’ first thought when seeing someone on helpful with FAQ’s, assembly videos, and a bike was, “How great, there is one less person in a car causing congestion on my more. daily commute. ” What if bicyclists’ first thought upon seeing cars crowding a street was, “Too bad those people don’t have smart public transportation as an alternative...
-
Page 3: Table Of Contents
Contents Tech Wheels Front Wheel Secondary Retention Devices Call-Out Illustration Removing and Installing Wheels • Removing a Front Wheel General Warning • Installing a Front Wheel A Special Note to Parents • Removing a Rear Wheel • Installing a Rear Wheel Bicycle Assembly Steps Brakes Brake Controls and Features... -
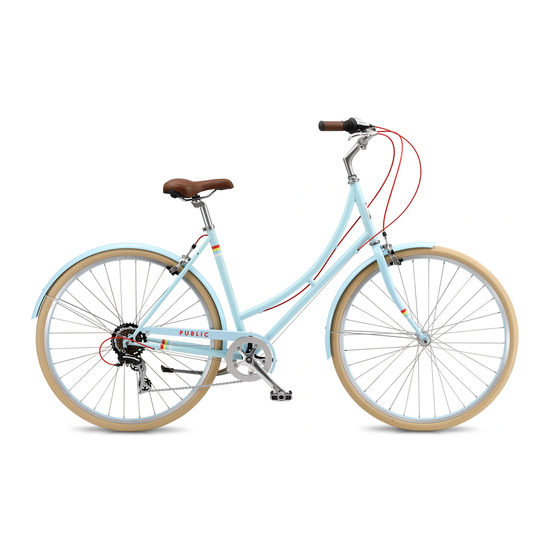
Page 4: Call-Out Illustration
Bicycle Owner’s Manual MY2012 // Model Year 2012 Modified from BPSA 9th Edition, 2007 PUBLIC www.publicbikes.com 1-888-450-0123 Wheel Chain Chainring Pedal Seat Post Seat Fender Frame Steerer Tube 10. Quill Stem 11. Handlebars 12. Brake Lever 13. Fork 14. Brakes 15. -
Page 5: General Warning
IMPORTANT This Manual contains many “Warnings” responsible for the activities and safety of This manual contains important safety, and “Cautions” concerning the conse- your minor child. Before permitting your performance and service information. Read quences of failing to maintain or inspect child ride the bicycle, you should read this it before you take the first ride on your new your bicycle and failing to follow safe... -
Page 6: Bicycle Assembly Steps
Bicycle Assembly Steps Your PUBLIC bicycle comes directly to you 99% assembled. The instructions will guide you through the additional steps necessary to complete assembly. However, PUBLIC strongly suggests having your bicycle assembled by a qualified bicycle mechanic or bicycle shop. We feel everyone needs a good local bicycle shop for follow-up service and maintenance as well. -
Page 7: Brakes
proper function. If cables are not routed properly, remove stem and move cables until correct, then reinstall and tighten stem. NOTE: The 8-speed cable is attached from below (Figure 5a), the 3-speed and 7-speed cable is attached from above (Figure 5b). FRONT BRAKE/FENDER INSTALLATION •... - Page 8 This aligns your front brake with the front wheel (Figure 13). REAR FENDER INSTALLATION • The rear fender of your PUBLIC bike comes 75% installed. To complete installation, first remove the lower strut mounting bolts from rear dropout eyelets (Figure 14).
- Page 9 • Using your hand, begin threading the right pedal into the right crankarm by turning the pedal axle CLOCKWISE Once the pedal threads are engaged (Figure 20). (ensuring no cross-threading), use a 15mm or adjustable wrench to tighten right pedal (Figure 21).
-
Page 10: First
First in any direction. See p. 14 (Seat Retention Devices) to make sure. Position). Riding with an improperly secured All PUBLIC bicycles are intended for use wheel can cause the wheel to wobble Are the stem and handlebars at the on paved roads only. - Page 11 A professional bicycle mechanic secure them. If you’re not sure, ask true a wheel unless you have the knowl- with a torque wrench should tighten someone with experience to check. edge, experience and tools needed to the fasteners on your bicycle. If you do the job correctly.
-
Page 12: First Ride
• Wheel retention system: Make lose control and fall. Skidding is another and special bicycle traffic laws. It’s your sure the front and rear wheels example of what can happen when a wheel responsibility to know and obey the laws. are correctly secured. -
Page 13: Riding Safety
• Bright, visible clothing that is not so loose that it can be tangled in the —Bert Hill, Safety Course Instructor bicycle or snagged by objects at —San Francisco Bike Coalition the side of the road. • Protective eyewear—to protect Ride defensively. Ride so that others... -
Page 14: Off-Road Safety
“When I see an adult on a bicycle, I do not despair for the future of the human race. ” —H.G. Wells 10. Never carry a passenger, unless it is We recommend that children not ride on Be prepared. If something goes wrong a small child wearing an approved rough terrain unless they are accompanied while you’re riding off-road, help may... -
Page 15: Changing Components Or Adding Accessories
Adults who choose to accept the greatly Removing reflectors will reduce your equipped with correctly positioned increased risk of riding at dawn, dusk or visibility to others using the roadway and and securely mounted reflectors. night need to take extra care both riding increases your risk of being struck by other While riding at dawn, dusk or night: and choosing specialized equipment which... -
Page 16: Fit
accessories sold by PUBLIC have been WARNING: If your bicycle does minimum standover height clearance of tested for compatibility with your bicycle, not fit properly, you may lose control and two inches (5 cm). reliability and safety. You should be aware fall. - Page 17 To find your best seat position, make only Appendix A or the manufacturer’s riders like the seat nose angled up one adjustment at a time. If the seat posi- instructions). or down just a little. If you choose to tion is not comfortable for you, contact a make your own seat angle adjustment, Once the seat is at qualified bicycle shop.
-
Page 18: Handlebar Height And Angle
“The bicycle, the bicycle surely, should always be the vehicle of novelists and poets. ” —Christopher Morley damage to the seat post, or can cause HANDLEBAR HEIGHT AND ANGLE WARNING: An insufficiently you to lose control and fall. A correctly tightened stem clamp bolt or handlebar Your bicycle is equipped with a “quill”... -
Page 19: Tech
WARNING: The shorter the brake Therefore, it is essential that you: WARNING: Do not remove or dis- lever reach, the more critical it is to have able the secondary retention device. As Understand and apply the correct correctly adjusted brakes, so that full its name implies, it serves as a back-up technique for clamping your wheel in braking power can be applied within... -
Page 20: Installing A Front Wheel
2) Loosen the bolt-on fastener(s) of hub, consult PUBLIC (toll-free, frame dropouts and pull it all the your front wheel a few turns coun- 1-888-450-0123), a qualified way in to the dropouts. ter-clockwise—using an appropriate bicycle shop or the hub manufac- 4) Replace the chain on the chainring. -
Page 21: Brake Controls And Features
Applying brakes too hard or too “[T]he bicycle will accomplish more for women’s sensible dress than all the suddenly can lock up a wheel, which reform movements that have ever been waged. ” could cause you to lose control and —Author Unknown, from Demerarest’s Family Magazine, 1895 fall. -
Page 22: Shifting Gears
“Nothing compares to the simple pleasure of a bike ride. ” —john F. Kennedy the indicated position for the desired gear ratio. The shifter is located on the inside portion of your bicycle’s right grip. After different amounts of pressure to each... -
Page 23: What If It Won't Shift Gears
WHat IF It Won’t SHIFt GeaRS? grip. After you have moved the shifter to next gear, chances are that the shift cable If moving the shift control one click repeat- the gear position of your choice, ease the or rear derailleur are out of adjustment. pressure on the pedals for an instant to Take the bicycle to a qualified bicycle shop edly fails to result in a smooth shift to the... -
Page 24: Pedals
PEDALS design. the lowest rolling resistance, but also pro- duces the harshest ride. High pressures Toe overlap is when your toe can The size and pressure rating are marked work best on smooth, dry pavement. touch the front wheel when you turn on the sidewall of the tire (see Fig. -
Page 25: Tire Valves
CAUTION: Pencil type automotive tire up; push the pump head on to the valve is critical that you have any repair or gauges can be inaccurate and should head; inflate. To inflate a Presta valve with maintenance which is not specifically not be relied upon for consistent, accu- a Schraeder valve pump fitting, you’ll need described in this manual performed by... -
Page 26: Service Intervals
“Think of bicycles as rideable art that can just about save the world. ” —Grant Petersen bicycle has been exposed to water shop to recommend a book on bicycle repair should be performed in a properly repair. equipped facility by a qualified bicycle or grit or at least every 100 miles: mechanic using the correct tools and pro- Clean the bicycle and lightly lubricate... -
Page 27: If Your Bicycle Sustains An Impact
• Grab one pedal and rock it toward • Check to make sure that all parts often related to the kind of riding you do and away from the centerline of the and accessories are still secure, and to the treatment to which you sub- bicycle;... -
Page 28: Fastener Torque Specifications
Appendix A PUBLIC Bikes, Inc. LIMITED WARRANTY PUBLIC Bikes, Inc. warrants each frame, fork, and original com- FASTENER TORQUE SPECIFICATIONS ponent part of the bicycle against defects in workmanship and • Correct tightening torque of threaded fasteners is very impor- materials: tant to your safety. - Page 30 “Life is like riding a bicycle — in order to keep your balance, you must keep moving. ” —Albert Einstein 123 SOUTH PARK SAN FRANCISCO, CA 94107 +1 888 450 0123 www.publicbikes.com...
Need help?
Do you have a question about the Bike and is the answer not in the manual?
Questions and answers