Table of Contents
Advertisement
Available languages
Available languages
Quick Links
O W N E R ' S M A N U A L
INSTALLATION • OPERATION • MAINTENANCE
SAFETY PRECAUTIONS • REPAIR PARTS
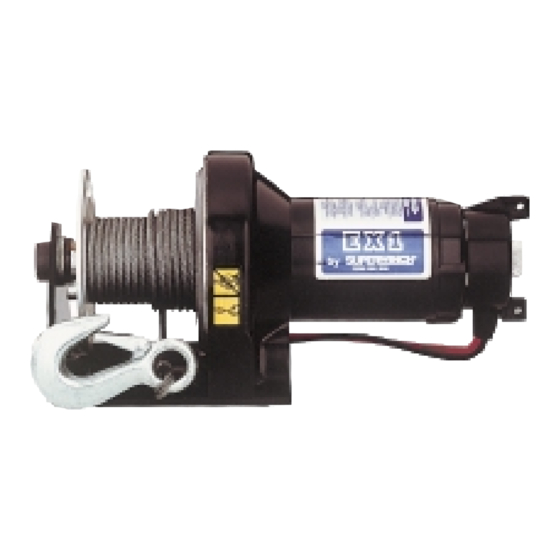
MODEL EX1
12 Volt DC Electric Winch
READ AND UNDERSTAND THIS MANUAL
BEFORE INSTALLATION AND OPERATION
OF YOUR SUPERWINCH PRODUCT.
Superwinch, Inc.
Winch Drive
Putnam, CT 06260
U.S.A.
Tel. (860) 928-7787
Fax (860) 928-1143
90-10439 Rev D– 5/15/98
Part No. 1110
Superwinch, Ltd.
Abbey Rise, Whitchurch Road
Tavistock, Devon PL 19 9DR
England
Tel. (1822) 614101
Fax (1822) 615204
Advertisement
Table of Contents

Summary of Contents for Superwince EX1
- Page 1 O W N E R ’ S M A N U A L INSTALLATION • OPERATION • MAINTENANCE SAFETY PRECAUTIONS • REPAIR PARTS MODEL EX1 12 Volt DC Electric Winch Part No. 1110 READ AND UNDERSTAND THIS MANUAL BEFORE INSTALLATION AND OPERATION OF YOUR SUPERWINCH PRODUCT.
-
Page 2: Load Capacity
I N T R O D U C T I O N Thank you very much for purchasing a Superwinch product. We hope and expect that you will be pleased with the performance and reliability of this unit. If you are not, for any reason, please contact our Customer Service Department: (860) 928-7787 USA;... - Page 3 Do not stand between the these safety guidelines. winch and load. 1. The EX1 winch is rated at 1,000 5. INSPECT WIRE ROPE AND lbs. (single-line) capacity. DO NOT EQUIPMENT FREQUENTLY. A OVERLOAD. DO NOT ATTEMPT...
- Page 4 13. AVOID CONTINUOUS PULLS G E N E R A L S A F E T Y FROM EXTREME ANGLES as I N F O R M A T I O N this will cause the wire rope to ( C O N T. ) pile up at one end of the drum (Figure 5).
- Page 5 26. Always install winch in such a G E N E R A L S A F E T Y way that the operator will be I N F O R M A T I O N standing with a comfortable ( C O N T.
-
Page 6: Electrical Installation
MOUNTING (CONT.) to the battery negative terminal (Figure 8). Be sure connections are Drill two 7/16" (12mm) diameter clean and tight. Do not connect the holes with center lines exactly switch or wiring to any other power 3-11/16" (93.66mm) apart (Figure 7) source in the vehicle. - Page 7 From Switch Circuit Protector Circuit Protector Battery Cable Solenoid Figure 10 If connection to the battery positive Secure the switch to the motor by terminal is not possible because of tightening the round thumb screw the terminal design, connect the on the outside of the switch (Figure circuit protector to the starter 12).
-
Page 8: Switch Operation
LUBRICATION O P E R A T I O N Your new winch has lifetime lubrica- tion. There will be some grease leaking SWITCH OPERATION out of the winch, especially during the When the switch springs back to the first few operations. This is normal and “OFF”... -
Page 9: Motor Does Not Operate
windings, damaging the wire T R O U B L E S H O O T I N G rope. To prevent this problem, keep the wire rope tightly and If the winch motor labors and then evenly wound on the drum at all stops, the load is too great. - Page 10 5. PREVENT KINKS BEFORE THEY OCCUR. Figure 16 a. This is the start of a kink. At this time, the wire rope should be straightened. b. The wire rope was pulled and loop has tightened into a kink. Wire rope is now permanently damaged and must be replaced.
- Page 11 R E P L A C E M E N T P A R T S L I S T Reference Number Description Part Number Handsaver 89-32300 Rotating Gear Drum 90-32038 Perimeter Bearing 90-23137 Nylon Step Washer 90-12418 Carrier Bearing 90-23140 Planetary Gearing Assembly 90-23138...
- Page 12 N O T E S...
- Page 13 N O T E S...
- Page 14 N O T E S...
- Page 15 W A R R A N T Y R E P A I R C E N T E R S U S A C A N A D A Superwinch Inc. Les Equipment Twin Winch Drive 10401 Parkway Blvd. Putnam, CT 06260 Ville D’Anjou, Quebec H1J 1R4 860-928-7787...
- Page 16 L I M I T E D W A R R A N T Y V A L I D W O R L D W I D E LIMITED WARRANTY Superwinch Inc. (“Seller”) warrants to the original buyer (“YOU”) all parts and components except wire rope to be free of defects in materials and workmanship for a period of ONE (1) year from provable date of purchase.
- Page 17 MANUAL DEL PROPIETARIO INSTALACIÓN • OPERACIÓN • MANTENIMIENTO PRECAUCIONES DE SEGURIDAD PIEZAS DE REPUESTO MODELO EX1 Cabrestantes eléctricos de 12 Volts Nº de Pieza 1110 LEA Y ENTIENDA ESTE MANUAL ANTES DE INSTA- LAR Y OPERAR SU PRODUCTO SUPERWINCH. Superwinch, Inc.
- Page 18 I N T R O D U C C I Ó N Gracias por comprar un producto Superwinch. Esperamos que esté satisfe- cho con el rendimiento y confiabilidad de esta unidad. Si no lo está por cualquier motivo, por favor comuníquese con nuestro Departamento de Servicio al Cliente al: (860) 928-7787 en E.U.A.;...
-
Page 19: Información General De Seguridad
5. INSPECCIONE FRECUENTEMENTE 1. El cabrestante EX1 está clasifica- EL CABLE DE ALAMBRE Y EL do a una capacidad (de línea EQUIPO. UN CABLE DE ALAM- sencilla) de 454 kg. (1000 lb). - Page 20 transportar gente. INFORMACIÓN GENERAL 11. Su cabrestante no está diseña- DE SEGURIDAD (CONT.) do ni destinado para opera- ciones de izado elevado. Use la BARRA PROTECTORA 12. VITE TIRAR DESDE ÁNGULOS PARA MANOS (Figura 2) inclui- EXTREMOS SIN USAR LA GUÍA da con el cabrestante para DE RODILLOS OPCIONAL Nº...
-
Page 21: Montaje
TAPE LAS ETIQUETAS DE INFORMACIÓN GENERAL ADVERTENCIA O DE INSTRUC- DE SEGURIDAD (CONT.) CIONES. Es posible que alguien que no haya leído CABRESTANTE O A SU este manual tenga que verlas ALREDEDOR (LA ZONA DE para entender la operación PELIGRO), para que no se correcta del cabrestante. -
Page 22: Instalación Eléctrica
MONTAJE CONT. Tornillo de una camioneta o camión Rondana plana pequeño o la base de cabrestante de un remolque. El cabrestante puede montarse en Rondana plana posición horizontal o vertical Rondana (Figura 6.) No monte el de presión Soporte cabrestante donde haya la posibili- Tuerca dad de que se sumerja en agua. - Page 23 Comenzando desde el cabrestante, Si la conexión a la terminal positi- pase los cables dentro del compar- va de la batería no es posible por timento del motor. Si es posible, el diseño de la terminal, conecte el use las rutas y soportes del cablea- protector de circuito al lado «vivo»...
- Page 24 I N S T A L A C I Ó N ( C O N T. ) Apagado Cable Asegure el interruptor al motor hacia apretando el tornillo de mariposa afuera del exterior del interruptor (Figura Cable hacia 12). Las cuerdas se atornillan en el adentro orificio roscado dentro del contac- Figura 13...
-
Page 25: El Motor No Funciona
CABLE DE ALAMBRE 1. Quite el interruptor y luego vuélvalo a poner en el motor, Una pieza de su cabrestante que asegurándose que esté alineado requiere de atención periódica y correctamente sobre los contac- reemplazo con el tiempo es el cable tos de bronce del motor y que de alambre. - Page 26 que la carcasa. Para revisar la tem- a. Este es el comienzo de una peratura del motor, deje de tirar y torcedura. En este momento debe toque cuidadosamente la carcasa enderezarse el cable de alambre. del motor. Si es motor está b.
- Page 27 L I S T A D E P I E Z A S D E R E F A C C I Ó N Referencia Descripción de Pieza Cant. Barra protectora para manos 89-32300 Tambor de engrane giratorio 90-32038 Rodamiento de perímetro 90-23137 Rondana de paso de nilón 90-12418...
- Page 28 N O T E S...
- Page 29 N O T E S...
- Page 30 N O T E S...
- Page 31 C E N T R O S D E R E P A R A C I O N D E G A R A N T I A E U A C A N A D A Superwinch Inc. Les Equipment Twin Winch Drive 10401 Parkway Blvd.
- Page 32 G A R A N T Í A L I M I T A D A Válida en Todo el Mundo GARANTÍA LIMITADA. Superwinch Inc. (“Vendedor”) le garantiza al comprador original (“UD.”) que todas las partes y componentes excepto el cable están libres de defectos en materiales y mano de obra, durante un periodo de (UN) 1 año a partir de la fecha de compra demostrable.
- Page 33 M O D E D ’ E M P L O I INSTALLATION • FONCTIONNEMENT • ENTRETIEN PRÉCAUTIONS DE SÉCURITÉ • PIÈCES DE RÉPARATION MODÈLE EX1 Treuils électriques de 12 volts DC Numéros de pièces 1110 LISEZ ET COMPRENEZ CE MODE D’EMPLOI AVANT D’INSTALLER ET DE FAIRE FONCTIONNER...
- Page 34 I N T R O D U C T I O N Merci de votre achat d’un produit Superwinch. Nous espérons et nous sommes confiants que vous serez satisfait et de la performance et de la fiabilité de cet appareil. Si vous ne l’êtes pas, pour quelque raison que ce soit, veuillez contacter le Service Clientèle au : + 860 928 7787 (U.S.A.);...
-
Page 35: Informations Générales De Sécurité
N’enjambez 1. Le treuil EX1 a une capacité de jamais un câble tendu et inter- valeur nominale de 1000 livres disez aux autres d’en faire (454 kg) (à... - Page 36 levage ou de déplacement de INFORMATIONS GÉNÉRALES personnes. DE SÉCURITÉ (Suite) 11. Votre treuil n’est ni destiné ni conçu pour les opérations de levage. 12. N’ESSAYEZ PAS DE TREUILLER À L’ANGLE SANS UTILISER UN GUIDE-CÂBLE FACULTATIF (NO. DE PIÈCE 1507 OU 1560), car l’absence de guide-câble pour- Figure 2 rait endommager le treuil et...
-
Page 37: Installation
24. N’INSTALLEZ JAMAIS LE INFORMATIONS GÉNÉRALES TREUIL DE TELLE MANIÈRE DE SÉCURITÉ (Suite) QUE LES ÉTIQUETTES D’AVER- TISSEMENT ET DE CONSIGNES TREUIL OU À PROXIMITÉ DE SOIENT CACHÉES. Une person- CEUX-CI (ZONE DE DANGER) ne n’ayant pas lu ce mode de manière à... -
Page 38: Installation Électrique
treuiller. Les emplacements sug- INSTALLATION ÉLECTRIQUE gérés sont : le pare-chocs avant ou Ce treuil fonctionne sur un arrière plat d’un véhicule ou le courant automobile direct stan- plateau d’un camion ou le support dard de 12 volts. de treuil d’une remorque. Ne connectez Le treuil peut être monté... - Page 39 En commençant au treuil, faites Si la connexion à la borne positive passer les fils dans le comparti- de la batterie n’est pas possible à ment du moteur. Utilisez si possi- cause de la conception de la ble le support et le cheminement borne, connectez la protection au pour les fils existant déjà.
-
Page 40: Entretien
Fixez le commutateur au moteur en serrant la vis à oreilles ronde Eteint Embobinage sur l’extérieur du commutateur (Figure 12). La vis se visse dans l’orifice taraudé entre les contacts en laiton du moteur (Figure 11). Débobinage N’utilisez pas de pince pour serrer la vis à... - Page 41 CÂBLE MÉTALLIQUE 1. Retirer le commutateur et Une partie du treuil qui exigera replacez-le ensuite sur le votre attention et que vous devrez moteur en vous assurant qu’il remplacer après un certain temps est correctement aligné sur les est le câble métallique. Inspectez connecteurs en laiton du régulièrement le câble pour voir moteur et que la vis à...
- Page 42 5. EMPÊCHEZ LES BOUCLES AVANT QU’ELLES NE SE PRODUISENT. 2. NE LAISSEZ PAS SURCHAUFFER LE MOTEUR DU TREUIL. N’oubliez pas que le treuil est conçu pour une utilisation inter- mittente. Pendant des tractions longues ou lourdes, le moteur chauffera. Les pièces internes seront plus chaudes que le carter.
-
Page 43: Liste De Pièces De Rechange
LISTE DE PIÈCES DE RECHANGE Numéro de référence Description Numéro de piéce Qté Barre protège-mains 89-32300 Tambour d’entraînement rotatif 90-32038 Palier de contour 90-23137 Rondelle étagée en Nylon 90-12418 Roulement porteur 90-23140 Assemblage d’entraînement planétaire 90-23138 Roue solaire à 10 dents 90-22865 Rondelle d’appui plate 90-23120-08... - Page 44 N O T E S...
- Page 45 N O T E S...
- Page 46 N O T E S...
- Page 47 CENTRES DE REPARATION SOUS GARANTIE É T A T S - U N I S C A N A D A Superwinch Inc. Les Equipment Twin Winch Drive 10401 Parkway Blvd. Putnam, CT 06260 Ville D’Anjou, Quebec H1J 1R4 860-928-7787 514-353-1190 repair@superwinch.com DJT Automotive...
- Page 48 G A R A N T I E L I M I T É E VALABLE A TRAVERS LE MONDE GARANTIE LIMITÉE. Superwinch, Inc. (le “Vendeur”) garantit à l’acheteur d’origine (“vous”) que toutes les pièces et composants, à l’exception du câble métallique, sont sans vice de matériaux ou de fabrication, et ce, pendant une période d’un (1) an à...
Need help?
Do you have a question about the EX1 and is the answer not in the manual?
Questions and answers