Table of Contents
Advertisement
Quick Links
Advertisement
Table of Contents

Related Manuals for Avermedia AVerLife 0272


Summary of Contents for Avermedia AVerLife 0272
-
Page 1: User Manual
AVerLife ExtremeVision Media Player O272 English User Manual... - Page 2 No part of this document may be reproduced or transmitted in any form, or by any means without the prior written permission of AVerMedia Technologies Inc. AVerMedia Technologies Inc. reserves the right to modify its models, including their characteristics, specifications, accessories and any other information stated herein without notice. The official printout of any information shall prevail should there be any discrepancy between the information contained herein and the information contained in that printout.
- Page 3 BATTERY SAFETY INFORMATION - Store the batteries in a cool dry place. - Do not dispose of used batteries in domestic waste. Dispose of batteries at special collection points or return to point of sale if applies. - Remove the batteries during long periods of non-use. Always remove exhausted batteries from the remote control.
- Page 4 Input: 100-240V~, 50-60Hz 0.5A Max. Output: 12V 1.5A Dimension Size 250 mm(W) x 44 mm (H)x 221.8 mm (D) Weight 1 kg Environmental Condition 0~40 ℃ Operating Temperature International Headquarter Address No.137, Jian 1st Rd., Zhonghe Dist., New Taipei City 23585, Taiwan (R.O.C.) Website www.avermedia.com/avertv Telephone 886-2-2226-3630...
-
Page 5: Table Of Contents
Table of Contents PACKAGE CONTENTS ...................... 3 HARDWARE OVERVIEW ....................4 PERIPHERAL CONNECTIONS ................... 5 USING REMOTE CONTROL ..................... 7 FIRST START-UP AND FIRMWARE UPGRADE ............... 10 5.1 S TV M .................... 10 ETUP FOR 5.2 W ..................10 IRED ETWORK ETUP 5.3 W... - Page 6 Q: W ’ ? ......... 42 HY CAN CONNECT THE PLAYER TO MY HOME NETWORK Q: I USB HDD E ? ..........42 XTERNAL NCLOSURE NOT SUPPORTED ENG-2...
-
Page 7: Package Contents
About this User’s Manual This User’s Manual gives you the fastest way for hand-on procedure to enjoy multimedia with AVerLife ExtremeVision Media Player. 1 Package Contents The product package contains the following items: High Gain USB Wireless Adapter AVerLife ExtremeVision Media Player (Optional) Composite Cable Component Cable... -
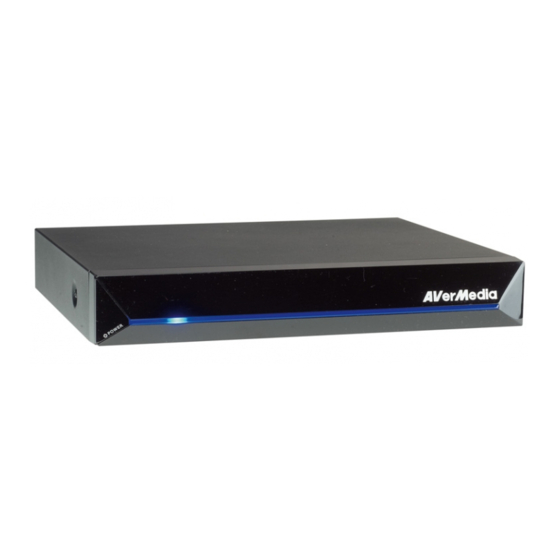
Page 8: Hardware Overview
2 Hardware Overview Power On / Off FRONT VIEW USB/ E-S ATA Port Power Port ComponentVideo Output USB Port Composite Output HDMI Output S/PDIF Port Ethernet Port REAR VIEW Power ON/Off Press to turn the unit on/into stand-by mode. ... -
Page 9: Peripheral Connections
3 Peripheral Connections The figure below shows the proper cable connections between AVerLife ExtremeVision Media Player and your audio/video equipments. Use one of the connections (A) ,(B) and (C) below to output the signal to your TV. The (A) (B) (C) connections serve the same purpose;... - Page 10 The USB port (5) is for HDD enclosure, flash drive, keyboard, mouse, or wireless dongle (Optional). * Contact an AVerMedia representative for a USB Wi-Fi dongle to connect your AVerLife ExtremeVision Media Player to the wireless network. *Supported File Systems: FAT, FAT 32, NTFS, EXT3, HFS+ ...
-
Page 11: Using Remote Control
4 Using Remote Control Use the remote control to navigate the menu, and to select and watch videos, listen to music, or view photos on your television. KEYPAD FUNCTION DESCRIPTION Press to turn the unit on/into stand-by mode. (POWER) * Stand-by mode: power-saving sleep mode. (HOME) Press to directly access the main page. - Page 12 (WEB) Press to directly access Web page. In Media playback mode: Press to sort the files stored in the same folder alphabetically / (SORT) alphabetically backwards / by size. While using web browser: Press to call up the on-screen keyboard. In Video &...
- Page 13 In Photo viewing mode: Press to play the background music. In Media playback mode: (Func) Press to select viewing mode/sorting/BGM function keys. (Eject) Press to safely remove the external storage device. Press to set/cancel A-B repeat mode. Press to copy selected files/ folders either between USB storage devices (BACKUP) or between USB storage device and e-SATA HDD.
-
Page 14: First Start-Up And Firmware Upgrade
5 First Start-up and Firmware Upgrade 5.1 Setup for TV Mode Please set the video source selector of your TV to match the connection from your AVerLife ExtremeVision Media Player. For example, if you use HDMI, set the TV to use the correspondent HDMI input port. -
Page 15: Wireless Network Setup (Optional)
5.3 Wireless Network Setup (Optional) AVerLife ExtremeVision Media Player supports wireless Ethernet with a USB Wi-Fi dongle supplied by AVerMedia. And please be noted that a USB Wi-Fi dongle not authorized by AVerMedia is NOT supported. For video of very high bit rate, streaming with a wired connection between AVerLife ExtremeVision Media Player and home router is recommended. - Page 16 ENG-12...
-
Page 17: Firmware Upgrade Procedure
5.4 Firmware Upgrade Procedure AVerMedia regularly releases the latest version of firmware for AVerLife ExtremeVision Media Player. Having the latest firmware enhances the functionality of AVerLife ExtremeVision Media Player. There are two ways to upgrade the firmware of AVerLife ExtremeVision Media Player: (1) via USB storage device, and (2) via the Internet. - Page 18 Upgrading the Firmware via the Internet To upgrade the firmware via the Internet, Please refer to the following procedure: 1. Select Setup Main Menu > Version > Firmware Update > Internet Upgrade. 2. The system will then automatically search for the available firmware code from the Internet.
-
Page 19: Media Sources
Then press OK to start the playback. * Please make sure AVerLife ExtremeVision Media Player is not on the firewall block list of your UPnP servers. *For how to enable UPnP in Windows 7/Vista/XP, please download the “UPnP Setup Procedure” from http://www.avermedia.com/Product/ProductDetail.aspx?Id=515&tab=UserManual. ENG-15... -
Page 20: Network Neighborhood (Samba Client)
6.2 Network Neighborhood (Samba Client) This feature enables you to access shared media content from the NAS device or computer on the same network. Before using this function, please make sure: (1) the AVerLife ExtremeVision Media Player is properly connected to a LAN with Internet access, and (2) no firewall is blocking the shares from remote sites. -
Page 21: Local Storage Device
6.3 Local Storage Device AVerLife ExtremeVision Media Player provides both USB and E-SATA interface for connecting your storage devices. Note: The number of USB ports can be extended by a USB hub, please be careful of the extra power consumption for the extra devices. AVerLife ExtremeVision Media Player itself supplies limited power (1.1A) for the USB port. -
Page 22: Enjoying Multimedia
7 Enjoying Multimedia 7.1 Playing Music, Photo and Video Files The AVerLife ExtremeVision Media Player enables you to play music/photo/video files stored in the external storage devices. Supported media formats are listed as below: WMA, WMA9, WMA-Pro, MP1/2/3, LC-AAC, HE-AAC, OGG, WAV/PCM/LPCM, Audio DTS,Dolby Digital, Vorbis, FLAC, M4A, MKA, Dolby True-HD(Pass Through), Photo... - Page 23 (BGM) Press to play or manage the background music. (BACK) Press to return to the previous page. (HOME) Press to directly access the main page. * To switch audio languages, subtitle languages, or aspect ratios while playing video, press ▲/▼/◄ / ► the remote control.
- Page 24 Adding and Playing Background Music: This function provides easy access to background music playback. The following steps show how to add background music and play your favorite songs while viewing photos: 1. While playing music, press (BGM) add the song into background music list. Press again to remove it from (BGM)
- Page 25 4. Choose a target destination. Press OK to confirm. ENG-21...
-
Page 26: Web Browser
7.2 Web Browser The web browser enables you to surf the web using the remote control or keyboard/mouse. Note: An USB interface keyboard and mouse can be plugged to facilitate your web surfing experience. Make sure you plug it in before you using the Web Browser. Accessing Web Browser: On the main menu, select Web Browser. - Page 27 Description on the Icons in the Address Bar: Press on the remote control to select the address bar at the top of the browser window. Then use on the remote control to move among options. Press OK to confirm. Icons Function Go to the homepage.
- Page 28 Description on the Browser Menu: The browser menu at the left bottom of the screen allows you to easily browse the webpage. (MENU) on the remote control. Use ▲/▼/◄ / ► to To call up the browser menu, press select among options and press OK to confirm. Press (MENU) again to exit the browser menu .
- Page 29 RSS (Really Simple Syndication): When there’s an RSS (Really Simple Syndication) icon like on a webpage, that means the page can be viewed with RSS format used to publish frequently updated works—such as blog entries, news headlines, audio, and video. An RSS document (which is called a "feed", "web feed"...
- Page 30 Customize Quick Access to Your Favorite Websites: This function allows you to manage your commonly visited websites and provides quick access to your favorite websites. You can also organize your bookmarks into categories. Please follow the steps below: 1. Select Web Browser > Customize. Press (WEB) on your remote control.
- Page 31 Signing in Yahoo! Mail: To sign in Yahoo! Mail, please follow the steps below: 1. Select Web Browser > Yahoo Mail. Press (WEB) on your remote control. Then select “Yahoo Mail”. 2. Input the user name (Yahoo!ID) and password using the on-screen keyboard. Then move the cursor over Sign in.
-
Page 32: Youtube
7.3 YouTube YouTube XL, a simplified version of YouTube, provides you an easy access to view YouTube clips on your large screen TV. Note: Login-related functions are not supported on AVerLife ExtremeVision Media Player. Accessing YouTube: 1. On the main menu, select Web Browser. Press (WEB) on your remote control. - Page 33 Page scrolling controls. Description on the Sidebar: The side menu bar on the left of the screen offers access to several video filters, searching function, settings page, and YouTube information. Videos: The Videos tab provides access to spotlight, top rated, and most viewed videos. The “More” link offers additional categories that you can navigate to.
- Page 34 On the video page, there are five buttons on the bottom. You can select “Info” to display video information and “Related” to see related video entries. Note: Login-related functions (“Favorite”, “Flag”, and “Share”) are not supported on AVerLife ExtremeVision Media Player. To go to the previous page, select <...
- Page 35 You can also use the search box at the upper right of the screen to search for a topic on YouTube. Settings: Several settings options are available in the Settings tab. To turn on the function of auto-playing the next video, select “Play next video when current video ends”...
-
Page 36: Play Internet Radio- Live 365
About: The About tab displays information regarding YouTube XL. 7.4 Play Internet Radio- Live 365™ Live365™ is an Internet radio service that provides unlimited on-demand access to thousands of radio stations. The audio is streamed directly over the Internet. Before using this function, please make sure your network is properly set up. -
Page 37: Shoutcast
* Press (BGM) on the remote control to add the selected radio station into background music list. *To access a list of your preset radio stations, select iMedia > Live365 > My Preset. Then input the account name and password. 7.5 SHOUTcast™... -
Page 38: Flickr
7.6 Flickr AVerLife ExtremeVision Media Player allows you to browse photos from the Flickr Web albums. Before using this function, please make sure your network is properly set up. Please follow the steps below to access the photo archive: Exploring What’s New: 1. - Page 39 2. Input your username and password using the on-screen keyboard. Press OK on the remote control to confirm. 3. Use ▲/▼/◄ / ► to select the photo you wish to view from the thumbnails list. Press OK to view the selected photo in full screen.
-
Page 40: Picasa
7.7 Picasa AVerLife ExtremeVision Media Player allows you to browse photos from the Picasa Web albums. Before using this function, please make sure your network is properly set up. Please follow the steps below to access the photo archive: Exploring What’s New: 4. - Page 41 2. Input your username and password using the on-screen keyboard. Press OK on the remote control to confirm. 3. Use ▲/▼/◄ / ► to select the photo you wish to view from the thumbnails list. Press OK to view the selected photo in full screen.
-
Page 42: News Reader
7.8 News Reader RSS News Reader allows you to view and organize the latest news from a bunch of sources. Before using this function, please make sure your network is properly set up. Please follow the steps below to use News Reader: Viewing RSS Feeds: 1. - Page 43 2. Use▲/▼to select <<Add>> and press OK to confirm. 3. Input the URL of a new RSS feed and use▲/▼to select “Save”. Press OK to confirm. ENG-39...
-
Page 44: Bittorrent Download
7.9 BitTorrent Download BitTorrent is a peer-to-peer file sharing protocol used for distributing large amounts of data. Before using this function, please make sure your network is properly set up. Note: An external storage device is required for BitTorrent downloading. Please note that only NTFS file system is supported. - Page 45 Managing Torrent: 1. Transferring the .torrent files to your own storage device and then plug it into AVerLife ExtremeVision Media Player. 2. Power on AVerLife ExtremeVision Media Player. 3. Select BitTorrent Download on the main menu. Press OK. 4. Use▲/▼to select an item. 5.
-
Page 46: Faq
Q: Why can’t I see anything on TV screen? Answer: Please select the correct signal input on your TV set. If you connect the player to TV via HDMI, please select the right HDMI port no. on your TV set; if you connect the player to TV via A/V port, please select the right A/V port no.
Need help?
Do you have a question about the AVerLife 0272 and is the answer not in the manual?
Questions and answers