Table of Contents
Advertisement
Advertisement
Table of Contents

Subscribe to Our Youtube Channel
Summary of Contents for A-Maize-Ing Heat LDJ991
- Page 1 Model LDJ991 Boiler Model LDJ991-10 Boiler Model 14 Bin LDJ991_E01_R03_2006.03...
- Page 2 Boiler tested and certified by Underwriters Laboratories A-MAIZE-ING HEAT®, and A-MAIZE-ING HEAT® Logo are registered trademarks of LDJ Manufacturing, Inc. in the U.S. and/or other countries. No part of this manual may be reproduced in any form or by any means, electronic or mechanical, including photocopying, recording, or by any information storage and retrieval systems, without the express written consent of LDJ Manufacturing, Inc.
-
Page 3: Table Of Contents
Variable BTU Timer (LDJ991-10 only) ........16... - Page 4 Wiring Diagram: LDJ991 100,000 BTU Boiler ........
-
Page 5: Warranty
LDJ Manufacturing, Inc. within 30 days of date of purchase, warranty claims on your unit ® may be denied. All warranty claims must be reported to the nearest A-MAIZE-ING HEAT dealer. I S C L A I M E R O F I A B I L I T Y The foregoing warranty constitutes the only warranty made by LDJ Manufacturing, Inc. -
Page 6: Safety Instructions
If you have any questions about this product or its installation, please contact us: Address LDJ Manufacturing, Inc. 1833 Hwy 163 Pella, Iowa 50219 Phone 641 • 620 • 9412 866 • 535 • 7667 641 • 620 • 8302 Website www.cornheat.com Email info@ldj-products.com Models LDJ991 and LDJ991-10 LDJ991_E01_R03_2006.03... -
Page 7: Installation And Location Considerations
O C A T I O N O N S I D E R A T I O N S ® Failure to install the A-MAIZE-ING HEAT boiler according to the guidelines and instructions contained within this manual may result in serious injury or death, property damage, or voiding of the warranty. -
Page 8: Combustion Air Requirements
For more information on venting with listed firebox. chimneys, refer to “Venting Information” on page 29. • A minimum distance of 18" must be maintained between the connection pipe and combustible wall surfaces. Models LDJ991 and LDJ991-10 LDJ991_E01_R03_2006.03... -
Page 9: Barometric Draft Controls
Step 1: Remove all shipping materials and remove boiler from pallet. Step 2: Place boiler at desired location. Step 3: Remove auger motor assembly and hardware package from ash pan drawer. LDJ991_E01_R03_2006.03 Models LDJ991 and LDJ991-10... -
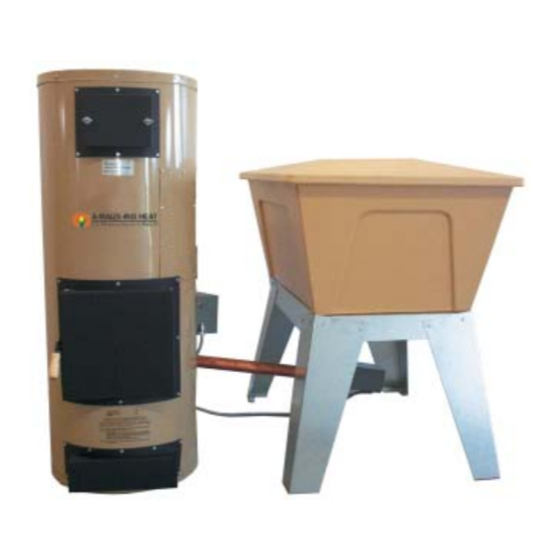
Page 10: Unpacking And Setup - Storage Bin
Step 10: Install cover on auger motor housing. Step 4: Slide auger boot (6) with clamp (7) over bin outlet. Tighten clamp securely. Models LDJ991 and LDJ991-10 LDJ991_E01_R03_2006.03... -
Page 11: Plumbing
14) after the installation of the boiler is Step 3: Hold gauge in position and install one complete and a fire has been built 1-3/4" screw through top hole (1); do not fully tighten. LDJ991_E01_R03_2006.03 Models LDJ991 and LDJ991-10... - Page 12 Step 10: At the top of the unit, connect the hoses to it. • Connect the all white hose to the port marked HIGH (6). • Connect the white hose with the red line to the port marked LOW (7). Models LDJ991 and LDJ991-10 LDJ991_E01_R03_2006.03...
-
Page 13: Electrical Connections
Step 1: Take low-limit switch box (2) and locate on chimney vent. Step 2: Attach box and switch (3) to chimney vent with four sheetmetal screws (4). IMPORTANT: Make sure switch (3) is turned as shown to prevent terminal contact with box. LDJ991_E01_R03_2006.03 Models LDJ991 and LDJ991-10... -
Page 14: Operation
NOTE: When lighting the LDJ991-10 boiler (variable BTU output), always light it with the boiler set for 100,000 BTU output. After the boiler has run for thirty minutes, make the desired adjustments to the output. - Page 15 (the auger motors will not turn until the boiler has reached operating temperature). Keep the switch in the START position for 5 to 10 minutes, or until you see a good even fire. LDJ991_E01_R03_2006.03 Models LDJ991 and LDJ991-10...
-
Page 16: Draft Adjustment
Manufacturing, Inc. for assistance. Step 5: To maintain the fire, a boiler timer will activate the fuel feed system for a short period of time followed by a longer period of no fan or auger activity (LOW FIRE). Models LDJ991 and LDJ991-10 LDJ991_E01_R03_2006.03... -
Page 17: Power Failure Instructions
To maintain the fire, the low fire timer will activate the fuel feed system for a short period of time followed by a longer period of no fan or auger activity (LOW FIRE). Adjusting the on and LDJ991_E01_R03_2006.03 Models LDJ991 and LDJ991-10... -
Page 18: Variable Btu Timer (Ldj991-10 Only)
Boiler Installation and Owners Manual Variable BTU Timer (LDJ991-10 only) Below are suggested timer settings to obtain various BTU outputs from the LDJ991-10 boiler when burning corn. The actual BTU output may vary depending upon the characteristics of the fuel being burned. Contact LDJ Manufacturing for settings for other fuels (pellets, etc.). -
Page 19: Maintenance
If the ashes are disposed of by burying in soil or otherwise dispensed, they should be retained in the closed container until all clinkers have thoroughly cooled. LDJ991_E01_R03_2006.03 Models LDJ991 and LDJ991-10... -
Page 20: Monthly Maintenance
Clean, oil, and inspect all blower, auger, and connections. Clean out ash buildup in pipes. pump motors. This includes the burner fan, Replace any pipe showing any signs of burner auger, storage bin auger, and “burning through”. circulation pump. Models LDJ991 and LDJ991-10 LDJ991_E01_R03_2006.03... -
Page 21: Troubleshooting
Fire goes out Chimney draft too high; clinkers are building up. Boiler inefficient and has too much ash Wet or dirty corn; not enough combustion air; not enough draft; not enough OFF time during low fire operation. LDJ991_E01_R03_2006.03 Models LDJ991 and LDJ991-10... -
Page 22: Poor Combustion
Corn cob or stalk is stuck in auger; boiler Clean/repair as necessary. has smoked back through the auger tube causing a build up of sticky residue. Burn auger has stopped, forcing hopper Clean/repair as necessary. auger to bind up. Models LDJ991 and LDJ991-10 LDJ991_E01_R03_2006.03... -
Page 23: Inefficient Operation And/Or Operating Too Hot
Not enough time between idle cycles Try changing timer — if set at 2 & 6, (indicated by fire pushing out the top). change to 2 & 7 (experimentation may be necessary). LDJ991_E01_R03_2006.03 Models LDJ991 and LDJ991-10... -
Page 24: Mechanical / Electrical
24V trans- Verify HEAT signal from thermostat. former. Check heat relay. The START/OFF/ON switch left in START Change switch to ON. position after starting fire in burn pot. Models LDJ991 and LDJ991-10 LDJ991_E01_R03_2006.03... -
Page 25: Wiring Diagram: Ldj991 100,000 Btu Boiler
Switch 210°F Closes on temp. rise H-BK H-BK Low Fire Timer/Relay (LF) Bin Auger timer Motor BLUE Burner Relay (HR) Furnace Auger Motor Relay BLUE START START Combustion Toggle Switch Blower Motor Boiler Control Box LDJ991_E01_R03_2006.03 Models LDJ991 and LDJ991-10... -
Page 26: Wiring Diagram: Ldj991-10 165,000 Btu Variable Rate Boiler
Boiler Installation and Owners Manual : LDJ991-10 165,000 BTU V I R I N G I A G R A M A R I A B L E A T E O I L E R 120V 120V NEUTRAL Fuse... -
Page 27: Repair Parts
Burn Pot Auger Motor - 6 rpm — 3180 Lock Collar 1980 Bolt, 1/4" x 1/2" Self Tapping 3200 Burn Pot Auger Flighting 2070 Screw - Sheet Metal, #10 x 1-3/4" 3000 Auger Support 1410 6" x 6" Box LDJ991_E01_R03_2006.03 Models LDJ991 and LDJ991-10... -
Page 28: Hopper Bin Auger
Bin Auger Motor - 4 rpm — 1410 6" x 6" Box A-3070 Auger Support 5000 Lag Bolt - 1/4" x 1" 7530 Rubber Tee A-7540 Bin Auger Tube 1480 Conduit Fitting A-1550 Flex Conduit Models LDJ991 and LDJ991-10 LDJ991_E01_R03_2006.03... -
Page 29: Storage Bin - Model 14
Boiler Installation and Owners Manual Storage Bin - Model 14 Part Part Description Quantity Used Number LDJ620-9 LDJ620-10 7520 Bin Lid 7500 Bin Cavity 7510 Bin Base 7520 Shutoff Valve LDJ991_E01_R03_2006.03 Models LDJ991 and LDJ991-10... -
Page 30: Boiler Electrical
1630 Aquastat Relay (inside box) 1642 Pressure / Temperature Gauge 1645 Pressure Relief Valve 1660 Low-Limit Switch (chimney vent temperature) 1636 High-Limit Control 1680 START/OFF/ON Switch 1620 Low Fire Timer (inside box) 1860 Combustion Fan Models LDJ991 and LDJ991-10 LDJ991_E01_R03_2006.03... -
Page 31: Addendum
Boiler Installation and Owners Manual D D E N D U M Venting Information LDJ991_E01_R03_2006.03 Models LDJ991 and LDJ991-10... - Page 32 Boiler Installation and Owners Manual Models LDJ991 and LDJ991-10 LDJ991_E01_R03_2006.03...
-
Page 33: Barometric Draft Control Information
Seal with high temperature RTV silicone or high temperature foil tape UL listed for the temperature of the application. For proper settings and operation of the burner and the draft combustion testing instrumentation and draft gauges must be used. LDJ991_E01_R03_2006.03 Models LDJ991 and LDJ991-10... - Page 34 In mild weather when less heat is needed, or the fire is to be banked, close ash pit draft door partly or entirely. If desired, a check damper also can be used when banking the fire. Page 2 PN 02702600 Rev A 10/00 Models LDJ991 and LDJ991-10 LDJ991_E01_R03_2006.03...
Need help?
Do you have a question about the LDJ991 and is the answer not in the manual?
Questions and answers