Table of Contents
Advertisement
Quick Links
Advertisement
Table of Contents

Subscribe to Our Youtube Channel
Related Manuals for VistaQuest Digital Video Camcorder


Summary of Contents for VistaQuest Digital Video Camcorder
- Page 1 Digital Video Camcorder User’s Manual...
- Page 2 121109 For customers in North and South America For customers in USA This device complies with Part 15 of the FCC rules. Operation is subject to the following two conditions: (1) This device may not cause harmful interference. (2) This device must accept any interference received, including interference that may cause undesired operation.
-
Page 3: Table Of Contents
Table of Contents Page 1. System Requirements -------------------------------------------------------------------- 2. Package Contents ------------------------------------------------------------------------- 3. Name of Parts ------------------------------------------------------------------------------- 4. Display Information ------------------------------------------------------------------------ 5. Getting Started ------------------------------------------------------------------------------ • Installing DV Batteries ----------------------------------------------------------------- • Inserting SD/MMC Card -------------------------------------------------------------- 6. Taking Pictures ------------------------------------------------------------------------------- • Taking a Video --------------------------------------------------------------------------- •... -
Page 4: System Requirements
1. System Requirements • Personal computer, laptop, desktop, or IBM compatible with Pentium 166 MHz minimum, and with an active USB (Universal Serial Bus) port. • Windows 2000 / XP / Vista, CD ROM drive, color monitor, mouse and keyboard. •... -
Page 5: Name Of Parts
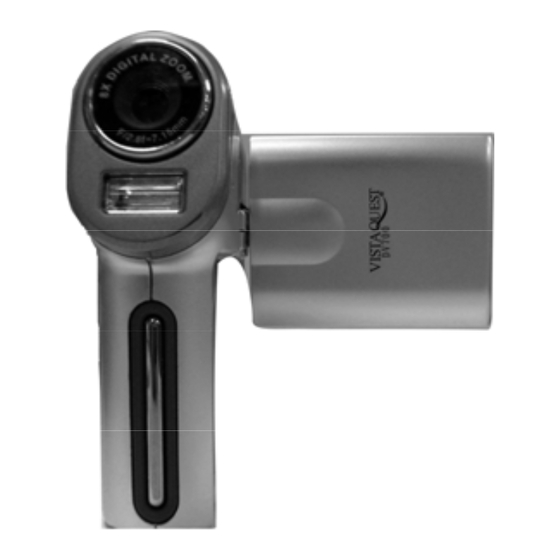
3. Name of parts 1.FOCUS SWITH Macro Normal Landscape 2.POWER (ON/OFF) BUTTON 3.STRAP EYELET 4.POWER CHARGE LAMP 5.POWER LAMP /INDICATOR LAMP 6. SPEAKER 7.SHUTTER/SNAP BUTTON 8.ZOOM OUT ( ○ - ); ZOOM IN ( ○ + ) 9.ARROW OK BUTTON; LEFT BUTTON;... -
Page 6: Display Information
4. Display Information - 3 -... - Page 7 - 4 -...
-
Page 8: Getting Started
5. Getting Started CAUTION Please install the DV7 driver before using your DV700 with a PC. The best way to transfer picture to the PC is using the Mass Storage mode to copy all your pictures. • Installing DV Batteries: 1.Slide open the battery compartment cover by pressing the place as shown on the right side. -
Page 9: Taking Pictures
6. Taking Pictures • Taking a Video 1. Turn on the DV by pressing the POWER button and then start screen appears. 2. The TFT screen will display (default ). 3. View the subject through the TFT screen. 4. Press the SHUTTER BUTTON to take a video; Press the SHUTTER BUTTON again to stop recording. -
Page 10: Using Voice Pen
• Using voice pen 1.Press the RIGHT BUTTON (mode button) three times and you will see the icon shows on the TFT screen. 2.Press the shutter button to record voices; press the shutter button again to stop recording. 7. Reviewing videos/photos/voice Press the MODE BUTTON button to enter playback mode and press the OK button you will see the videos/photos/voice in thumbnail mode. -
Page 11: Deleting Files
Deleting files When in playback status, the user can press the ▼ button, and press the ▲ or ▼ button to select the Delete or Execute to delete the files or exit, press the OK button to confirm. Or user can press the menu button to active the playback menu. Press the ▲ or ▼ button to select Delete and you will see the icon in blue. - Page 12 [Exposure Value] Exposure compensation allow you change the exposure setting manually to adjust for the lighting of your subject. This feature helps to improve better results when recording a backlit subject, a strongly lit subject indoors, or a subject that is against a dark background. •...
- Page 13 2592x1944 for standard picture size; produces normal picture 5M (Medium) pixels resolution and middle file size. 2048x1536 for smallest picture size; produces lowest picture 3M (Small) pixels resolution and smallest file size. [Quality] Fine Setting the picture quality to fine with big picture size. Standard Setting the picture quality to standard with small picture size.
- Page 14 [White Balance] When the white balance is set to match the light source, the camera can take picture more accurately. The camera sets the white balance automatically according to Auto shooting conditions. Daylight Use when shooting at outdoors in sunlight on a clear day. Use when shooting at outdoors and the sunlight is not enough Cloudy such as under cloudy skies, in shade or at dusk.
- Page 15 [Sharpness] Hard Setting the sharpness to hard. Normal Setting the sharpness to normal. Soft Setting the sharpness to soft. [Preview] Setting the preview to on. You can view the Picture within 1 second after you captured the picture. Setting the preview to off. [Time Stamp] Do not print the time on the file.
- Page 16 [Beep] Setting the beep sound to on. Setting the beep sound to off. (*) [Language] English Setting the language to English. (*) Français Setting the language to French. Deutsch Setting the language to German. Italiano Setting the language to Italian. Español Setting the language to Spanish.
-
Page 17: Playback Status Menu
[TV Output] NTSC Setting the TV Output to NTSC. Setting the TV Output to PAL. [Date Input] Do not input the time on the file. Input the time on the file. Playback Status Menu [Delete] Single to delete (erase) current file. to delete (erase) all files. -
Page 18: Installing Software
[Thumbnail] Press the OK button to see the files in the thumbnail mode and then press the OK button to view the file in the whole LCD panel. 9. Installing Your Software • Installing Software 1.Insert installation CD into the CD-ROM drive and the installation CD menu should appear. -
Page 19: Downloading And Uploading Files To Your Computer
11. Downloading/Uploading files to Your Computer 1.Turn the DV and computer on, then connect the DV to the computer with the included USB cable. 2.“USB Mass Storage drive” appears on the computer screen. Downloading files to your computer For Windows XP / Vista: A dialogue box with options appears as shown on the right side. -
Page 20: Appendix
Appendix: Specifications Camera Mode DV mode; Still mode; Playback mode; SD/MMC card reader; Voice recoder; Mass storage CMOS SENSOR CMOS sensor Lens Module Fixed lens 、F2.8 、EFL = 7.15mm Focus range Macro : 16cm; Portrait : 0.5m~1.1m; Landscape : 1.0~Inifinity White Balance Auto / Daylight / Cloudy /Tungsten / Fluorescent EV compensation... -
Page 21: Specification
Specifications Delete One / All / Select Playback digital zoom ISO Speed Auto Shutter Speed Electronic : 1/8-1/4000 sec Color LCD Display TOPPLY 2.0 " LTPS;Resolution :558(H) x 234(V) Storage system 32M Internal Flash Memory External: SD or MMC Card Mass Storage Anti-Flicker 50/60 Hz... -
Page 22: Faq
Q1: I have noticed that the pictures I have taken are all very dark. How can I make these pictures lighter? Should I use the flash often? A1: Avoid taking pictures in places with little lighting. When it is cloudy, please use other means to create more light before taking pictures. -
Page 23: Troubleshooting
Troubleshooting Problem Source Solution The DV is not The power is not on • Slide the ON/OFF button to turn the DV running The batteries were not • The correct direction to insert the AA inserted properly batteries is indicated on the DV. Batteries are depleted •... - Page 24 Problem Source Solution Picture is not The lens is dirty • Clean the lens. clear The pictures are Hands were not steady • Ensure hands are steady when taking blurred when taking the picture picture and remain steady one second after pressing the shutter button.
-
Page 25: Safety Precaution
Safety Precautions Precautions for The DV Do not shoot while driving or walking, otherwise it may cause traffic accident. Do not trigger the flash in close proximity to human or animal eyes. Expose to the intense light produced by the flash may damage eyesight, especially for young children, please shoot at least one meter (39 inches) away when using the flash. - Page 26 Do not operate this DV with wet hands. This could pose a risk of electronic shock. Under the environment with electrostatic discharge, the DV may malfunction and require the user to reset the DV. Under the environment with electrical fast transient (EFT), the DV may lose function and require user to reset the DV.
Need help?
Do you have a question about the Digital Video Camcorder and is the answer not in the manual?
Questions and answers