Advertisement
Table of Contents
- 1 Table of Contents
- 2 Important Safety Instructions
- 3 Precautions
- 4 Unit Functions
- 5 Parts of the Turntable Unit Functions
- 6 Remote Control
- 7 Preparation for Use
- 8 Basic Operation
- 9 Listening to the Radio
- 10 Aux Operation
- 11 Listening to a Record
- 12 Listening to a CD
- 13 RECORDING to a CD
- 14 Specifications
- 15 Trouble Shooting
- Download this manual
Advertisement
Table of Contents

Subscribe to Our Youtube Channel
Related Manuals for Victoria ITC-TWCDRW

Summary of Contents for Victoria ITC-TWCDRW
- Page 1 OWNER’S MANUAL MODEL: ITC-TWCDRW Turntable with Compact Disc (CD-RW) Recorder, Cassette Player, and AM/FM Radio...
-
Page 2: Table Of Contents
TABLE OF CONTENTS Important Safety Instructions ...................3 Precautions ........................5 Unit Functions .........................10 Parts of the Turntable Unit Functions ................12 Remote Control .......................14 Preparation for use ......................17 Basic Operation ........................17 Listening to Radio ......................18 Aux Operation .........................19 Listening to a Record .......................19 Listening to a CD......................21 RECORDING to a CD ....................29 Specifications ........................36... -
Page 3: Important Safety Instructions
IMPORTANT SAFETY INSTRUCTIONS For Audio Products - Read Thoroughly When using electrical products, basic precautions should always be followed including: 1. Read Instructions - All the safety and operating instructions should be read before the product is operated. 2. Retain Instructions - The safety and operating instructions should be retained for future reference. - Page 4 14. Power Lines - An outside antenna system should not be located in the vicinity of overhead power lines or other electric light or power circuits, or where it can fall into such power lines or circuits. When installing an outside antenna system, extreme care should be taken to keep from touching such power lines or circuits as contact with them might be fatal.
-
Page 5: Precautions
PRECAUTIONS Safety Information Caution: 1. Do not remove the protective housing. 2. Use of controls and adjustments or performance of procedures other than those specified herein may result in hazardous radiation exposure. 3. If this product develops trouble, contact a qualified service center, and do not use the product in a defective state. - Page 6 Before Use 1. Choose unit installation location carefully. Avoid placing it in direct sunlight or close to a source of heat. Also avoid locations subject to vibrations and excessive dust, cold or moisture. Keep away from sources that hum, such as transformers or motors. 2.
- Page 7 • Use a soft anti-static cloth to gently wipe the record’s surface when the record has become dirty. • Keep records in their shield when not in use. • Store records upright on their edges. Storing horizontally may warp record or curve the record •...
- Page 8 Discs Please use CD, CD-R and CD-RW discs bearing the “DIGITAL AUDIO” mark. This unit CANNOT RECORD CD-R and CD-RW discs designed for computer systems. • “CD-R” and “CD-RW” discs designed for computer systems and properly recorded by a computer are playable, but this unit cannot record, finalize nor erase them. •...
- Page 9 ballpoint or hard-tipped pen, as this may cause damage to the recorded side. • Do not use CDs with an irregular shape (octagonal, heart shaped, business card size, etc). CDs of this sort can damage the unit: • If you have any doubts of using CD-R/CD-RW disc, read the precautions supplied with the disc, or contact the disc manufactures directly.
-
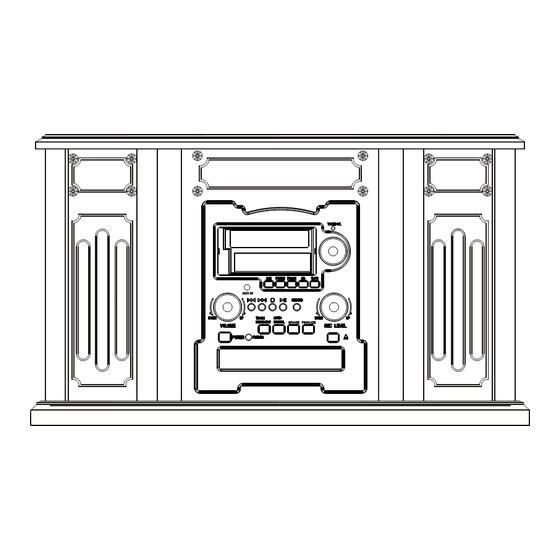
Page 10: Unit Functions
UNIT FUNCTIONS 1. AUX IN JACK Use this AUX IN jack to listen the external source. 2. DISPLAY PANEL (frequency) When the unit is on, this display will light. 3. DISPLAY 4. AUX Press the AUX button and select AUX to listen to the external source connected to the AUX IN jacks. - Page 11 5. PHONO Press the PHONO button and select PHONO to play a record. 6. FM/AM Press the FM/AM button to listen to the radio. 7. REMOTE SENSOR When operating the remote control unit, point it towards the REMOTE SENSOR. 8. CD Press the CD button to play a CD.
-
Page 12: Parts Of The Turntable Unit Functions
20. MANUAL/AUTO REC Use this button to select the mode of track number assignment. 21. TRACK INCREMENT During recording, use this button to divide tracks. 22. PHONES For private listening, first reduce the volume level to minimum. Then insert the plug from your headphones into the PHONES jack, and adjust the volume by turning the VOLUME knob. - Page 13 A Turntable B Screw fixing the turntable for transportation Before use, completely loosen the screw by turning it clockwise with a coin or screwdriver. When you transport the unit, turn the screw counterclockwise to secure the turntable. C Cue-lever Use this lever to lift the tone arm. D Tone arm holder E Speed selector F Tone arm...
-
Page 14: Remote Control
Battery Replacement If the distance required between the remote control unit and main unit decreases, the batter- ies may be exhausted. In this case, please replace the battery with new ones. Precautions concerning batteries • Be sure to insert the batteries with correct positive “+” and negative “-” polarities. •... - Page 15 A POWER Press the POWER button, the display is lighted during stand by mode (but nothing shows on the display). B OPEN/CLOSE In CD, PHONO or AUX mode, use this button to D C open and close the disc tray. This button does not work in FM/AM mode C CD Press the CD button to play a CD.
- Page 16 Press the PHONO button and select PHONO to play a record. P AUX Press the AUX button and select AUX to listen to the external source connected to the AUX IN jacks. Q Radio Press the FM/AM button to listen to the radio. R TAPE Press the TAPE button to play cassette.
-
Page 17: Preparation For Use
PREPARATION FOR USE 1. Connect the AC power cord to the mains. 2. Remove white PROTECTIVE NEEDLE COVER by gently pulling towards front of unit. 3. Release TONE ARM by gently pushing hold-down clip to the right. This will unlock the tone arm from its armrest. -
Page 18: Listening To The Radio
2. Select the source by pressing the corresponding button. 3. Rotate the VOLUME knob clockwise to adjust the desired sound level. 4. Listening through Earphones/Headphones (Not included). The sound from the speakers will shut off. LISTENING TO THE RADIO 1. Select FM or AM using the FM/AM button. 2. -
Page 19: Aux Operation
AUX OPERATION An external (auxiliary) audio source (i.e., personal CD player or MP3 player) can be con- nected to this unit and heard through the speakers. (1) Plug one end of cable (included) into the AUX IN socket on the back of the unit. (2) Plug the other end of the cable into the headphone or Line Out socket of the external source. - Page 20 4. Select the speed. 5. Gently push the clamper to the right to release the tone arm. 6. Raise the cue lever to lift the tone arm off the tone arm support. 7. Move the tone arm gently to the edge of the record (or the starting point of a track). The turntable will begin to turn.
-
Page 21: Listening To A Cd
Do not place anything on top of the turntable cover, especially while playing a record. When the playback has been finished, the tone arm automatically returns to the tone arm holder and the rotation stops. To stop playback manually, slightly lift the tone arm using the cue lever and return it to the tone arm holder. - Page 22 closing operations. 4. Press the OPEN/CLOSE button to close the tray. • It takes a few seconds for the unit to load the disc. No buttons will work during loading. Wait until the total number of the tracks and the total play time of the disc are displayed. •...
- Page 23 B To skip to the next or a previous track During playback, repeatedly press the SKIP button ( or ) until the desired track is found. The selected track will be played from the beginning. In the stop mode, press the SKIP button ( ) repeatedly until the track you want to listen is found, and press the PLAY/PAUSE button ( ) to start playback from the selected track.
- Page 24 Each time the DISPLAY button is pressed, the display changes as follows: Un-finalized CD-R/CD-RW, stopped During recording...
- Page 25 Repeat Playback Each time the REPEAT button is pressed, the repeat mode is changed as follows: REPEAT ALL (Repeat ALL the Tracks) Press the REPEAT button once during playback. All the tracks of the disc will be played repeatedly. REPEAT 1 (Repeat one track) Press the REPEAT button twice during playback.
- Page 26 The tracks can be played randomly. Press the SHUFFLE button during playback. (In the stop mode, press the SHUFFLE button and the PLAY button) When the SHUFFLE playback of all the tracks has been finished, the unit stops and the shuffle playback mode is cancelled.
- Page 27 2 Press the MUSIC SKIP button ( ) to select a track. 3 Press the PROGRAM button. The track is programmed, and “P-02” is display. Repeat step 2 and 3 to program more tracks. • You can program up to 32 tracks. •...
- Page 28 To check the programmed order To add a track to the end of the program In the stop mode, press the PROGRAM button. Select a track number by pressing the MUSIC SKIP button, and then press the PROGRAM button. The track is added to the end of the program. To delete the last track from the program.
-
Page 29: Recording To A Cd
RECORDING to a CD About CD-R and CD-RW discs CD-R discs can be recorded once only. Once they have been used for recording, they cannot be erased or re-recorded. However, if space is available on the disc (and the disc has not been finalized), additional material can be recorded. - Page 30 STEP 1: SELECT AUDIO SOURCE Audio from the PHONO, TAPE or AUX sources can be recorded on the CD recorder. 1. To record from a record, select PHONO button 2. To record from an external source, press the AUX button and connected the cable to the AUX IN jacks at the back, select AUX button 3.
- Page 31 TRACK INCREMENT The unit does not divide tracks. The unit will record the next track when you press the TRACK INCREMENT button If you do not finish a track recording and you press the TRACK INCREMENT button, the unit will record the next track. B.
- Page 32 STEP 5: SELECT RECORDING LEVEL (optional) If necessary, adjust the recording level using the REC LEVEL knob , the display will show from 00 to 79. Play the source to be recorded and adjust the recording level so that the loudest sound does not exceed the “OVER”...
- Page 33 12 13 You cannot restart recording while “busy” is displayed. Remember that every time recording is paused or stopped, a new track number will always be assigned. It is not possible to record in two “stages” within one track. C Manual Track Division It is possible to divide the recording into tracks while recording.
- Page 34 FINALIZING As has been explained earlier, in order for a disc to become a standard CD, it must have a Table of Contents (TOC) written to it. This process is known as finalizing. 1. Press the FINALIZE button in the stop mode.
- Page 35 1. Press the CD button to select “CD”. 2. Load a recorded CD-RW. 3. Press the ERASE button while in the stop mode. (1). Wait until “Busy” disappear on the display. Never turn the power off nor unplug the power cord. (2).
-
Page 36: Specifications
SPECIFICATIONS AMPLIFIER Section Output Power ..............2.5 W + 2.5 W Frequency Response ............60 to 20, 000 Hz TUNER Section FM Section Frequency Range ..........88 to 108 MHz AM Section Frequency Range........... 530 to 1710 KHz CD PLAYER section Frequency Response ...... -
Page 37: Trouble Shooting
Need additional help? Call us Monday thru Friday 8:00 AM to 5:00 PM Pacific Time at (866)446-0961... - Page 38 MODEL: ITC-TWCDRW Turntable with Compact Disc (CD-RW) Recorder, Cassette Player, and AM/FM Radio Grace Digital Inc. San Diego, CA...
Need help?
Do you have a question about the ITC-TWCDRW and is the answer not in the manual?
Questions and answers