Table of Contents
Advertisement
Quick Links
Advertisement
Table of Contents

Summary of Contents for Duolabs Spa QBox HD
- Page 1 Online version rev.02 QBox High Definition User Guide Page 1 of 99...
-
Page 2: Table Of Contents
Table of Contents BEFORE INITIAL OPERATION ON THE RECEIVER ............... 5 .......................... 5 AFETY INSTRUCTIONS .......................... 8 ACKAGING CONTENTS ..............................9 IEWS ....................... 10 XPLANATION RONT ANEL ........................ 11 XPLANATION ANEL ..........................14 EMOTE ONTROL INSTALLATION ............................17 ........................... 17 HECK FOR UPDATES . - Page 3 -EPG ............................31 ULTI EDIT THE CHANNEL LIST ........................33 ..........................34 DDING A BOUQUET ......................35 DD A SERVICE TO FAVORITES ..................36 DDING MULTIPLE SERVICES TO A BOUQUET ....................37 EMOVE A SERVICE FROM FAVORITES ...................... 38 OVING A SERVICE TO FAVORITES .......................
- Page 4 11.2 DVB-T T ......................81 UNER CONFIGURATION 11.3 ..........................82 UTOMATIC SCAN 11.4 ............................. 83 ANUAL SCAN FIRMWARE UPDATE........................84 12.1 ..................84 HAT IS NEEDED TO UPDATE YOUR 12.2 ..........................85 HAT TO UPDATE 12.3 LAN (E ) ..................... 86 PDATING OX VIA THERNET...
-
Page 5: Before Initial Operation On The Receiver
1 Before initial operation on the receiver 1.1 Safety instructions General instructions 1.1.1 Please read the safety instructions completely and carefully, before using the QBox. The Manufacturer takes no responsibility for damages as a result of incorrect handling of the QBox. The safety marking is located on the exterior of the bottom of the apparatus. - Page 6 1.1.2 Shut down In case your QBox is not in use for a long period of time disconnect the power plug from the power outlet. During thunder storm the unit should also be physically disconnected from the power outlet. Additional safety instructions: 1.1.3 (Dis-)Connecting to a LNB: Turn the QBox off before you connect or disconnect a cable coming from or going to a LNB...
- Page 7 1.1.4 Disposal instructions The packaging of the QBox only consists of reusable materials. Please recycle if possible. This symbol on the product or on its packaging indicates that this product must not be disposed of with your other household waste. Instead, it is your responsibility to dispose of your waste equipment by handing it over to a designated collection point for the recycling of waste electrical and electronic equipment.
-
Page 8: Packaging Contents
1.2 Packaging contents Please check the completeness of the box’s contents. What’s included on the package: 1 x QBox High Definition Please check the Tuner configuration from the carton box 1 x Remote Controller 1 x Battery Pack (2x AAA) 1 x User Manual Optional not included on the standard configuration: Wi-Fi 802.1n module for WLAN connection... -
Page 9: Views
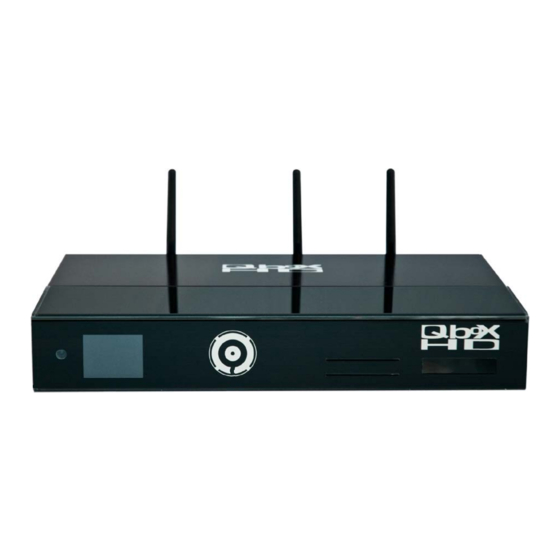
1.3 Views 1.3.1 Font View Common Interface Slot Remote Control TFT Display 2,2” Touch Pad Smarcard Readers Top (Slot 1) Bottom (Slot2) Sensor 65536 Colors Cap Sense Technology Top (Slot 1) Bottom (Slot2) 1.3.2 Rear View E-SATA Removable USB Input RGB Output Power Switch Wi-Fi Antenna... -
Page 10: Explanation Front Panel
1.4 Explanation Front Panel Common Interface Slot Plug in here any Common Interface Module of your choice. Smartcard Readers Insert your Conax, Dreamcrypt or DGCrypt Smartcard with the golden chip facing down and forward into one of the two Smartcard reader slots. Remote control sensor The remote control sensor receives the infrared signals of the Remote Control. -
Page 11: Explanation Rear Panel
1.5 Explanation Rear Panel Power Switch The main power switch completely cuts power from your QBox. Power Cord Plug the power cable into the main power socket. You must not connect the power plug to anything other than a socket that supplies 110V/60Hz or 230V/50Hz. E-SATA Connector This is the connector to connect an external Hard Disk E-SATA. - Page 12 QBox tuners. Please do not mount any tuner if you are not sure if the tuner you are using is compatible with QBox Tuners. QBox tuners are available by QBox resellers or directly by Duolabs Spa. QBox High Definition...
- Page 13 Wi-Fi Antenna (optional) QBox is capable to support WLAN connection with using the WLAN module optionally available (please check your sales configuration on the carton box if available). Three Wi-Fi antennas are needed to get the maximum performance for the WLAN module which operates following the 802.11n Standard.
-
Page 14: Remote Control
1.6 Remote Control Mute Button POWER Button Numeric KeyBoard BOUQUET Button INFO Button MENU Buttons NAVIGATION Buttons OK Button VIDEO Button AUDIO Button VOLUME Button PVR STOP Button PVR REC Button EXIT Button Option Buttons PVR Mode Buttons TEXT Button TV Button RADIO Button MEDIA Button... - Page 15 Important notes about operation All functions of the QBox can be controlled via OSD-Menu (On-Screen-Display). This makes the handling of the QBox very easy for you. All options are indicated by four colored dots or beams (red, green, yellow, blue) in the OSD-Menu and can be started with the Option Buttons on the Remote Control.
- Page 16 The Power-Button switches your QBox on and off. POWER Button Pressing the MUTE-Button mutes the Volume. A crossed speaker symbol will appear on the TV screen. MUTE Button Pressing it again or pressing one of the Volume +/- Buttons brings back the audio. The Mute-Button deletes a character during text input.
-
Page 17: Installation
2 Installation 2.1 Check for updates. When the Set Top Box is received it is possible that many new features are already been implemented in the meanwhile. A firmware update is important to be made. Before starting the receiver please check on the official web site www.qboxhd.com or www.duolabs.com if there is any firmware update that may have fixed some previous problems. -
Page 18: Before Turning The Qbox Hd On
2.2 Before turning the QBox HD on. Please remove the protection plastic from all the box and clean the front and rear panel carefully before turning the receiver on. IMPORTANT NOTE! To clean the front panel plastic after removing the protection film please use small quantity of water mixed with glass cleaning products. -
Page 19: Turning The Device On
2.3 Turning the device on Place the batteries inside the battery compartment of the remote control keeping in mind the right polarity. Before using the QBox, please read the safety instructions (See chapter 1.1 Safety instructions) Connect the LNB or antenna with a coaxial cable to LNB in or Antenna in at your QBox. See chapter 1.3.2 Explanation rear panel. -
Page 20: Start Wizard
3 Start wizard The start wizard helps you with the basic setup of your QBox. 3.1 Video output selection READ CAREFULLY! At the first usage of your QBox you have to set up the video/audio output for your receiver. There are two possible options: 1. -
Page 21: Language Selection
3.2 Language selection Select your desired and language with the Navigation-Buttons up and down. Press the OK-Button to activate. The start wizard takes you through the basic se- tup of your QBox. Press the OK-Button on your remote control to get to the next step. -
Page 22: Tuner Setup
3.3 Tuner setup Detailed information about the tuner setup can be found in chapter 11.1 DVB-S Tuner configuration 3.4 Service scan Detailed information about the service scan can be found in chapter 11.3 Automatic scan QBox High Definition User Guide Page 22 of 99... -
Page 23: Parental Control
3.5 Parental Control Refer to section 6.7 Parental Control for further information about this feature Entering the pin code Finalizing the basic setup QBox High Definition User Guide Page 23 of 99... -
Page 24: Basic Operation
4 Basic operation 4.1 Turning your QBox on and off Use the Power-Button to turn your QBox on and off. To put your QBox into Standby-Mode either press the Power-Button on your remote control or directly on your QBox. The current time will be shown in the QBox’s LCD-Display. Pressing the Power-Button for three seconds saves all settings and prepares your QBox for disconnection from power. -
Page 25: Service Selection
4.2 Service selection Pressing the Left/Right-Buttons on your QBox remote control will take you to the previous or next service. Pressing the 0 on the Numeric-Keypad will enable you to skip back and forth between the two most recently watched services. This feature is quite useful during commercial breaks since it enables you to watch another channel and quickly check if your movies is back on. -
Page 26: Changing The Audio Track
4.5 Changing the audio track Pressing the AUDIO-Button in TV or Radio Mode will reveal the “Audio” menu of the selected service. Use the Navigation-Buttons up and down to move to desired audio track. Press the OK-Button to select. The contents of this menu will vary from service to service. -
Page 27: Subtitles
4.9 Subtitles Press the Menu-Button to enter the main menu. Select “Subtitles” and press the OK-Button. A list with the available subtitles will show up. Use the Navigation-Buttons up and down to select a desired subtitle and press the OK-Button to activate. The screenshot on the left shows you an exam- ple of how a subtitle looks. -
Page 28: Infobar
4.10 Infobar The Infobar appears and disappears by pressing the OK-Button once, if no OSD menu is shown on your screen or when you change channels. The Infobar shows all necessary Information about the selected service. Active Tuner Signal Level/-Strength Channel Name Current Time Progress Bar... -
Page 29: Electronic Program Guide Epg
5 Electronic Program Guide EPG By pressing the INFO-Button in TV-Mode you are supplied with detailed information about the current show and by pressing the Right- Button afterwards about the next show. Pressing the yellow Options-Button activates the “Channel-EPG” (See chapter 5.1) and pressing the blue Options-Button activates the “Multi-EPG“... -
Page 30: Single-Epg
5.1 Single-EPG In this view you are supplied with detailed information about the currently selected channel’s programming. By pressing the yellow Options-Button your can ether sort the “Single-EPG” alphabetically or by time. You can also access this view by pressing 1. -
Page 31: Multi-Epg
5.2 Multi-EPG Use the blue and yellow Options-Buttons to switch between the now, next and more views. Pressing the green Options-Button will give you the possibility to automatically copy the start and end time of the selected show into a recording timer. If you have set the “Multi bouquets”... - Page 32 5.2.1 Time/Date Input Press the Menu-Button in the Multi-EPG view. A window will appear where you can enter a time and date. After you have entered the desired time and date press the OK-Button to activate you selection. The Multi-EPG will be displayed according to your set time and date.
-
Page 33: Edit The Channel List
6 Edit the channel list What is a bouquet? A bouquet can be thought of something like a folder. Every channel equals a page in this folder and the pages are sorted into categories. This way you can create a bouquet called “Kids”, for example, under which you “file” all children’s stations. -
Page 34: Adding A Bouquet
6.1 Adding a bouquet To be able to add a bouquet you have to set the “Allow multiple bouquets” option to yes. Pressing the Up/Down-Buttons on your remote control activates the service list. Press the blue Options-Button to switch to the bouquet view. -
Page 35: Add A Service To Favorites
6.2 Add a service to favorites If you want to add a service to your Favorites-view you can choose from services in the All-, Satellites-and Provider-views. You can switch views by pressing the red, green, yellow and blue Options-Buttons. At this point we only describe the process from the All-Bouquet since it is the same for the others. -
Page 36: Adding Multiple Services To A Bouquet
6.3 Adding multiple services to a bouquet You can select multiple services from the All-view to be added to the currently selected bouquet. Pressing the Up/Down-Buttons on your remote control activates the service list. Use the Bouquet +/- Buttons to switch to the desired bouquet. -
Page 37: Remove A Service From Favorites
6.4 Remove a service from favorites Pressing the Up/Down-Buttons on your remote control activates the service list. Use the Navigation-Buttons up/down to select the desired service and press the MENU-Button to open the “Channellist menu”. Navigate to the option “remove service”. The selected service will be deleted from your favorites list. -
Page 38: Moving A Service To Favorites
6.5 Moving a service to favorites Pressing the Up/Down-Buttons on your remote control activates the service list. Use the Navigation-Buttons up/down to select the desired service and press the MENU-Button to open the “Channellist menu”. Navigate to the option “enable move mode” and press the OK-Button. -
Page 39: Adding A Marker To Favorites
6.6 Adding a marker to favorites You have the option to add makers within the favorites bouquets. Pressing the Up/Down-Buttons on your remote control activates the service list. Use the Bouquet +/- Buttons to switch to the desired bouquet. As an alternative you can press the blue Options-Button and select the desired bouquet. -
Page 40: Parental Control
6.7 Parental control Parental control makes it possible to lock selected channels. If no OSD menu is visible on your screen, press the Menu-Button to open the main OSD menu. Navigate to the option Setup” and press the OK-Button to select. Navigate to the “Parental lock“... - Page 41 You will see this notice that the pincode has been changed. Press the OK-Button to get back into the Parental control menu. If the entered pincode was false you will see this notice. Press the OK-Button to get back into the “Change service pin”...
-
Page 42: Protecting The Parental Lock Setup
6.8 Protecting the parental lock setup Additionally you have the option to protect the parental control menu using a pin code. Setting the “Protect setup” option to yes you will only be able to change parental control setting after you have intered the correct pincode. -
Page 43: Hard Disk Operation
7 Hard disk operation 7.1 How to mount the external E-SATA Hard Disk An E-SATA Hard Disk can be connected externally in the dedicated port on the back of the receiver: External E-SATA Hard Disk needs to be powered with its external power supply. Note! Before you can use the hard disk you have to initialize it first. -
Page 44: Management
7.2 Management If no OSD menu is visible on your screen, press the Menu-Button to open the main OSD menu. Navigate to the option “Setup” and press the OK-Button to select 1. Navigate to the option “System” and press the OK-Button ... - Page 45 7.2.1 Initialization If no OSD menu is visible on your screen, press the Menu-Button to open the main OSD menu. Navigate to the option “Setup” and press the OK-Button to select 4. Navigate to the option “System” and press the OK-Button ...
-
Page 46: Recording
7.3 Recording 7.3.1 Instant Recording Press the red Options-Button. You have five available options: - Add recording (indefinitely) - Add recording (stop after current event) - Add recording (enter recording duration) - Add recording (enter recording endtime) - Don't record Use the up/down-Buttons to navigate to you desired selection and press the OK-Button to select. -
Page 47: Stop Recording
7.3.2 Stop recording Switch to the service which recording you want to stop. Press the red Options-Button, select the "Stop recording" option and press the OK-Button to select. The recording will be stopped immediately. 7.3.3 Recording by timer You see the “Timer Editor“ menu. Pressing the red Options-Button will delete a timer. - Page 48 7.3.4 Manual programming Press the green Options-Button to add a new timer. You can choose between two different timer types. "Record" to record the desired show or "Zap" to automatically switch to the service. As repeat type you can choose between "once" and "repeated" The repeat type "repeated"...
- Page 49 7.3.5 Timeshift Once you started an instant recording you can fast-forward and rewind while recording as long as you have already recorded at least 1 minute long. Press the yellow Options-Button to pause the screen (video and audio will pause). The recording will continue in the background.
-
Page 50: Watch A Recording
7.4 Watch a Recording Press the Video-Button to get to the selection of recordings. Use the Navigation-Buttons up and down to select a recording. Press the OK-Button to start playing it. During replay you can see the control symbols in the Infobar. - Page 51 The PVR-Mode can be exited by pressing the TVButton. You will be asked if you want to stop the replay of the recording. If you choose “Yes” you will be taken back to the last channel you were watching. Skipping in a recording Button Time Button...
-
Page 52: Setting A Marker (Bookmarks)
7.5 Setting a marker (Bookmarks) Fast forward to the point where you want to add a marker and press the 0 on the Numeric-Keypad. This will set a marker at the desired point. The red dashes in the timeline correlate to a marker. Skip to a marker You can directly skip to a previously set marker during playback. -
Page 53: Delete A Recording
7.6 Delete a Recording Press the Video-Button to get to the selection of recordings. Use the Navigation-Buttons up and down to select a recording. Press the Menu-Button. Use the Navigation-Buttons up and down to select “Delete” and press the OK-Button. You will be asked if you want to delete the recording. -
Page 54: Movielist Options
7.7 Movielist options To access the Movielist menu press the Video-Button and then the Menu-Button. Sorting options You have the choice between two different sorting options: 1. Alphabetic sort 2. Sort by date List styles You have the choice between different list styles: ... - Page 55 List styles List style default List style default with extended description List style single line List style compact List style compact with description QBox High Definition User Guide Page 55 of 99...
-
Page 56: Teletext
8 Teletext You are in the TV or Radio mode. Press the Text-Button to enter the Teletext. Keep in mind that not every station transmits Teletext! Teletext - regular navigation: If you are viewing any Teletext page you can enter the interactive mode by pressing the OK-Button. Use the Navigation-Buttons to select a text page number and press the OK-Button to call this page. - Page 57 Teletext configuration menu: If the Teletext page 100 is shown you can press the MENU-Button to enter the Teletext configu- ration menu. You have the following options: Teletext - Selection: Select the "Search" option and press the OK-Button to start searching for Teletext information on other services without having to leave the service that you currently are watching.
- Page 58 Here you can adjust the transparency value of your Teletext. Press the Navigation-Buttons left or right to adjust the alpha value. National character set: automatic recognition = on/off The national codepage detection is used to display the teletext pages with the right letterset for your location.
-
Page 59: Sleep Timer
9 Sleep timer Using the sleep timer you can put your QBox into standby or turn it off after a predetermined amount of time. Press the blue Options-Button and select the option “Sleep Timer” Shutdown QBox after: Set the number of minutes after you wish the predetermined shutdown action to be executed. Timer status: Set this option to “enabled”... -
Page 60: Preferences
Preferences 10.1 Language If no OSD menu is visible on your screen, press the Menu-Button to open the main OSD menu. Navigate to the option “Setup” and press the OK-Button to select 1. Navigate to the option “System” and press the OK-Button. ... -
Page 61: Customize
10.2 Customize If no OSD menu is visible on your screen, press the Menu-Button to open the main OSD menu. Navigate to the option “Setup” and press the OK-Button to select 1. Navigate to the option “System” and press the OK-Button. ... - Page 62 Intermediate mode: These settings supplement the settings in simple mode. Recordings always have priority: If this option is set to “Yes” your QBox will automatically switch to the service which is supposed to be recorded in case there is a conflict with an existing timer. If you set this option to “No”...
-
Page 63: Setting The Time Zone
10.3 Setting the time zone If no OSD menu is visible on your screen, press the Menu-Button to open the main OSD menu. Navigate to the option “Setup” and press the OK-Button to select 1. Navigate to the option “System” and press the OK-Button. ... - Page 64 Video output: This option selects to which output the video signal will be sent to. HDMI If you have connected your TV to the HDMI output of your QBox set the “Output type” option to HDMI Scart If you have connected your TV to the Scart output of your QBox set the “Output type” option to Scart. Mode: Use the Navigation-Buttons left/right to select the desired screen resolution.
- Page 65 These options are only available if the output type is set to “Scart”: Mode: Scart Select the standard supported by your TV screen. This is usually either PAL or NTSC. If you own a TV screen which supports both modes you can also select the Multi option. You TV screen will automatically switch depending on the input signal.
-
Page 66: Lc-Display
10.5 LC-Display If no OSD menu is visible on your screen, press the Menu-Button to open the main OSD menu. Navigate to the option “Setup” and press the OK-Button to select 1. Navigate to the option “System” and press the OK-Button. ... -
Page 67: Front Panel Led Color And Intensity
10.6 Front Panel LED color and Intensity It is possible to customize the Front Panel LED’s color and brightness. If no OSD menu is visible on your screen, press the Menu-Button to open the main OSD menu. Navigate to the option “Setup” and press the OK-Button to select 1. -
Page 68: Network
10.7 Network If no OSD menu is visible on your screen, press the Menu-Button to open the main OSD menu. Navigate to the option “Setup” and press the OK-Button to select 1. Navigate to the option “System” and press the OK-Button. ... - Page 69 Use the Navigation-Buttons and the Numeric-Keypad to change the values. Use DHCP: If enabled your QBox will get its IP from a DHCP server. If you are using a router to access the internet you usually have a DHCP server. Disable this option to set a static IP address. IP Address: Enter the IP address here.
-
Page 70: Wi-Fi Configuration
10.8 Wi-Fi Configuration If no OSD menu is visible on your screen, press the Menu-Button to open the main OSD menu. Navigate to the option “Setup” and press the OK-Button to select 1. Navigate to the option “System” and press the OK-Button. 2. - Page 71 Set “Use Interface” to “yes” to enable the Wi-Fi. This screen will appear. Refer to the network settings chapter 10.7 for standard network settings. Encryption is coming on next slide For Wi-Fi encryption set the option “Encryption” to “on”. Encryption supported are: WEP, WPA and WPA2 Scan Wireless Networks: This will scan for the network Access Points or Routers connected in...
-
Page 72: Skin
10.9 Skin Selecting another skin will change the looks of your OSD(On-Screen-Display). If no OSD menu is visible on your screen, press the Menu-Button to open the main OSD menu. Navigate to the option “Setup” and press the OK-Button to select. 1. -
Page 73: Factory Reset
10.10 Factory reset If no OSD menu is visible on your screen, press the Menu-Button to open the main OSD menu. Navigate to the option “Setup” and press the OK-Button to select 1. Navigate to the option “System” and press the OK-Button. ... -
Page 74: Service Searching
Service searching 11.1 DVB-S Tuner configuration If no OSD menu is visible on your screen, press the Menu-Button to open the main OSD menu. Navigate to the option “Setup” and press the OK-Button to select 1. Navigate to the option “Service searching” and press the OK-Button. ... - Page 75 11.1.1 Single satellite – direct connection (DVB-S) Use this type of configuration if you want to receive a single satellite with a Single Universal LNB. The coax cable is directly connected from you QBox to the LNB. Please read the section 11.1 DVB-S configuration to learn how to get into this menu. The “Satconfig”...
- Page 76 11.1.2 Two satellites via Toneburst A/B (DVB-S) Use this type of configuration if you want to receive two satellites from one LNB each. It does not matter if you use one or two dishes to achieve this. Connect the two coax cables form the two LNBs to a so-called Toneburst switch and connect the coax cable from the Toneburst switch to your QBox.
- Page 77 11.1.3 Two satellites via DiSEqC A/B (DVB-S) Use this type of configuration if you want to receive two satellites from one Twin Universal or Quad Universal LNB. It does not matter if you use one or two dishes to achieve this. In this case the LNBs are connected to a so-called Multiswitch from which the signal is via coax cabled to the satellite receivers (QBoxes) in your household.
- Page 78 11.1.4 Four satellites via DiSEqC A/B/C/D (DVB-S) Use this type of configuration if you want to receive four satellites from one Single Universal or Twin Universal LNB for four or eight parties. It does not matter if you use one or two dishes to achieve this. In this case the LNBs are connected to a so-called Multiswitch from which the signal is via coax cabled to the satellite receivers (QBoxes) in your household.
- Page 79 11.1.5 Stab Positioner using USALS (DVB-S) Use this type of configuration if you want to receive many satellites with a Stab positioned from a Single Universal LNB. The coax cable is directly connected from you QBox to the LNB. Please read the section 11.1 DVB-S configuration to learn how to get into this menu. The “Satconfig”...
- Page 80 11.1.6 Stab Positioner without USALS (DVB-S) Use this type of configuration if you want to receive many satellites without a Stab positioned from a Single Universal LNB. The coax cable is directly connected from you QBox to the LNB. Please read the section 11.1 DVB-S configuration to learn how to get into this menu. The “Satconfig”...
-
Page 81: Dvb-T Tuner Configuration
11.2 DVB-T Tuner configuration If no OSD menu is visible on your screen, press the Menu-Button to open the main OSD menu. Navigate to the option “Setup” and press the OK-Button to select 1. Navigate to the option “Service searching” and press the OK-Button. ... -
Page 82: Automatic Scan
11.3 Automatic scan If no OSD menu is visible on your screen, press the Menu-Button to open the main OSD menu. Navigate to the option “Setup” and press the OK-Button to select 1. Navigate to the option “Service searching” and press the OK-Button. ... -
Page 83: Manual Scan
11.4 Manual scan If no OSD menu is visible on your screen, press the Menu-Button to open the main OSD menu. Navigate to the option “Setup” and press the OK-Button to select 1. Navigate to the option “Service searching” and press the OK-Button. ... -
Page 84: Firmware Update
Switch, HUB or Router while it may not be needed on Windows XP. The Software needed to update your QBox is the QBox HD Updater. The latest updating software version can be downloaded from the official web site www.qboxhd.com or www.duolabs.com Please do not use other software if you are not sure about what you are doing. -
Page 85: What To Update
12.2 What to update There are two parts of Box that can be updated. 1. Boot Update. Boot Update will update the NOR memory inside the QBox which contains Kernel, UBoot and other basic function of the QBox. Boot Update files have the extension .qhu Boot Update is a hard update and needs to turn OFF and then ON the QBox. -
Page 86: Updating Qbox Via Lan (Ethernet)
It is recommended to connect the QBox to a LAN Switch, HUB or Router to prevent data loss or timeout on some Windows OS 3. Launch the QBox HD Updater software: The first time QBox HD Updater is launched it will ask for the IP address. - Page 87 12.3.1 Boot Update Boot Update. Boot Update will update the NOR memory inside the QBox which contains Kernel, UBoot and other basic function of the QBox. Boot Update files have the extension .qhu Boot Update is a hard update and needs to turn OFF and then ON the QBox. To start Boot Update press the “Update Button”.
- Page 88 12.3.2 Filesystem Update File System is the update of the internal USB Pen of your QBox. Standard sales configuration of the QBox contains a 1GB USB Pen for storage of small contents or setting or third party applications. File System update files have the extension .tar.gz File System update is a soft update and needs the Enigma 2 Middleware to be running (the receiver must be in normal operation mode).
-
Page 89: Updating Qbox Via Usb Pen
12.4 Updating QBox via USB Pen It is possible to update the QBox via USB Pen in stand-alone mode. This update can be a partial update or either a Full Recevory depending on the file that is downloaded from official web site. 1. -
Page 90: System Information
System Information 13.1 Service If no OSD menu is visible on your screen, press the Menu-Button to open the main OSD menu. Navigate to the option “Information” and press the OK-Button to select The “Information” menu will open up. Navigate to the option “Service” and press the OK-Button. -
Page 91: About (Hard- And Firmware)
13.2 About (Hard- and Firmware) If no OSD menu is visible on your screen, press the Menu-Button to open the main OSD menu. Navigate to the option “Information” and press the OK-Button to select The “Information” menu will open up. Navigate to the option “About…”... -
Page 92: Appendix A Wi-Fi Module Mounting
APPENDIX A Wi-Fi Module Mounting. QBox can host a Wi-Fi Module with technology IEEE 802.11n as plug in for WLAN connection to a home network through the router and is 100% transparent as the Ethernet connection. Please remember to keep the cable Ethernet connection enabled (ON) otherwise Wi-Fi Module will not be activated! The Wi-Fi Module must be installed inside the QBox and it is not an invasive installation that requires special skills. - Page 93 3. Move the metal cover very slowly to the back like in the following picture: 4. When you come close to the end please pull carefully the metal cover on the QBox High Definition User Guide Page 93 of 99...
- Page 94 5. Locate the Wi-Fi Module slot: Board version 0.3 Board version 0.4 6. Insert the Wi-Fi Module like here: Board version 0.3 Board version 0.4 7. Carefully pull down the module like here: Board version 0.3 Board version 0.4 QBox High Definition User Guide Page 94 of 99...
- Page 95 8. Connect the antenna connectors properly: 9. Connect the other side of the antenna connector to the back metal panel QBox High Definition User Guide Page 95 of 99...
- Page 96 10. Fix the ring: 11. Fix the Wi-Fi Antenna 12. Repeat this operation for each of the 3 antennas included in the Wi-Fi module Kit. 13. Close the receiver doing all the procedures on the way around. QBox High Definition User Guide Page 96 of 99...
-
Page 97: Technical Specifications
Technical Specifications System and Chipsets: • Chipset STi7101 (ST40 with SH4 Core) at 266Mhz • 8MByte of NOR ROM for secure bootloader storage • 128 MB of system RAM. • FPGA Chipset at 100 Mhz as co-processor with soft 32-bit MCU16MB D-RAM Video Decoding and Resolution HD display multi format capable (1080I, 720P, 480P/576P, H.264 (MPEG-4 part 10) and MPEG-2. -
Page 98: Contacts
Contacts Duolabs Spa Via Baggi, 28 36061 Bassano Del Grappa (Vicenza) Italy Telephone and Fax Tel. +39-0424-1951.000 Fax. +39-0424-1951.500 International Email: Sales & General info@duolabs.com Technical Support support@duolabs.com Instant Messaging Sales & General MSN Messenger: riccardo@cellularcenter.it (no Email here) Skype: duolabs... -
Page 99: Qbox High Definition User Guide
Copyright notes © Duolabs Spa 2009. All rights reserved. This product contains files that are distributed under different licenses, especially a Open- Source License, the GNU General Public License. You can find details about this License on the next three pages. Additional notes about the source code and patches under...
Need help?
Do you have a question about the QBox HD and is the answer not in the manual?
Questions and answers