Table of Contents
Advertisement
Advertisement
Chapters
Table of Contents

Related Manuals for Plasma Cool ACW600C


Summary of Contents for Plasma Cool ACW600C
- Page 1 Owner’s Manual Portable Air Conditioner Model ACW600C It is important that you read these instructions before using your new purchase and we strongly recommend that you keep them in a safe place for future reference. Innovative AutoDrain NanoMist Technology Patent Pending...
-
Page 2: Table Of Contents
Table of Contents Thank You! ………………………………………………………………………1 Safety Instructions …………………………………………………………… 1-2 Specifications ……………………………………………………………………3 Parts ……………………………………………………………………………4 Positioning ………………………………………………………………………5 Control Panel ……………………………………………………………………6 Remote Control …………………………………………………………………7 Multi Protective Function ………………………………………………………8 Emptying the Water Container …………………………………………………9 Cleaning ……………………………………………………………………… 10 Troubleshooting ……………………………………………………………… 11 Warranty ……………………………………………………………………… 12... -
Page 3: Thank You
Thank You! Thank you for purchasing an Arbaco Portable Air Conditioner. Arbaco is a leading brand in indoor air treatment. We would like you to enjoy the many bene ts this unit offers, so please read this manual carefully and take full advantage of the many advanced features that your Arbaco Portable Air Conditioner offers you. - Page 4 Safety Instructions Do not use your air conditioner: If the power cable wires When small children may On a slope or uneven Close to a heat source are frayed or cut be left unattended surface This products is not made If there is a risk of liquid Inside unit exposed to the In a permanent very humid...
-
Page 5: Specifications
Specifi cations Model ACW600C Cooling Capacity 12,000 BTU/h Cooling/Heating 1000W / 9.7A Power Consumption / Current Moisture Removal in Cooling mode 61 pints/day Power Supply 110-120V/60Hz Refrigerant R410A Compressor Rotary Fan Speed 3 Speeds Thermostat 64ºF - 80ºF Ambient Temperature Range 60ºF - 105ºF... -
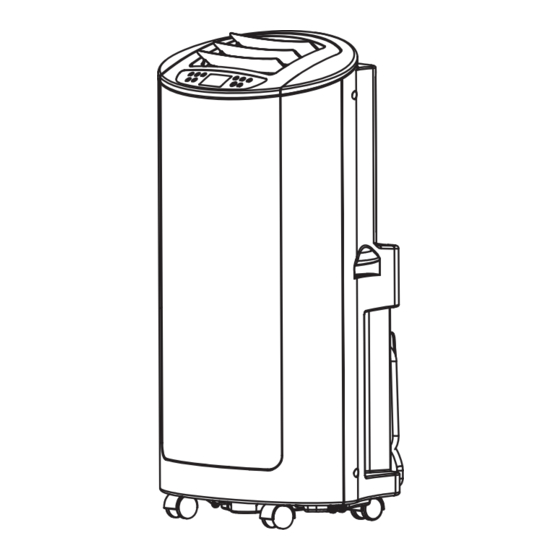
Page 6: Parts
Parts Front Side Back Side Top Cover Outlet Control Upper Filter frame Panel Handle Exhaust Connector Front Cover Power Supply Cord Power Lower Cord Filter Frame Location Caster Plug Cap Rubber Plug Check packing accessories and read your user’s manual to learn how to use them. Remote Control Slide Bar... -
Page 7: Autodrain Nanomist Technology Assembly
AutoDrain NanoMist Technology Assembly ™ Put spiral water Attach Window pipe into hot air Slide Bar exible hose. Connector to Exhaust Hose by twisting as shown. Turn the Connect the connector female half of the quick connector 90 degrees clockwise until it at the end of the is locked in place. -
Page 8: Assembling Outer Adaptor
Positioning This unit can easily be moved from one room to another. In doing, so keep this in mind: • The air conditioner must stand upright on an even surface. • Do not position near bath, sink, or other permanent, wet or damp area. •... - Page 9 Control Panel Timer Mode Display Area Swing Fan Speed Receptor When plug in, follow the start music, unit is in standby status. Digital screen will indicate temperature (Range: 41º-95ºF), if temperature above 95º, screen will show “H”, if below 41º, indicate “L”.
-
Page 10: Remote Control
Remote Control Power Mode Down Swing Sleeping Temperature Timer Mightiness Reset Keypad Lock POWER: Press this key to turn on/off the button. MODE: Press this key to choose cooling, dehumidifying, fan UP: Press this key to turn up temperature or adjust time. DOWN: Press this key to turn down temperature or adjust time. -
Page 11: Multi Protective Function
Multi Protective Function Freeze Prevention Control When the ambient temperature is very low under Cooling and Dehumidifying Mode, the compressor and water motor will stop working if the copper coil temperature Tp <2º after the compressor continued to work for 10 minutes, the LCD Display E4; when copper coil temperature will increase>8º, the protection will be dis-functioned automatically, and restore to foregoing mode for Compressor Three-minutes Delay protection function. -
Page 12: Emptying The Water Container
Emptying the Water Container In case of the W (W.F.) LED alert, the unit is required to be ATER drained. At the end of AC Season, this unit should be drained prior to storage. In both situations, we recommend that you take the following steps. -
Page 13: Cleaning
Cleaning Always unplug the unit from the power supply (wall outlet) before beginning the cleaning. Housing Use a soft, damp cloth to wipe the body clean. Never use strong chemicals, oil-based products, detergents, chemically treated cloths or other cleaning solutions. These could possibly damage the housing. Filter ·... -
Page 14: Troubleshooting
Troubleshooting Never try to repair or dismantle the air condition yourself. Incompetent repairs result in loss of warranty and can endanger the user and the property. No power supply. Make sure the Connect to a functioning outlet and switch on. The air green light on the plug is lit. -
Page 15: Warranty
One Year Limited Warranty American Comfort Worldwide LLC (“ACW”) warrants this ACW portable air conditioner to the original retail purchaser (“Purchaser”) purchasing only in the 48 Contiguous States, for one year from the date of purchase, against defects in material and workmanship under normal use and service. Should your ACW Portable air conditioner prove defective within one year from the date of purchase, please follow our return procedure to return the defective unit. - Page 16 CLimatiseur portable Modèle ACW600C fabriqué par...
- Page 17 Merci ! ……………………………………………………………………………1 Instructions de sécurité…………………………………………………………1-2 Spécifications ………………………………………………………………..……3 Pièces ………………………………………………………………………….…..4 Autodrain technology assembly................5 Installation …………………………………………………………………….….6 Panneau de commande ………………………………………………………..….7 Télécommande ………………………………………………………………...…8 Fonction multi protection …………………………………………………...……9 Vidange du réservoir d’eau ……………………………………………..……10 Nettoyage …………………………………………………………………...……11 Dépannage ……………………………………………………………..………12 Garantie……………………………………………………………..………… 13...
-
Page 18: Merci
Merci ! Instructions de sécurité IMPORTANT ! AVERTISSEMENT ! - Page 22 AutoDrain NanoMist Technology Assembly ™ Tendez la n du Mettez le tuyau tuyau légèrement. d’eau qui est en Attachez le spirale dans l’air connecteur de le chaud tuyau la barre de exible. glissement de la fenêtre au tuyau d’Echappement en le tordant mme indiqué.
-
Page 29: Pièces
Ne tentez jamais de réparer ou de démonter le climatiseur vous-même. Une réparation mal exécutée annulera la garantie et pourrait être dangereuse pour l’utilisateur ou la propriété. è l Le climatiseur ne Panne d’alimentation. Assurez- Brancher dans une prise de courant alimentée et mettre sous démarre pas.* vous que le voyant vert sur la tension. -
Page 30: Garantie
Garantie limitée de un an Pour que la garantie offerte par American Comfort Worldwide LLC (« ACW ») soit valide, ce climatiseur portable ACW doit être détenu par l’acheteur original (« l’acheteur ») et avoir été acheté dans un des 48 états contigus. La garantie est valable pour un an, à...
Need help?
Do you have a question about the ACW600C and is the answer not in the manual?
Questions and answers