Table of Contents
Advertisement
AUTOMATIC
SPRINKLER TIMER
Owner's Manual PRT-4 / PRT-6
For use with standard 24 VAC automatic sprinkler valves. These timers are designed for use in any 110
VAC /60 Hz ±10% AC outlet (240 VAC, 50 HZ for international version). The PRT Sprinkler Series
Timers provide simple programming and flexible schedules to meet your landscape watering needs.
We recommend you read this Owner's Manual completely before installing the timer to ensure proper
operation and safety.
Thank you for choosing the OPTIMA PRT-4 / PRT-6 Timer. Several innovative features allow you the
flexibility to tailor your program to fit a variety of watering requirements; and, best of all, it is easy to
program!
• Simple to use dials and buttons.
• Three available start times for each station to give you maximum flexibility.
• Off and Winterize features allow you to keep all your program settings while turning off your system
when you want!
Just in case, if you have questions, please call us toll free at 1-800-742-9922. (U.S.A., Canada & Mex-
ico).
ABOUT YOUR LAWN
Optima's PRT Series Sprinkler Timer is the central unit that controls watering times for your automatic
sprinkler system. The following information provides an overview of how the timer works.
Stations
To meet the different watering requirements of your lawn, trees, flowers, and other landscaping, you
can divide your yard into separate areas called "stations" or "zones".* Each "station" has one valve that
controls multiple spray heads or sprinklers. For example, if you have 4 valves, you can divide your lawn
into 4 "stations". See the figure below. (You cannot link more than one valve to one "station.") You can
however, select a different length of watering time for each "station".
* In the sprinkler industry, the terms "stations" and "zones" have the same meaning.
Station
3
House
Station
1
Station
4
Station
2
1
Advertisement
Table of Contents

Related Manuals for Optima PRT-4

Summary of Contents for Optima PRT-4
- Page 1 We recommend you read this Owner's Manual completely before installing the timer to ensure proper operation and safety. Thank you for choosing the OPTIMA PRT-4 / PRT-6 Timer. Several innovative features allow you the flexibility to tailor your program to fit a variety of watering requirements; and, best of all, it is easy to program! •...
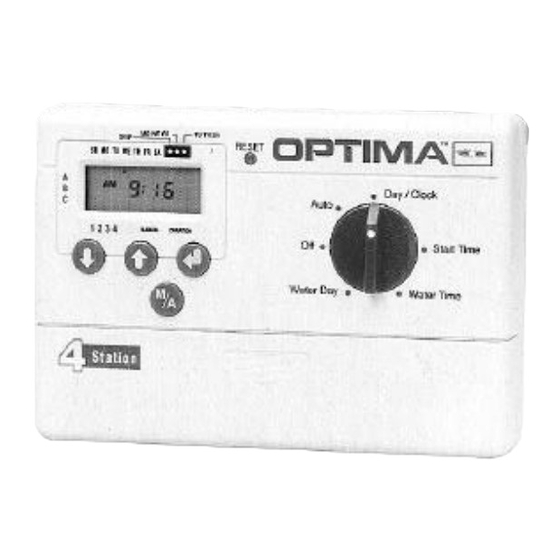
- Page 2 LEGEND: Up Arrow TU TH SA MO WE FR Days of the Week SKIP Down Arrow MO TU WE TH Confirm Arrow Water Icon Starts Manual On/Advance 1 2 3 4 5 6 MANUAL DURATION Indicator Symbol Stations Dual Program Button Watering Schedule (Days) You can choose how often to water your lawn in one of three ways: 1) by Specific Days of the Week (MO, TU, WE, etc.), 2) by Day Intervals (Every day, Every 2 days or Every 3 days), or 3) by a choice of...
- Page 3 HOW TO INSTALL STEP 1: CHOOSE TIMER LOCATION Select an INDOOR location near a standard 120 volt AC electrical outlet (240 Volt outlet for 50 HZ units). The location should be completely protected from moisture, direct sunlight and below freezing temperatures.
- Page 4 STEP 4: WIRE VALVES 1. Choose Wire (wire not included) For runs of less than 800 feet, use 18 gauge color-coded, multi-strand direct burial wire. For runs of longer than 800 feet, use 14 gauge color-coded, multi strand direct burial wire. Be sure the wire has the number of strands equal to the number of valves used PLUS ONE for the Common Wire (e.g.
- Page 5 NOTE: Check local regulations to ensure compliance with any wiring, electrical or installation codes. STEP 5: CONNECT TRANSFORMER 1. Turn dial to Off. NOTE: In Off position display will be blank. 2. Plug pigtail connector (located at the end of transformer wire) into the two prongs to the left of the battery holder located under the cover of the timer.
- Page 6 PROGRAMMING THE PRT-4 / PRT-6 Day/Clock STEP 1: SETTING CURRENT DAY AND TIME TURN DIAL TO Day/Clock POSITION 1. An indicator symbol will blink under SU. Use the Ý or Þ arrow button to move the blinking symbol under the current day.
- Page 7 5. Press the Û button to confirm the program. The Auto lights and display will be on steady to show how the program is set. 6. Rotate the dial to Auto make sure there is not a sym- bol showing under the SKIP, MO, WE, FR, or TU, TH, SA position.
-
Page 8: Set The Water Time For Each Zone
STEP 3: SET THE WATERING START TIMES When shipped from the factory the timer has a default Start program with an 8 a.m. start time once a day. Time 1. Turn the dial to the Start Time position. 2. At this point the "A" indicator symbol will be on, and the start time will be displayed (default is 8:00 a.m.). -
Page 9: Manual Start For A Cycle Or A Zone
4.At this point the next zone indicator symbol will be on and the amount of time for that zone will be flashing. Press the Ý or Þ arrow to adjust the time to the cor- rect amount of time. 5.Press the Û button to move to the next zone and re- peat Step 4 for the remainder of the zones or turn the dial to the Auto position to activate the automatic schedule. - Page 10 Single station does not shut off Valve is stuck. Fuse blows as soon as timer is plugged in. Bad transformer, or electrical short in timer. For troubleshooting help, contact OPTIMA: Customer Support Center 6991 E. Southpoint Rd., Bldg. #1 Tucson, AZ 85706...
Need help?
Do you have a question about the PRT-4 and is the answer not in the manual?
Questions and answers
How do I know it has a battery in it
No, the Optima PRT-4 does not come with a battery included.
This answer is automatically generated
I have lived in this house for 12 years and I turn off the system and restarted the system and part 1 ran and I can’t get the other one o change other
Optima pt-4 is coding a blinking AC code