
Summary of Contents for Champion Irrigation Products C-6
- Page 1 CHAMPION C-6 & C-9 IRRIGATION CONTROLLERS Expandable to 12 & 15 Zones Indoor & Outdoor Models USER MANUAL...
-
Page 2: Features & Benefits
Contact Champion Technical Support at (800) 33-CHAMP [800-332-4267] if you have any questions. The Champion C-6 and Champion C-9 controllers are available with 6 & 9 zones, respectively. Controllers can be expanded, with modules, to include up to 15 zones. Controllers are available in controller boxes, for outdoor applications. -
Page 3: Table Of Contents
CHAMPION C-6 & C-9 CONTROLLERS TABLE OF CONTENTS FEATURES & BENEFITS............................2 INSTALLATION................................4 Indoors..................................4 Outdoors..................................4 Mounting Your Controller ............................4 Wiring Your Valves..............................5 Wiring Your Controller .............................5 AUTOMATIC SPRINKLER SYSTEMS........................6 PROGRAMMING YOUR CONTROLLER .......................7 Programs A, B, & C ..............................7 Setting the Current Calendar Time, Month, Day, & Year..................8 Factory Set/Default Program ............................8... -
Page 4: Installation
120° Fahrenheit. Outdoors Your Champion C-6 (or C-9) controller includes a weatherproof power cord. If you want to hard wire your controller to conduit, the factory installed power cord can be easily removed. 1. Disconnect power to the controller. -
Page 5: Wiring Your Valves
CHAMPION C-6 & C-9 CONTROLLERS 5. Open the controller panel door. 6. Install two more screws from the front, through the holes at the bottom of the box. Wiring Your Valves Use color-coded 18 gauge (16 or 14 gauge can also be used) plastic jacketed sprinkler wire to connect the controller to your valves. -
Page 6: Automatic Sprinkler Systems
(such as front and back yard). Adding Modules Your Champion C-6 (or C-9) controller can operate as many as 15 zones. Zones can be added to your controller by adding modules. Each module adds three zones. If you have a six (6) zone controller, you can add up to 3 additional modules. -
Page 7: Programming Your Controller
CHAMPION C-6 & C-9 CONTROLLERS Each program can be assigned one or up to four start times. The valves assigned to the program(s) will water in sequencial order at each start time. For example, if Program A has an 8 AM start time, the first valve assigned to Program A will begin to water at 8 AM. The next valve will water when the first valve’s Run Time is complete. -
Page 8: Setting The Current Calendar Time, Month, Day, & Year
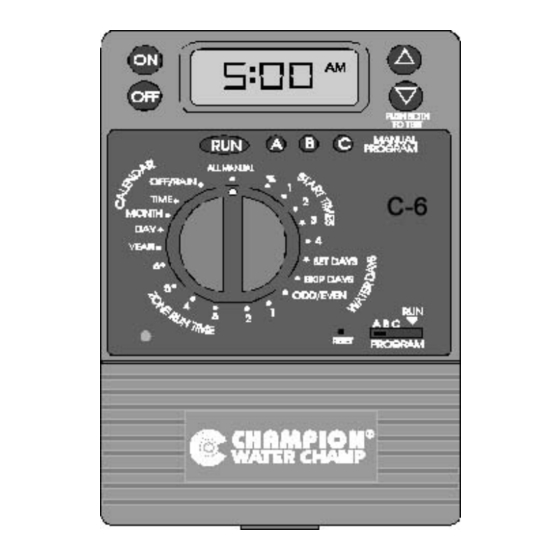
CHAMPION C-6 & C-9 CONTROLLERS Setting the Current Calendar Time, Month, Day, & Year Start programming your controller by setting the CALENDAR • TIME [current time A.M. or P.M.] • MONTH [01 = Jan., 02 = Feb., and so on] •... -
Page 9: Setting A Watering Schedule
CHAMPION C-6 & C-9 CONTROLLERS Setting A Watering Schedule Programs A, B, and C can each have their own set of start times, run times, and watering days. Set the Program switch to A, B, or C to modify these settings. Use these programs to satisfy the different watering needs of your landscape. -
Page 10: Setting Run Times
CHAMPION C-6 & C-9 CONTROLLERS NOTE: If Mondays, Wednesdays, and Fridays are selected, the display would show: S [M] T [W] T [F] S To water every other x number of days: 1. Move the PROGRAM switch to the ‘A’ position, to begin editing program A. Move the switch to B or C, to edit these programs respectively. -
Page 11: Efficient Run Times
CHAMPION C-6 & C-9 CONTROLLERS CAUTION: Make sure programs do not overlap. Add up the combined run times for all zones in Program A and add that to Program A's START TIME to determine the earliest START TIME for Program B. For example, if START TIME 1 for Program A is set to 4:00 A.M. -
Page 12: Operating Your Controller
CHAMPION C-6 & C-9 CONTROLLERS OPERATING YOUR CONTROLLER Automatic Operation 1. Zones will turn ON automatically according to the START TIMES, WATER DAYS, and ZONE RUN TIMES that you set, so long as the rotary dial is not pointing to the OFF/RAIN position. -
Page 13: Features
CHAMPION C-6 & C-9 CONTROLLERS FEATURES OFF/RAIN Use the OFF/RAIN setting to keep valves from turning ON when it is raining or for any other reason, without reprogramming your controller. 1. Turn the rotary dial to the OFF/RAIN position. 2. The time and all programs will be retained, but electricity will not turn valves ON. -
Page 14: Internal Lithium Battery
CHAMPION C-6 & C-9 CONTROLLERS Internal Lithium Battery An internal lithium battery is supplied with your controller. The expected life of the battery is up to seven (7) or more years. The battery backs up the customer entered programs and time and date in the event of a temporary AC power failure. -
Page 15: Program Information
CHAMPION C-6 & C-9 CONTROLLERS PROGRAM INFORMATION STATION RUN TIMES STATION LOCATION STATION RUN TIME PGM C START TIMES START START START START TIME 1 TIME 2 TIME 3 TIME 4 PGM A PGM B PGM C WATERING DAYS SKIP... -
Page 16: Solutions To Common Problems
CHAMPION C-6 & C-9 CONTROLLERS SOLUTIONS TO COMMON PROBLEMS PROBLEM POSSIBLE CAUSES & SOLUTIONS One valve does not Make sure valve wires are not broken turn on, all others Test valve with known good solenoid work correctly. Make sure watering time is not set to OFF...
Need help?
Do you have a question about the C-6 and is the answer not in the manual?
Questions and answers