Table of Contents
Advertisement
Advertisement
Table of Contents

Subscribe to Our Youtube Channel
Related Manuals for Galaxy Digital HD Satellite Receiver

Summary of Contents for Galaxy Digital HD Satellite Receiver
- Page 1 User’s Manual Digital HD Satellite Receiver Galaxy...
-
Page 2: Table Of Contents
PREFACE 1- OVERVIEW 1. WHAT IS THIS PRODUCT FOR? 2. WHAT FEATURE DOES THIS PRODUCT OFFER? 3. FOR YOUR SAFETY 4. PLEASE CHECK THE FOLLOWING ACCERSSORIES ARE ENCLOSED 5. HOW TO USE THE REMOTE CONTROL KEY 6. FRONT PANEL 7. REAR PANEL 8. -
Page 3: 1- Overview
1- OVERVIEW 1. WHAT IS THIS PRODUCT FOR? This manual describes how to setup and operate Your STB. Only qualified personnel should handle any problems beyond this manual. This product is designed for using Digital Satellite and allows you to enjoy a lot of broadcasting whenever you want to watch it anytime. -
Page 4: For Your Safety
▪ 8 Favorite Group List ▪ Powerful Channel Editing Function Sorting: Alphabetic, FTA/Scramble, Parental Lock and with default option Move, Delete, Favorite Edit Parental Lock, Channel Rename, Channel Skip ▪ Manual PID/Satellite & TP/Network Scan ▪ Blind Scan ▪ Multi Satellite Scan – Simultaneous Scan with various Satellites ▪... -
Page 5: How To Use The Remote Control Key
HOW TO USE THE REMOTE CONTROL KEY Function Turns the equipment on/off Sounds Off/On PAUSE Holds the picture or release the pause INFO Shows detail channel information AUDIO Selects audio mode, Select audio language LAST Returns to previous program MENU Enters main menu screen. -
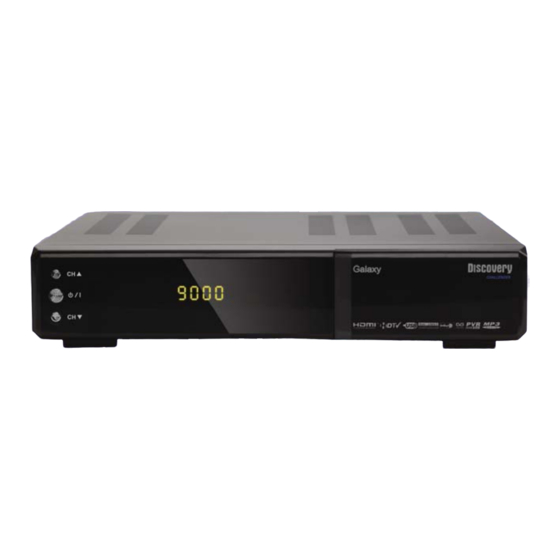
Page 6: Front Panel
6. FRONT PANEL Name Fuction CH DOWN To move down in menus, To change channels POWER To Put Power in and out of standby CH UP To move up in menus, To change channels DISPLAY Display Segment LED IR Receiver Connection USB Port ( switch Front/Rear ) SMART CARD Smart Card Slot... -
Page 7: Connection Diagram
8. CONNECTION DIAGRAM Connect the cable from the satellite dish to the LNB Input socket on the receiver. The SCART connect the TV set. -
Page 8: Start Up
2 - OPERATING 1. Start Up Please follow the brief procedure below and watch the satellite programs. Select the User Setup and confirm Language Select the Installation and antenna setup Adjust LNB configuration per each satellite Execute scanning to find program Exit from installation after all programs are searched. - Page 9 2.2 Satellite List When you enter to Satellite List menu, there will display the screen. • Press [Red] key to enter Edit Satellite where you can edit Satellite name and longitude • Press [Green key to enter Add Satellite menu •...
- Page 10 2.3 Antenna Setup In this section you could know how to operate Antenna Setup. 2.3.1 Tuner Press ◀ ▶ keys to fix Tuner LNB1 or LNB2. 2.3.2 Satellite Press ◀ ▶ keys to fix Satellite or [OK] key to select Satellite list. 2.3.3 LNB Frequency Select LNB type using ◀...
- Page 11 1) DiSEqC 1.2 – Motor Setting If you select “DiSEqC1.2”, “Local Longitude / Local Latitude” is not available. • Press◀ ▶ key or [OK] key to change satellite or transponder. • Position No.& Save: You can press ◀ ▶ key or number key to select or input Position NO. •...
- Page 12 2.4 Single Satellite Search Scan all the listed transponders in a selected satellite. In “Satellite” item, press◀ ▶ key to select satellite, which you to scan. Otherwise, press [OK] key can open the “satellite list” for you to select directly. •...
-
Page 13: Edit Channel
2.4 TP List & Search • Press ◀ ▶ key, you can switch satellite. • Press [Red] key to open edit TP menu. User can edit TP info by using ◀ ▶ key manually. • Press [Green] key, open new TP menu. User can add a new TP by using ◀... - Page 14 3.1.2 Lock • Press [Red] key can enter lock mode and press ▲▼ key to move the highlight and press [OK] key, it will display a dialogue to ask you to input password. The default password is “0000”. If you input the correct password you can see a “lock mark”...
- Page 15 3.1.5 Edit • Press [Blue] key will open “Edit” menu. • Press [Exit] can exit “Edit Channel” menu. If you do modification in “Edit Channel” menu, the system will show up a message box to inquire you whether saving or not when exit. 3.1.5.1 Sort •...
-
Page 16: User Setup
3.3 Delete Channel 3.3.1 One satellite delete channel • You can press ◀ ▶ key to select satellite. • Press [Ok] key, it will show up a warning message box to inquire you whether delete or not. • If you select “Yes”, selected satellite channels will be deleted. - Page 17 automatically with second audio language. The selections of audio languages include: English, French, German, Russian, Arabic, Portuguese, Turkish, Spanish, Polish, Italian and Persian. • Second Audio: If the channel has no correspond audio with “First Audio” but have corresponded audio with “Second Audio”, system will play the second audio language as default.
- Page 18 • “Date” and “Time” These items are valid only when the setting of “GMT Usage” is “Off”. You can press◀ ▶ keys to moving highlight and use number keys to input directly. • If the current channel provides the correct time information, you will see the current time while you enter “Time” menu.
- Page 19 • Channel Lock determining that when users wish to play the lock channels, whether have to input the password or not. If the setting is “Yes”, play the channels with lock mark will show up a dialogue on the screen and ask for the password.
-
Page 20: System Tools
4.8 Others • LNB Power If the setting is “On”, the receiver will supply power to satellite antenna. If the setting is “Off”, the receiver won’t supply power to satellite antenna. • Channel Play type You can select the “playing channels” as “Free”, Scrambled”... - Page 21 5.3 Upgrade By RS232 (Receiver to Receiver) • Connect Null Modem RS 232 Cable (Pin #2 & #3 twisted) between master and slave receiver. • Hook up the master receiver to the TV and select transfer mode. • Turn on the slave receiver power. •...
-
Page 22: Game
6. Game When you enter “Game” menu, you will see Games include Tetris, Othello and Sudoku. 6.1 Tetris • Moving highlight to “Setup” and press ◀ ▶ key to select the game level (speed). • Moving highlight to “Start” and press [OK] key to start the game. -
Page 23: Hdd (Pvr)
7. HDD ( PVR ) You can find information for HDD and PVR setting in this USB menu. 7.1 Record Manager You can play recorded contents as follows ; • Press [Play] key to preview. • Press [OK] to play the recorder in full screen.. •... - Page 24 7.4 Media Player Media Play List will be served when USB plug in. You can preview the picture at the top right corner if the scroll bar is on the picture files (JPG, BMP), and show the MP3 logo when at MP3 file. When you press [F1] Key first time, Storage Type (( Partition and other Device) can be changed.
- Page 25 7.4.2 Image Player It will show up automatically Image file (JPG and BMP) in preview window through ▲▼ key. After select File and press [OK], you can see Slide Show. < Color key operation > [Red] Key : It will show up Play list you selected [GREEN] key : To select file to play [Yellow] key : To select all file in Folder [Blue] key : It can be changed into File and Folder Edit...
-
Page 26: Pvr
8. PVR 8.1 Recording When you press [REC] button at the channel for TV program you want to record, it automatically starts recording for two hours. If you want to change the record time, press [REC] button one more time in order to adjust recording time. If you press [STOP] button, it immediately stop recording. -
Page 27: Channel List
8.4 Timeshift You can use “Timeshift” function in this menu. The option is “On/Off”. If you set timeshift “On”, it will record the current channel you watch automatically. Then you can press [Pause] / [Fast Backward] / [Slow Backward] key to watch the previous program. -
Page 28: Program Guide
10. Program Guide (EPG) ▪ The title and start time of the program is shown as in the right figure after pressing [EPG] key. ▪ Select the particular channel. The channel will be changed. ▪ If you want to watch TV with full screen, Press EXIT. 11. -
Page 29: Multi Pictures
12. Favorite channel ▪ Press [FAV] key to recall a stored favorite channel. ▪ Favorite channel is programmed and stored in the Favorite Edit menu. 13. V.mode ( Video Mode) ▪ Press [V.mode] key one time to check Video mode ( Resolution ) ▪... -
Page 30: 3- Specification
3- SPECIFICATION Satellite Tuner 1 RF Input Connector F-type,IEC169-24 1 RF output(loop through out) F-type,IEC169-24 Frequency Range 950MHz to 2150MHz Input Level -65 dBm~-25 dBm LNB Power 14V/19V (400mA Max) Symbol Rate 1 to 45Msps.(SCPC,MCPC) DiSEqc Diseqc 1.0, 1.1, 1.2 & USALS Compatible Band Switch 22KHz tone Demodulation... - Page 31 USB2.0 1 Host Data port Connector 9 pin D-Sub Type Protocol RS232 Asynchronous Data Rate Max. 19.2Kbps Remote Control Type IR RCU Battery 2x1.5V AAA Type Power Supply Input Voltage AC 90-250V, 50/60Hz Power Consumption Max. 30 Watts Type SMPS Physical Specification Dimension (W x D x H) 280 (W) x 230 (D) x 50(H) mm...
-
Page 32: Trouble Shooting
5- TROUBLE SHOOTING There may be various reasons for the abnormal of the unit. Therefore, if the unit does not work properly, Check the unit according to the procedures shown in the table below. Problem Possible causes Remedy No Picture or Sound Wrong connection of the Scart to TV Connect two terminals correctly input Terminal...
Need help?
Do you have a question about the Digital HD Satellite Receiver and is the answer not in the manual?
Questions and answers