
Subscribe to Our Youtube Channel
Summary of Contents for Swiss Timing OSV-STAR
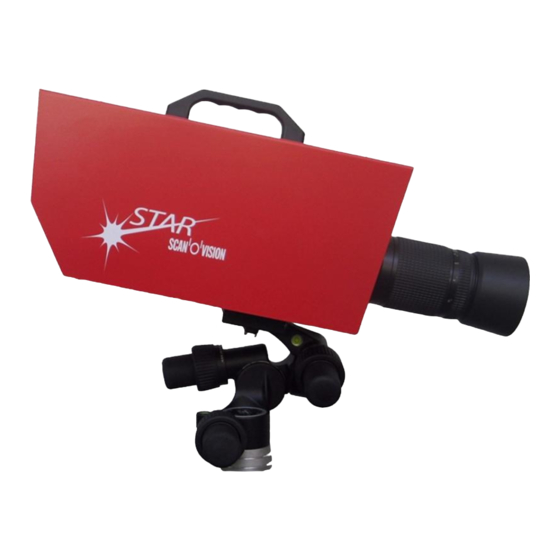
- Page 1 SCAN'O'VISION STAR CAMERA OSV-STAR User’s Manual 3434.505.02 Version 2.0 Edition November 2012...
- Page 2 Swiss Timing Ltd. specifically disclaims any implied warranty of merchantability, quality and/or fitness for any particular purpose. Swiss Timing Ltd. shall not be liable for errors contained in this documentation or for incidental or consequential damages in connection with the supply, performance or use of this documentation.
-
Page 3: Table Of Contents
OSV-STAR / Scan'O'Vision STAR camera TABLE OF CONTENTS INTRODUCTION......................1 Presentation of the camera ....................2 1.1.1 Top view ......................2 1.1.2 Front view ......................2 1.1.3 Rear face ......................3 1.1.4 Bottom view ......................3 Definitions .......................... 3 INSTALLATION ......................4 First setup .......................... - Page 4 Camera reset ........................20 APPENDIX ........................21 Abbreviations and symbols ..................... 21 Index of tables and figures ....................21 Version history......................... 21 SWISS TIMING LTD P.O. Box 138, rue de l'Envers 1 Phone +41 32 488 36 11 2606 Corgémont, Switzerland +41 32 488 36 09 www.swisstiming.com...
-
Page 7: Introduction
OSV-STAR / Scan'O'Vision STAR camera INTRODUCTION Congratulations on your purchase of a Scan'O'Vision , the most advanced electronic photofinish system in sport. With its advanced, patented technology, the Scan'O'Vision family is the only photofinish system that lets you align the camera very easily on any finish line using a video image. -
Page 8: Presentation Of The Camera
Presentation of the camera 1.1.1 Top view 1. Handle to carry the camera. 2. Initial alignment sight. 3. Axis of alignment. 1.1.2 Front view 10. Fixing for lens protection. 11. Reference mark (hole) for lens mounting. 12. Latch for unlocking the lens. 13. -
Page 9: Rear Face
OSV-STAR / Scan'O'Vision STAR camera 1.1.3 Rear face 20. Yellow LED: indicators for vertical status [see 2.10]. 21. Green LED: indicator of working status (lit when the camera is in operation). 22. Air output with ventilator. 23. Connection for WIFI antennas... -
Page 10: Installation
2 INSTALLATION First setup If you have ordered the optional internal battery [3434.980], you have to mount it in the camera before the first use: 1. With the delivered tool, remove the screw that block the battery cover (point 33 of chapter 1.1.4) and open battery cover. -
Page 11: Choice Of The Lens
STAR models 220 and 2020. Please check with a Swiss Timing representative before purchasing a Nikon compatible lens as several models are not compatible with the STAR’s highest resolutions. Swiss Timing can also provide you the lens corresponding exactly to your camera model. -
Page 12: Lens
To adjust the sharpness (or focus). Must be set in relation to the distance between the lens and the middle of the track; the final setting must be done when viewing the image on the computer (OSV-STAR software in setting mode). -
Page 13: Lens Mounting
If the clutch button can not be fully pressed, do not force; it is generally sufficient to give one or two command of focus in the software OSV-STAR (camera setting mode) to unblock the mechanism In order to protect the camera and the lens, please immediately put back the protective caps of the camera and the lens. -
Page 14: Wiring The Installation
With the optional internal battery, if the power is removed while the software is running, the internal battery will automatically keep the camera on until the reserve power is depleted or you exit the OSV-STAR software (in this case a question is asked if one wants or no to switch off the camera from the software). -
Page 15: Indicators
OSV-STAR / Scan'O'Vision STAR camera 2.10 Indicators On the rear panel, different LEDs indicate the state of the camera: State of LED Status Camera switched off. Camera switched on, in phase of initialization. Camera switched on and ready, perfectly vertical sensor. -
Page 16: Software
The main software is started by double clicking on the shortcut created on your desktop or by double clicking on the "OSV7.EXE" file in the main folder of the installation (C:\OSV-STAR). If errors occur when launching the OSV-STAR software, please refer to the ReadMe.txt file Page 10 3434.505.02... -
Page 17: Network Card Configuration
OSV-STAR / Scan'O'Vision STAR camera (contained in the C:\OSV-STAR directory); it is possible that your computer require the installation of some additional libraries. To uninstall or modify the OSV-STAR software installation, run again the Setup.exe software contained on the CD-ROM. - Page 18 Click on the "OK" button of this window, and then on the "OK" button of the previous “Connection Properties” window. The system may ask you to restart the computer at this point. b) Speed To ensure a constant data transfer, it is highly recommended to fix the transmission speed between the camera and the computer to 1Gb: ...
-
Page 19: Improve Performances
OSV-STAR / Scan'O'Vision STAR camera Improve performances To improve performances of the OSV-STAR software on your computer, verify that the "cache" of your hard disk is enabled: In Windows, click on the "start" button, then "Settings" and "Control Panel". -
Page 20: Update
Update The software updates are available as free download on our web site: www.swisstiming.com In some cases, the firmware of the camera must also be updated (see chapter 3.9). In any case it must be current with the version of the main software; if this is not the case, a warning message will be displayed when you launch the Scan'O'Vision application: “Incompatible hardware/software version”. -
Page 21: Camera Firmware Update
OSV-STAR / Scan'O'Vision STAR camera Camera firmware update Be sure the camera is connected to the computer, powered on and is running (boot sequence finished). If the OSV-STAR software is running, exit it. Launch the Firmware.exe utility tool from the... - Page 22 The blue process bar must reach 100% then, after about 20 seconds, the message “Please restart OSV-STAR camera and exit this software” is displayed in the bottom of the window. You can now exit the Firmware.exe utility tools by clicking on the icon.
-
Page 23: Options
OSV-STAR / Scan'O'Vision STAR camera 4 OPTIONS Internal battery A battery (option 3434.980) can be installed inside the camera. This battery allows the camera to continue to work up to one hour in case of power failure; so it is a good way to use with a laptop without need of UPS. -
Page 24: Properties
5 PROPERTIES Power supply 11 – 24VDC, 4A max Camera input: 100 – 240VAC, 50/60Hz, 1.5A max AC adapter provided: Connections POWER [Input for power or external battery, metal Tuchel 4pM]: +11V to +24V DC +11V to +24V DC Consumption: maximum 4A. START / FINISH [Input for timing, metal Tuchel 6pF]: FINISH+ (+12V sep) START+ (+12V sep) -
Page 25: Technical Characteristics
OSV-STAR / Scan'O'Vision STAR camera Technical characteristics Dimensions (L x W x H): 359 x 183 x 210mm (with handle) Weight Without With optional battery battery 3.8 kg 4.0 kg STAR 110 3.9 kg 4.1 kg STAR 210 3.9 kg 4.1 kg... -
Page 26: Maintenance And Protection
(see point 28 of chapter 1.1.3); the camera will switch off and on again (the synchronisation is lost). After the camera boots (about 80s), restart the OSV-STAR software. To switch off the camera, follow the procedure in chapter 2.8. Page 20 3434.505.02... -
Page 27: Appendix
OSV-STAR / Scan'O'Vision STAR camera APPENDIX 7.1 Abbreviations and symbols Abbreviations Symbols 7.2 Index of tables and figures Index of tables Index of figures 7.3 Version history Version Date Modifications since last version 01/01/10 Modifications STAR 220 Modifications camera version “555” (chapter 3.9) 13.11.12... - Page 28 NOTES Page 22 3434.505.02 Version 2.0...
- Page 29 SWISS TIMING LTD P.O. Box 138, rue de l'Envers 1 Phone +41 32 488 36 11 2606 Corgémont, Switzerland +41 32 488 36 09 www.swisstiming.com info@swisstiming.com SWISS TIMING LTD...
Need help?
Do you have a question about the OSV-STAR and is the answer not in the manual?
Questions and answers