Table of Contents
Advertisement
Advertisement
Table of Contents

Related Manuals for Sansui SAP201V


Summary of Contents for Sansui SAP201V
-
Page 1: User Guide
SAP201V Integrated Stereo Amplifier with DAC User Guide... -
Page 2: Dear Valued Customer
Dear Valued Customer Thank you for deciding to purchase this Sansui product. This instruction manual will give you a general idea of how this device operates, as well as providing you with information on safety procedures and cleaning. In order to maintain this product in good condition, and to ensure it’s safe operation, please take a few minutes to read and carefully follow all the safety and... -
Page 3: Table Of Contents
Table of Contents INTENDED USE .............................. 5 .............................. 5 XPLANATION OF SYMBOLS SAFETY INFORMATION ............................ 6 ACCESSORIES .............................. 7 DESCRIPTION OF PARTS ............................ 8 ................................... 8 RONT ANEL .................................. 8 EAR ANEL RM200 ........................ 9 ANSUI EMOTE ONTROL ... -
Page 4: Intended Use
There are no user-serviceable parts found inside the device, therefore the device need never be opened. Page | 5 © Sansui UK 2012 SAP201V IB Ver 1.0 Rev 0.0... -
Page 5: Safety Information
Eliminate potential tripping hazards by routing cables in such a way that no one can trip or stumble over them. Never use the device, if the power cable or device is damaged. Page | 6 © Sansui UK 2012 SAP201V IB Ver 1.0 Rev 0.0... -
Page 6: Accessories
Please check all these parts are present before proceeding. Please inform your dealer if any part is missing or damaged. 1 x Remote control handset 1 x mains power cable Page | 7 © Sansui UK 2012 SAP201V IB Ver 1.0 Rev 0.0... -
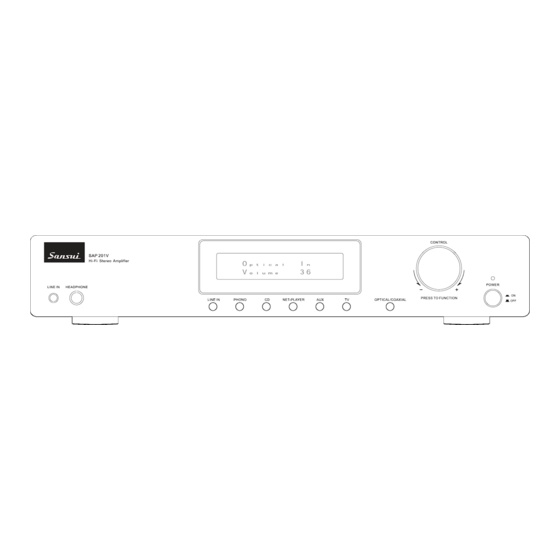
Page 7: Description Of Parts
Digital Coaxial S/PDIF input. Connect a COAX cable (not supplied) to connect to a digital output such as the coaxial output on a SACD or CD player. Phono ground terminal for connecting the ground connection from a turntable. Page | 8 © Sansui UK 2012 SAP201V IB Ver 1.0 Rev 0.0... -
Page 8: Sansui Rm200 Remote Control Handset
Do not place objects such as books on top of the remote controller. Doing so could depress the buttons on the remote continually and drain the batteries. Page | 9 © Sansui UK 2012 SAP201V IB Ver 1.0 Rev 0.0... - Page 9 Make sure that batteries are not dismantled, short-circuited or are thrown into fire. Never re-charge non- rechargeable batteries. There is a risk of explosion! Page | 10 © Sansui UK 2012 SAP201V IB Ver 1.0 Rev 0.0...
-
Page 10: Set Up And Connection To Other Devices
There are two types of digital audio connection terminals OPTICAL COAXIAL Follow the instructions for the device you wish to connect to ensure the correct cable is used. Page | 11 © Sansui UK 2012 SAP201V IB Ver 1.0 Rev 0.0... -
Page 11: Correct Connection Of Speakers
Connect the speakers as shown in the drawing below. Connect the positive speaker wire to the RED + positive terminal on the unit, and the negative speaker wire to the BLACK – negative on the unit. Page | 12 © Sansui UK 2012 SAP201V IB Ver 1.0 Rev 0.0... -
Page 12: Connecting Analog Audio Components
If the turntable has a ground wire, connect it to the unit's Phono GND screw. Note, however, that for some turntables, connecting the ground wire will increase the noise. If this happens, disconnect the ground wire. Connecting a CD or SACD player Page | 13 © Sansui UK 2012 SAP201V IB Ver 1.0 Rev 0.0... -
Page 13: Connecting A Network Player/Internet Radio/Dab+ Tune
When connecting any component to the amplifier please ensure the power is switched off before connection. There are two types of digital connection. Optical and Coaxial. See below Connecting a device via Digital Optical & Digital Coaxial Connection Page | 14 © Sansui UK 2012 SAP201V IB Ver 1.0 Rev 0.0... -
Page 14: Connecting The Power Cable
If the power cord is plugged in, connecting or disconnecting it to/from the unit could cause electric shock. Plug the power cord into a household power outlet. Page | 15 © Sansui UK 2012 SAP201V IB Ver 1.0 Rev 0.0... -
Page 15: Listening To Audio
Audio quality will stabilize about 10 to 30 minutes after the unit is turned on. Press the input button to select the audio playback component. Start playback on the component selected. Page | 16 © Sansui UK 2012 SAP201V IB Ver 1.0 Rev 0.0... - Page 16 When using the remote control to switch the unit to standby mode the POWER indicator light will change from BLUE to RED. To switch the unit on from standby simply press the power button on the remote control handset. Page | 17 © Sansui UK 2012 SAP201V IB Ver 1.0 Rev 0.0...
-
Page 17: Adjusting The Tone And Left/Right Volume Balance
Turn the CONTROL knob to adjust each tone setting. The last option in the cycle is LOAD DEFAULT?. Pressing the CONTROL knob again will reset the tone adjustment to normal. Page | 18 © Sansui UK 2012 SAP201V IB Ver 1.0 Rev 0.0... -
Page 18: Troubleshooting And Error Messages
7. Troubleshooting and error messages The SAP201V is equipped with state-of-the-art technology and is safe to operate. Nevertheless, problems or malfunctions may occur. Before contacting Sansui customer support, refer to the following for possible solutions. PROBLEM POSSIBLE SOLUTION No power when switched on... -
Page 19: Maintenance And Handling
Never use any abrasive or harsh cleaning agents (e.g. alcohol, benzene or thinners) as these could damage the controls, casing or any markings and labels found on the device. Page | 20 © Sansui UK 2012 SAP201V IB Ver 1.0 Rev 0.0... - Page 20 According to legislation batteries are to be returned to the place of purchase or disposed of at a designated recycling site Page | 21 © Sansui UK 2012 SAP201V IB Ver 1.0 Rev 0.0...
-
Page 21: Specifications
Power Consumption Max 250W Dimensions (WxHxD) : 430 x 80 x 283 mm Weight 6.3 kg NOTE: Specifications and design are subject to possible modifications without notice Page | 22 © Sansui UK 2012 SAP201V IB Ver 1.0 Rev 0.0... - Page 22 © Sansui UK 2012 SAP201V IB Ver 1.0 Rev 0.0...
Need help?
Do you have a question about the SAP201V and is the answer not in the manual?
Questions and answers