
Summary of Contents for esky C5900
- Page 1 IP Camera (C5900) User Manual IP Camera User Manual(H series) Model: C5900 © 2011 Hisgadget Inc...
-
Page 2: Preface
IP Camera (C5900) User Manual Preface Thank you for purchasing eSky C5900 Wireless IP Camera, a powerful and high-quality wireless IP camera. The camera can be installed as a standalone system within your wireless local network easily and quickly, and supports remote management function so that you can access and control it using a web browser on your PC/Mac. -
Page 3: Caution
Ignoring the warnings may result in serious hazards. This User Manual explains how to operate the C5900 IP Camera from a computer. As this section gives tips on using the User Manual, read it before you operate the camera is necessary. -
Page 4: Table Of Contents
IP Camera (C5900) User Manual Table of Contents Preface ................................. 2 CAUTION ..............................3 Chapter I Introduction ..........................7 Features ..........................7 System Requirements ......................8 Places of application ......................9 Packing List ......................... 9 Product illustration ......................10 Front view ........................... 10 1.5.1... - Page 5 IP Camera (C5900) User Manual Users settings........................33 RTSP settings ........................34 Multi-Camera settings ...................... 34 Basic network settings ....................36 Wireless LAN settings...................... 37 PPPoE settings ........................37 UPnP settings ........................38 4.10 4.11 DDNS service settings ..................... 39 Video setting ........................
- Page 6 IP Camera (C5900) User Manual Operating or storage location ..................64 Warranty Card........................66...
-
Page 7: Chapter I Introduction
IP Camera (C5900) User Manual Chapter I Introduction 1.1 Features High-quality monitoring via the network You can monitor a high-quality live image from the camera using the Web browser on a computer connected to a WiFi network. The maximum frame rate is 30 fps. Numbers of users can view live videos from one camera at the same time are not limited. -
Page 8: System Requirements
IP Camera (C5900) User Manual combines “Moving object detection” that detects moving objects in camera images with “Unattended object detection” that detects objects that do not move for a specified period in camera images. Two-way audio The camera is equipped with two-way audio that means you can use the camera as speaker and microphone at the same time. -
Page 9: Places Of Application
IP Camera (C5900) User Manual 1.3 Places of application This camera is an ideal solution for big departments, schools, factories, workshops etc. Please check out the integrity of the items in you package before installation, contact the reseller as soon as possible if any parts missed at the very first place. -
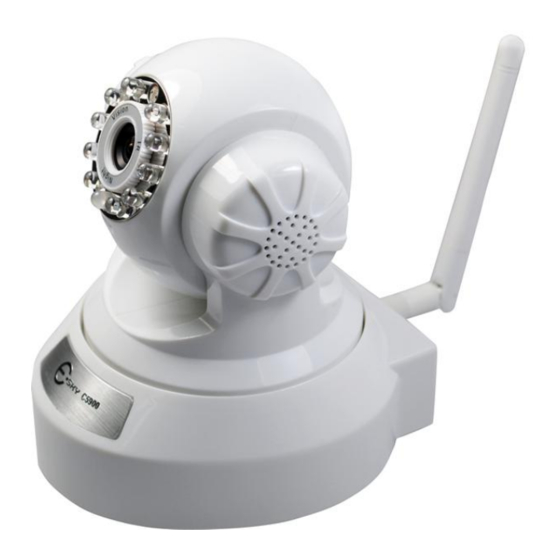
Page 10: Product Illustration
IP Camera (C5900) User Manual Mounting Bracket X 1 CD X 1 Quick Install Guide For Windows X 1 1.5 Product illustration 1.5.1 Front view Infrared LED: 11 IR LEDs LENS: CMOS sensor with fixed focus lens. (3.6mm) WIFI Antenna: Wireless Antenna... -
Page 11: Back View
IP Camera (C5900) User Manual 1.5.2 Back view Ethernet Port: RJ-45/10-100 Power Jack: DC 5V/2A Power supply T/F Card Slot: Micro SD Card Slot Network Light: The LED will blink when plug the power Power Light: If the power adapter works well, the light will turn on Audio Output: The jack is designed for external speaker. -
Page 12: Chapter Ii Installation
IP Camera (C5900) User Manual How to reset your camera: Use a slim toothpick thrusting into the reset spot at the buttom of the camera, and keep on pressing for 30 seconds. Please power on the camera before reset. Warning: Please use the original power adapter, otherwise the IP camera would be damaged. - Page 13 IP Camera (C5900) User Manual process. Click “Install Super Client” to start the installation. The SETUP window will appear as below. Hit "OK" to continue Click "next" to continue...
-
Page 14: Chapter Iii Accessing The Camera
IP Camera (C5900) User Manual After installation there will be two icons on your desktop: Chapter III Accessing the Camera 3.1 Authentication Double click this icon to start your IP Camera installation. Select the mode you want to proceed. If you are a new user, “Wizard Mode” is recommended. - Page 15 IP Camera (C5900) User Manual Figure 3.1-2 Figure 3.1-3...
- Page 16 IP Camera (C5900) User Manual Figure 3.1-4 You can see the network parameters of your IP camera in this screen. You need to make sure they are correct before you can view the camera from your PC. If you see red words “The camera can not be accessed, please set with one key or manually set” on your screen as shown in Figure3.1-3...
-
Page 17: Installing Plug-In
IP Camera (C5900) User Manual Enter the default User name (admin) and leave the password blank then press “OK” to access the main screen of the camera’s Web Configuration. The default username is ‘admin” and the camera initially will not ask for any password. The administrator should immediately implement a new password as a matter of prudent security practice. - Page 18 IP Camera (C5900) User Manual To operate the welcome page and the main viewer correctly, set the security level of the Internet Explorer to Medium or lower, as follows: Select Tools from the menu bar for Internet Explorer, then select Internet Options and click the Security tab.
-
Page 19: Initial Access To The Network Camera In Lan
IP Camera (C5900) User Manual 3.3 Initial Access to the Network Camera in LAN We take Internet Explorer for example: Click "here" to download activeX and install the activeX , then press "F5" to refresh the page. Attention: Please do not neglect the browser type you are using. -
Page 20: Capabilities Of Administrator And User
IP Camera (C5900) User Manual 3.4 Capabilities of Administrator and User This IP camera identifies the people who log in as the Administrator or User. The Administrator can use all the functions of this network camera including camera settings. The User can use the functions for monitoring the image and audio from the camera, and controlling the camera. -
Page 21: Main View
IP Camera (C5900) User Manual 3.5 Main View The main page layout has three parts: Camera View: What the camera sees. Pan/Tilt control buttons: These buttons provide a command interface to control the aim of the camera. : After P/T rotates all around, it returns center place... - Page 22 IP Camera (C5900) User Manual Configuration functions: The camera can be configured using these interfaces. Mode: the fluorescent light will flash according to the power line frequency that depends on local situation. Change the frequency setting to eliminate uncomfortable flash image when the light source is only fluorescent light.
-
Page 23: Wifi Configuration
IP Camera (C5900) User Manual 3.6 WiFi Configuration Figure 3.6-1 Figure 3.6-2... -
Page 24: How To Log In Your Camera Remotely
IP Camera (C5900) User Manual In Figure 3.6-1 of “IP Camera Wizard”, click Next. You will be requested to enter username and password again. (The default username is ‘admin’ and password is blank). Click Scan to find available WIFI networks. If the network does not show up as you expected, please scan again(Step B in Figure 3.6-2). - Page 25 IP Camera (C5900) User Manual If the built-in DDNS server does not please you, a third-party server is also on the table. You can apply for other DDNS server freely by disabling the "Factory DDNS" and input the corresponding information in the right place. Enable "Factory DDNS" would be recommended. Follow the picture...
-
Page 26: Port Forwarding
IP Camera (C5900) User Manual 3.7.2 Port Forwarding In order to access IP camera within your local network from outside, you need to create a special tunnel in your router. This is called Port Forwarding. Our software can configure port forwarding for certain brands of routers automatically. - Page 27 IP Camera (C5900) User Manual need to enter the brand of your router, login and password. If your brand is not in the list, you have to configure it manually. Please refer to router user manual for how to configure.
- Page 28 IP Camera (C5900) User Manual Forwarding is also called port mapping or virtual server differing from brands, but the settings are much the same. From the computer connected to the router, first open your Web browser. Then enter the router's address for network administration in the Web address field and hit return (Enter) to reach the router's home page.
-
Page 29: Log In Your Camera Via Mobile Device
IP Camera (C5900) User Manual Figure 3.7.2-2 Please do not forget to save these settings when you finish them. Common router default visit address 1. DLINK router default address is 192.168.0.1 2. Linksys router default address is 192.168.1.1 3. 3com router default address is 192.168.2.1 4. - Page 30 IP Camera (C5900) User Manual Enter access address http://demo.ipcam.so in the browser address bar, the following interface will appear: Input the Username and Password of the device, and the following interface will appear. There are four log-in options. Click to the third Sign in and use Mobile Phone mode.
- Page 31 IP Camera (C5900) User Manual Instruction for the key function: Update: Refresh the page. If the monitor picture is kept still, you may press this key to update the page. Up, down, left, and right: Rotate the camera P/T. The camera without P/T does not have these keys.
-
Page 32: Chapter Iv Extended Function
IP Camera (C5900) User Manual Chapter IV Extended Function Click this icon at the lower right corner of the camera's Web Configuration page to enter into setting panel 4.1 Camera info Show the information of IP camera's kernel version, parameters and SD card. -
Page 33: Data & Time Settings
IP Camera (C5900) User Manual 4.3 Data & Time settings Timezone: Select the proper time zone for the region from the pull-down menu at first. Synchronize with PC: Select this option and the date & time settings of the camera will be synchronized with the connected computer. -
Page 34: Rtsp Settings
IP Camera (C5900) User Manual set the user names and passwords, up to 8 users with 3 levels can be set. You can get more information about the capabilities of each level by referring to chapter 3.1 4.5 RTSP settings Set RTSP authority. - Page 35 IP Camera (C5900) User Manual In Multi-Device Settings page, you can see all devices searched in LAN. The 1st Device is the one you are operating. You can add more cameras in the list in LAN for monitoring. The inside software of camera supports up to 9 IP Cameras online simultaneously.
-
Page 36: Basic Network Settings
IP Camera (C5900) User Manual Tips: Using “IP Camera wizard” to copy the ‘alias’ , ’host’, ‘http port” would make the adding process more convenient 4.7 Basic network settings Set the IP camera's IP Address, sub mask address, gateway, DNS server, HTTP port. -
Page 37: Wireless Lan Settings
IP Camera (C5900) User Manual automatically. Note: If you want to access to your camera remotely or set up multi-camera a static IP address for each camera is a must. 4.8 Wireless LAN settings Please refer to chapter 3.6 getting more details. -
Page 38: Upnp Settings
IP Camera (C5900) User Manual 4.10 UPnP settings The camera supports UPnP (Universal Plug and Play), which is a set of computer network protocols that enable the device-to-device interoperability. In addition, it supports port auto mapping function so that you can access the camera if it is behind an NAT router or firewall. Select the Enable option to enable this feature. -
Page 39: Ddns Service Settings
IP Camera (C5900) User Manual 4.11 DDNS service settings If you enable factory DDNS, nothing need to be filled. If you want to user external DDNS server you can assign a fixed host and domain name to a dynamic Internet IP address. Select the Enable option to enable this feature. Then, enter the required information in the Host Name(server) User Name(account) and Password boxes. -
Page 40: Video Setting
IP Camera (C5900) User Manual 4.12 Video setting Set the IP camera's picture size, rate mode, key frame , picture quality and bit rate. To achieve good real-time visual effect, the network bandwidth should be large enough to allow a... -
Page 41: Mail Service Settings
IP Camera (C5900) User Manual transmission rate of greater than 20 image frames per second. If the broadband network is over 1 Mbps, set the “Video Quality” between 1 to 3. The maximum frame rate is 30. If your network bandwidth is more than 512Kbps, you can fix “Video Quality”... -
Page 42: Ftp Service Settings
IP Camera (C5900) User Manual 4.14 FTP service settings FTP server is mainly used for uploading the live pictures to FTP sever in case of alarming. FTP server: the address of FTP severs. FTP port: the port of FTP sever, normally is 21. -
Page 43: Alarm Service Settings
IP Camera (C5900) User Manual 4.15 Alarm service settings The Administrator can use the built-in motion detection to monitor any movement to perform many useful security applications. To upload the snapshots, users can choose either email or FTP according to user’s needs. Both e-mail and FTP use the network settings on the Email and FTP page. -
Page 44: Sd Card Record
IP Camera (C5900) User Manual 4.16 SD card record Some settings about SD card record Record cover (substitute): when the free memory of the SD card is zero, the camera would still store up videos into the card and substitute the older data with new data Record for alarm GPIO: begins recording when alarm triggered off by external security system. -
Page 45: Sd Card Playback
IP Camera (C5900) User Manual 4.17 SD card playback When recording video on SD card, you can download and playback in long distance directly. Clicking download and save it to the local hard disk, then play it by VLC player. -
Page 46: Log
IP Camera (C5900) User Manual 4.19 Log Record the operation log of IP camera The content of the log provides useful information about configuration and connection after system boot- up. -
Page 47: Chapter V Tips
IP Camera (C5900) User Manual Chapter V Tips 5.1 Reset and restore There is a reset hole at the bottom of the Camera. It is used to reset the system or restore the factory default setting How to reset your camera: Use a slim toothpick thrusting into the reset spot at the buttom of the camera,and keep on pressing for 15 seconds. -
Page 48: Chapter Vi Super Client
IP Camera (C5900) User Manual Chapter VI Super Client 6.1 Introduction IP camera-Central Management Client is a kind of software used for multiple IP camera monitoring, characterized with multi-camera monitoring, PTZ control, record, alarm and access authority management function, as well as easy operation and strong capability, it is a supplementary software for IP camera which has simple function itself. - Page 49 IP Camera (C5900) User Manual Now, let's take F series for example Name: Name of the device, to distinguish from others, will be displayed on the list. Basic Information: The basic information used for connecting the camera, such as connecting method, username, password and PTZ protocol, etc.
- Page 50 IP Camera (C5900) User Manual Camera visit: view live videos Forwarding Server: Will get the video from the forwarding server, so need to build a server. This mode does not support PTZ control. Support P2P: Support P2P technology. This mode cannot support PTZ control.
-
Page 51: Main Windows
IP Camera (C5900) User Manual 6.3 Main Windows Below is the main window of the Client software. -
Page 52: Ptz Control
IP Camera (C5900) User Manual Equipment Tree: a tree list of all the devices. Support multi-level structure, users can connect or disconnect the devices in the group, also, users can double click a device to connect it and see the video in the display area, or click the right mouse button to modify the settings. -
Page 53: Alarm
IP Camera (C5900) User Manual Enable record: When selected this option, record function is effective. Record always: The client will record all the time. Schedule record: Users can appoint a certain period in which the client will record. Alarm record: If it is selected and alarm function is enabled, the client will record when alarm is triggered. - Page 54 IP Camera (C5900) User Manual Enable alarm: Active alarm function Alarm group: If several cameras are in the same group, once one of them is triggered to alarm the others will alarm too. Alarm duration: One period of siren time when alarm is triggered.
- Page 55 IP Camera (C5900) User Manual defines the content, such as the name of alarm equipment, alarm time. These pre-defined contents have “$$” at the beginning, “$$” at the end For example: $$DevName$$: that the alarm occurred in the name of the equipment;...
- Page 56 IP Camera (C5900) User Manual Test: Click test button, the program will send a testing email, users can check whether it is correctly set or not, if sending failed, you should check out the details to get things square. Email SMTP setting is the same as the setting in Outlook or Foxmail, user also can log in the web mail and refer to the help file.
- Page 57 IP Camera (C5900) User Manual Password: FTP log in password; Save path: path for saving uploaded files, the program will build a folder named after the alarming time, the pictures and videos will be saved there. Dialing: When alarming, the program will dial the appointed telephone, mobile phone automatically through the PC modem.
- Page 58 IP Camera (C5900) User Manual Skype: Skype should be installed and set up as auto-landing in the computer you operating. During alarming the program will activate the Skype interface to send SMS messages. If Skype is not running, the program will automatically start Skype.
-
Page 59: History Manage
IP Camera (C5900) User Manual URL Link: when alarming, the program will open the appointed URL, normally this is used to inform other system of the alarm. 6.7 History Manage Users can manage all the history and alarm records here. -
Page 60: Operator Manage
IP Camera (C5900) User Manual In the windows, users have device list, alarm records list and records file list. If the alarm record file is image, then on the display area will show the picture browser, users can directly print or email the picture, if the file is video, then will play it on the right area. - Page 61 IP Camera (C5900) User Manual After selecting Enable Authentication, all the operation action will ask for authority verification. In default setting, admin is a super administrator, this account cannot be deleted but password can be changed. Add operator: Click Add button, a dialogue will pop up.
-
Page 62: Log Manage
IP Camera (C5900) User Manual Type in an account and assign it certain authority, click confirm to save it. Allow to add or delete sub-operator means the operation account can add its own subsidiaries; this could be valid after logging in with the account. - Page 63 IP Camera (C5900) User Manual Choose related date and device, then click find button.
-
Page 64: Chapter Vii Precautions
• If you lose data by using this unit, Hisgadget Inc accepts no responsibility for restoration of the data. 7.2 Operating or storage location Avoid operating or storing the camera in the following locations: •... - Page 65 IP Camera (C5900) User Manual Ventilation To prevent heat build-up, do not block air circulation around the camera. Transportation When transporting the camera, repack it as originally packed at the factory or in materials of equal quality. Cleaning • Use a soft, dry cloth to clean the external surfaces of the camera. Stubborn stains can be removed using a soft cloth dampened with a small quantity of detergent solution, then wipe dry.
-
Page 66: Warranty Card
IP Camera (C5900) User Manual 7.3 Warranty Card Please fill out the following form, then cut it off and return it to us together with the product. Product Model Release Date User Company User name User Address Tel. No. Maintenance Date...
Need help?
Do you have a question about the C5900 and is the answer not in the manual?
Questions and answers