Sony DSC-T900 Instruction Manual
Digital still camera
Hide thumbs
Also See for DSC-T900:
- Handbook (170 pages) ,
- Instruction manual (124 pages) ,
- Service manual (67 pages)
Table of Contents
Advertisement
Quick Links
Digital Still Camera
Instruction Manual
DSC-T900
Before operating the unit, please read
this manual thoroughly, and retain it for
future reference.
© 2009 Sony Corporation
4-130-970-11(1)
Getting started
Shooting/viewing
images
Using shooting
functions
Using viewing
functions
Deleting images
Connecting to other
devices
Changing camera
settings
GB
Advertisement
Table of Contents

Related Manuals for Sony DSC-T900


Summary of Contents for Sony DSC-T900
-
Page 1: Instruction Manual
Digital Still Camera images Instruction Manual Using shooting functions DSC-T900 Using viewing Before operating the unit, please read functions this manual thoroughly, and retain it for future reference. Deleting images Connecting to other devices Changing camera settings © 2009 Sony Corporation... -
Page 2: Important Safeguards
The model and serial numbers are located SAFEGUARDS on the bottom. Record the serial number in the space provided below. Refer to these numbers whenever you call upon your Sony dealer regarding this product. For your protection, please read these safety instructions completely before operating Model No. -
Page 3: Replacement Parts
Attachments Lightning Do not use attachments not recommended by the For added protection for this set during a lightning manufacturer, as they may cause hazards. storm, or when it is left unattended and unused for long periods of time, unplug it from the wall Cleaning outlet and disconnect the antenna or cable system. -
Page 4: Read This First
• Be sure to charge the battery pack using a Battery charger genuine Sony battery charger or a device that can charge the battery pack. • Keep the battery pack out of the reach of small This power unit is intended to be correctly children. -
Page 5: Regulatory Information
Trade Name: SONY – Increase the separation between the equipment Model No.: DSC-T900 and receiver. Responsible Party: Sony Electronics Inc. – Connect the equipment into an outlet on a circuit different from that to which the receiver Address:16530 Via Esprillo, is connected. -
Page 6: For Customers In Europe
Notice for the customers in the European countries with separate countries applying EU Directives collection systems) The manufacturer of this product is Sony Corporation, 1-7-1 Konan Minato-ku Tokyo, 108- 0075 Japan. The Authorized Representative for EMC and product safety is Sony Deutschland GmbH, Hedelfinger Strasse 61, 70327 Stuttgart, Germany. - Page 7 If you should lose the human health which could otherwise be caused by fuse cover, please contact your nearest Sony inappropriate waste handling of the battery. The service station.
-
Page 8: Table Of Contents
Table of contents IMPORTANT SAFEGUARDS ..............2 Read this first .................... 4 Notes on using the camera ..............10 Getting started ..............12 Checking the accessories supplied ............12 Identifying parts ..................13 Charging the battery pack............... 15 Inserting the battery pack/a “Memory Stick Duo” media (sold separately) .................. - Page 9 Deleting images ................39 Deleting the currently displayed image ..........39 Deleting multiple images................. 39 Deleting all images (Format) ..............40 Connecting to other devices ..........41 Viewing images on a TV ................41 Printing still images ................. 42 Using the camera with a computer ............44 Changing camera settings ............
-
Page 10: Notes On Using The Camera
Notes on recording/playback If you use accessories manufactured by Before you start recording, make a trial • companies other than Sony, this could cause a recording to make sure that the camera is camera trouble. working correctly. Using other manufacturers’ camera cases •... - Page 11 No compensation for damaged content or recording failure Sony cannot compensate for failure to record or loss or damage of recorded content due to a malfunction of the camera or recording media, etc.
-
Page 12: Getting Started
Getting started Checking the accessories supplied Battery charger BC-CSD (1) CD-ROM (1) • • – Cyber-shot application software – “Cyber-shot Handbook” – “Cyber-shot Step-up Guide” Instruction Manual (this manual) (1) • Using the wrist strap Power cord (mains lead) (1) •... -
Page 13: Identifying Parts
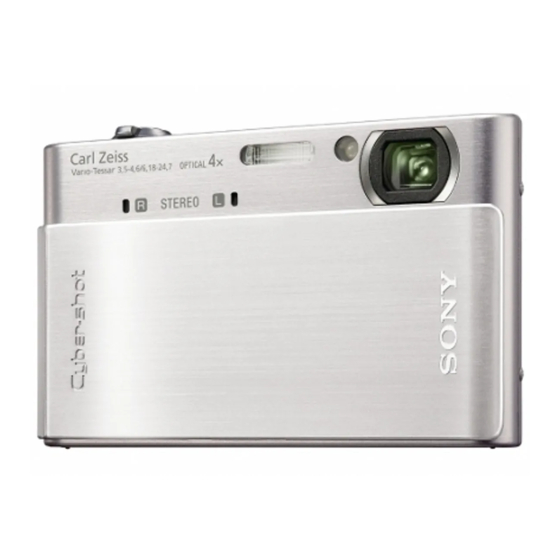
Identifying parts A Shutter button Camera B Speaker C Zoom (W/T) lever D Microphone E ON/OFF (Power) button F Flash G Self-timer lamp/Smile Shutter lamp/ AF illuminator H Lens I Lens cover J LCD screen/Touch panel (Playback) button L Mode switch M Hook for wrist strap/Grip N Battery eject lever O Battery insertion slot... -
Page 14: Sold Separately
Using AC Adaptor AC-LS5K Multi-output stand (sold separately) v mark 1 To DC IN jack 2 To a wall outlet Use the multi-output stand for attaching Connecting the camera to AC Adaptor AC- • LS5K (sold separately) will not charge the the camera in the following cases. -
Page 15: Charging The Battery Pack
Charging the battery pack Insert the battery pack into the battery charger. You can charge the battery even when • it is partially charged. Battery pack Connect the battery For customers in the USA and Canada charger to the wall Plug outlet (wall socket). -
Page 16: Using The Camera Abroad
When charging is finished, disconnect the power cord (mains lead) from the wall outlet (wall • socket), and remove the battery pack from the battery charger. Designed for use with compatible Sony batteries and the battery charger. • Battery life and number of images you can record/view Battery life (min.) -
Page 17: Inserting The Battery Pack/A "Memory Stick Duo" Media (Sold Separately)
Inserting the battery pack/a “Memory Stick Duo” media (sold separately) Open the cover. Insert the “Memory Stick Duo” media (sold separately). With the terminal side facing the lens, insert the “Memory Stick Duo” media until it clicks into place. Insert the battery pack. Check the direction of the battery, and insert it until the battery eject lever is locked. -
Page 18: To Remove The Battery Pack
“Memory Stick” media that When there is no “Memory you can use Stick Duo” media inserted “Memory Stick Duo” media Images are stored in the camera’s internal memory (approximately 11 MB). To copy images from the internal memory to a “Memory Stick Duo” media, insert the “Memory Stick Duo”... -
Page 19: Setting The Clock
Setting the clock Lower the lens cover. ON/OFF (Power) button The camera is turned on. You can also turn on the camera by • pressing the ON/OFF (Power) button. It may take time for the power to turn • on and allow operation. Lens cover Touch the desired date display format, then... -
Page 20: Shooting/Viewing Images
Shooting/viewing images Shooting images Make sure that the Mode switch is set to (Still image) and lower the lens cover. To shoot movies, set the Mode switch • (Movie) (page 33). Mode switch Lens cover Hold the camera steady Zoom (W/T) lever as illustrated. -
Page 21: Viewing Images
Viewing images Press the (Playback) button. The last image shot is displayed. When images on the “Memory Stick Duo” • media recorded with other cameras cannot be played back on this camera, view the images in [Folder View] (page 37). (Playback) button Selecting next/previous image... -
Page 22: Using Shooting Functions
Using shooting functions Displaying minimum indicators (Easy Shooting) This mode reduces the minimum number of settings and enlarges the text size for better visibility. Set the Mode switch to (Still image). (REC Mode) t Touch (Easy Shooting) t Action How to change Self-Timer (Self-Timer) t Select (Self-Timer Off) or... -
Page 23: Detecting Smiles And Shooting Automatically (Smile Shutter)
Detecting smiles and shooting automatically (Smile Shutter) Set the Mode switch to (Still image). Touch (Smile). Wait detecting a smile. When the smile level exceeds the b point on the indicator, the camera shoots images automatically. When you touch (Smile) again, Smile Shutter ends. -
Page 24: Detecting The Shooting Conditions Automatically (Scene Recognition)
Detecting the shooting conditions automatically (Scene Recognition) Set the Mode switch to (Still image). Touch (REC Mode) t (Intelligent Auto Adjustment) t Point the camera at the subject. When the camera recognizes the scene, (Twilight), (Twilight Portrait), (Twilight using a tripod), (Backlight), (Backlight Portrait),... - Page 25 Selecting the image you prefer after taking two shots with different settings (Scene Recognition) t Touch (Advanced). When the camera recognizes the scene (Twilight), (Twilight Portrait), (Twilight using a tripod), (Backlight), (Backlight Portrait) that poses difficulty of getting a clear shot, the camera automatically takes one more shot using a different effect by changing the settings as follows.
-
Page 26: Shooting Close-Ups (Macro/Close Focus)
Shooting close-ups (Macro/Close focus) You can shoot beautiful close-up images of small subjects such as insects or flowers. (Macro) t Touch desired mode t (Auto): The camera adjusts the focus automatically from distant subjects to close-up. Normally, put the camera in this mode. -
Page 27: Selecting A Flash Mode
Selecting a flash mode (Flash) t Touch desired mode t (Flash Auto): Flashes when there is insufficient light or backlight (Flash On): Flash always operates. (Slow Synchro (Flash On)): Flash always operates. The shutter speed is slow in a dark place to clearly shoot the background that is out of flash light. -
Page 28: Changing The Screen Display
Changing the screen display Touch t desired mode t (Normal): Displays buttons and icons (Simple): Displays only buttons (Image Only): Hides buttons and icons Note disappears from the screen if [Image Only] playback is selected. To display the buttons, • touch the center of the screen. -
Page 29: Focusing On A Specific Point Of The Frame
Focusing on a specific point of the frame Simply touch the point of the frame you wish to focus on to change the focus position. Point the camera at the subject, then touch the point of the frame you want to focus on. -
Page 30: Selecting The Image Size To Match The Usage
Selecting the image size to match the usage The image size determines the size of the image file that is recorded when you take a image. The larger the image size, the more detail will be reproduced when the image is printed on large-format paper. -
Page 31: Number Of Still Images That Can Be Recorded
Number of still images that can be recorded (Units: Images) Capacity Internal “Memory Stick Duo” media formatted with this camera memory Approx. 256 MB 512 MB 1 GB 2 GB 4 GB 8 GB 16 GB Size 11 MB 1401 2847 1963 3991... -
Page 32: Using The Shooting Mode That Matches The Scene (Scene Selection)
Using the Shooting mode that matches the scene (Scene Selection) Set the Mode switch to (Still image). To select / / / / : Touch (REC Mode) t desired mode t To select / / / Touch (REC Mode) t (Scene Selection) t desired mode t (Gourmet): Shoots food... -
Page 33: Shooting Movies
Shooting movies Make sure that the Mode switch is set to (Movie) and lower the lens cover. Mode switch Lens cover Press the shutter button fully down to start recording. Press the shutter button fully down again to stop recording. Viewing movies Press the (Playback) button and touch the... - Page 34 Maximum recording time The table below shows the approximate maximum recording times. These are the total times for all movie files. Continuous shooting is possible for approximately 29 minutes. (Units: hour: minute: second) Capacity Internal “Memory Stick Duo” media formatted with this camera memory Approx.
-
Page 35: Using Viewing Functions
Using viewing functions Viewing an enlarged image (Playback Zoom) Press the (Playback) button to display an image, then touch the area you want to enlarge. The image is enlarged at twice the size, with the area you touched at the center. When is set to [Image Only], touch the center of the screen, then... -
Page 36: Rotating A Vertical Orientation Image (Temporarily Rotated Display)
Rotating a vertical orientation image (Temporarily rotated display) Press the (Playback) button to display the still image, then select the vertical orientation images, then touch Touch again to end the display. • Viewing still images with music (Slideshow) Press the (Playback) button to display a still image, then touch... -
Page 37: Searching For An Image (Image Index)
Searching for an image (Image Index) Press the (Playback) button to display an image, then touch (Image Index). If you touch , you can set the • number of images displayed in the index screen to 12 or 20 images. Touch to turn the pages. - Page 38 Easily locating the images to be displayed When set to Date View/Event View/Folder View: When using a “Memory Stick Duo” media, touch (Date List), (Event List) or (Select Folder) to easily locate the desired images. Date List: Displays a list of the images taken on the selected date.
-
Page 39: Deleting Images
Deleting images Deleting the currently displayed image (Delete) t [OK] (page 21). Touch Deleting multiple images Touch (Image Index) t (Delete). Select images for deletion. 1 Touch / to turn the pages, then touch the images you want to delete. mark is attached to the selected images. -
Page 40: Deleting All Images (Format)
Deleting all images (Format) You can delete all data stored on “Memory Stick Duo” media or the internal memory. If a “Memory Stick Duo” media is inserted, all data stored on the “Memory Stick Duo” media are deleted. If no “Memory Stick Duo” media is inserted, all data stored in the internal memory are deleted. -
Page 41: Connecting To Other Devices
Connecting to other devices Viewing images on a TV Attach the camera to the multi-output stand (supplied). Connect the multi-output stand to the TV with the AV Cable (supplied). To audio/video To the A/V OUT (STEREO) input jacks jack AV Cable (supplied) Note The [Video Out] setting is set to [NTSC] mode at the factory to let you enjoy optimum movie •... -
Page 42: Printing Still Images
Printing still images If you have a PictBridge compliant printer, you can print images by the following procedure. Attach the camera to the multi-output stand (supplied). Connect the multi-output stand to the printer with the USB Cable (supplied). Turn on the printer, and press the (Playback) button. - Page 43 Superimposing dates on images This camera does not include a function for superimposing a date on an image. The reason for this is to prevent the date from being duplicated during printing. Printing at a shop: You can ask that images be printed with a date superimposed. For details, consult with a photo printing service shop.
-
Page 44: Using The Camera With A Computer
Using the camera with a computer Using “PMB (Picture Motion Browser)” You can enjoy the recorded images more than ever by taking advantage of the software, and “PMB” is included on a CD-ROM (supplied). There are more functions, in addition to those listed below, for enjoying your images. For details, see the “PMB Guide”... - Page 45 Stage 1: Installing the “PMB” (supplied) You can install the software (supplied) using the following procedure. When you install “PMB,” “Music Transfer” is also installed. Log on as Administrator. • Check your computer environment. Recommended environment for using “PMB” and “Music Transfer” OS (pre-installed): Microsoft Windows XP SP3/Windows Vista CPU: Intel Pentium III 800 MHz or faster (For playing/editing the High Definition...
- Page 46 Stage 2: Importing images to your computer using “PMB” Insert a fully charged battery pack to the camera and then attach the camera to the multi-output stand (supplied). Press the (Playback) button. Connect the camera to your computer. “Connecting…” appears on the screen of the camera. 1 To a USB jack 2 To a USB jack USB Cable...
- Page 47 To access the “PMB Guide” from the start • menu: Click [Start] [All Programs] [Sony Picture Utility] [Help] [PMB Guide]. Notes Do not disconnect the USB Cable from the camera while the camera is operating or while •...
-
Page 48: Changing Camera Settings
Changing camera settings Changing the operation sounds You can set the sound produced when you operate the camera. Touch (Settings) t [Main Settings] t t [Beep] t t desired mode t Shutter: Turns on the shutter sound when you press the shutter button. High/Low: Turns on the beep/shutter sound when you operate the touch panel/press the shutter button. -
Page 49: View Images
View Images Item Description Date View* Displays images by the date. Event View* Analyzes the dates shots and frequency, automatically organizes the images into groups and displays them. Favorites* Displays images registered as Favorites. Folder View Displays and organizes images by folders. These items are displayed only when “Memory Stick Duo”... - Page 50 Settings Item Description Main Settings - Main Beep: Selects the beeps produced when you operate Settings 1 the camera. Function Guide: Displays the function guide. Initialize: Restores the camera to its default settings. Calibration: Corrects misalignment of the response positions of the buttons on the touch panel. Housing: Changes the button operations when the camera is in the housing (Marine Pack).
-
Page 51: Using The Menu Items
Using the MENU items Displays available functions for easy setting when the camera is in shooting or playback mode. Only the available items are displayed on the screen. To restore the camera to its default settings, touch Settings) [Main Settings 1] [Initialize]. - Page 52 Item Description Face Detection Selects the priority subject for adjusting the focus when using face detection. When touched/ Auto/ Child Priority/ Adult Priority) Flash Level Adjusts the amount of flash light. Standard/ Anti Blink Sets Anti Blink function. Auto/ Off) Red Eye Reduction Sets to reduce the red-eye phenomenon.
-
Page 53: Using Functions In Program Auto Mode
Item Description (Delete) Deletes images. This Image/ Multiple Images/ All in Date Range*) * The displayed text differs according to each View Mode. (Protect) Prevents accidental erasure. This Image/ Multiple Images/ Set All in Date Range*/ Remove All in Date Range*) * The displayed text differs according to each View Mode. -
Page 54: Others
Others List of icons displayed on the screen Icons are displayed on the screen to indicate the camera status. You can select the display settings by touching the indication on the bottom right of the screen (page 28). When shooting still images Display Indication Battery remaining... - Page 55 Display Indication Display Indication C:32:00 Self-diagnosis display Image number/Number of images recorded in selected Histogram folder appears when • 100 Min Recordable time histogram display is disabled. Recording/Playback Media (“Memory Stick Duo” media, internal memory) PictBridge connecting Display Indication 35° 37' 32" N Latitude and Longitude PictBridge connecting display...
-
Page 56: Learning More About The Camera ("Cyber-Shot Handbook")
Learning more about the camera (“Cyber- shot Handbook”) “Cyber-shot Handbook”, which explains how to use the camera in detail, is included on the CD-ROM (supplied). Refer to it for in-depth instructions on the many functions of the camera. You need Adobe Reader to read “Cyber-shot Handbook”. If it is not installed on your computer, •... -
Page 57: Troubleshooting
3 Initialize the settings (page 50). 4 Consult your Sony dealer or local authorized Sony service facility. On repairing cameras with internal memory or Music files function included, data in the camera may be checked on minimum necessity to verify and improve the malfunction symptoms. - Page 58 The remaining charge indicator is incorrect. The battery charge will get used up quickly and the actual remaining battery charge will be • lower than the indicator in the following cases: When you use the camera in an extremely hot or cold location. –...
- Page 59 Viewing images Cannot play back images. Press (Playback) button (page 21). • The folder/file name has been changed on your computer. • No guarantees are made for playing back, on this camera, files containing images which were • processed on a computer or images which were shot using other cameras. The camera is in USB mode.
-
Page 60: Precautions
Precautions Do not use/store the camera in the On operating temperatures following places Your camera is designed for use under the temperatures between 0°C and 40°C (32°F and In an extremely hot, cold or humid place • 104°F). Shooting in extremely cold or hot In places such as in a car parked in the sun, places that exceed this range is not the camera body may become deformed and... -
Page 61: Specifications
Specifications Camera [Power, general] Power: Rechargeable battery pack NP-BD1, 3.6 V [System] NP-FD1 (sold separately), 3.6 V Image device: 7.79 mm (1/2.3 type) color CCD, AC-LS5K AC Adaptor (sold separately), Primary color filter 4.2 V Total pixel number of camera: Approx. 12.4 Power consumption (during shooting): 1.2 W Megapixels Operating temperature: 0 to 40°C (32 to 104°F) - Page 62 Rechargeable battery pack Trademarks NP-BD1 The following marks are trademarks of Sony • Corporation. Used battery: Lithium-ion battery , “Cyber-shot,” “Memory Maximum voltage: DC 4.2 V Stick,” , “Memory Stick PRO,” Nominal voltage: DC 3.6 V , “Memory Stick Duo,”...
- Page 64 Additional information on this product and answers to frequently asked questions can be found at our Customer Support Website. Printed on 70% or more recycled paper using VOC (Volatile Organic Compound)-free vegetable oil based ink. Printed in Japan...
Need help?
Do you have a question about the DSC-T900 and is the answer not in the manual?
Questions and answers