Table of Contents
Advertisement
Quick Links
AirPac, Incorporated
AirPac Technology Park
888 Shenandoah Shores Road
Front Royal, Virginia 22630
U.S.A.
Toll Free 888-324-7722
Web: airpacinc.com
email: coolit@airpacinc.com
© 1999 AirPac, Incorporated
Printed in U.S.A.
Manual CIT119..INSTR
COOL
1000
IT
®
7,500 BTU Portable Air Conditioner
Instructions for Installation,
Operation & Maintenance
Operation Manual
The Coolest Site on the Web
airpacinc.com
®
®
Advertisement
Table of Contents

Related Manuals for AirPac COOLIT 1000


Summary of Contents for AirPac COOLIT 1000
-
Page 1: Operation Manual
AirPac Technology Park 888 Shenandoah Shores Road Instructions for Installation, Front Royal, Virginia 22630 U.S.A. Operation & Maintenance Toll Free 888-324-7722 Web: airpacinc.com email: coolit@airpacinc.com The Coolest Site on the Web ® airpacinc.com © 1999 AirPac, Incorporated Printed in U.S.A. Manual CIT119..INSTR... - Page 3 4. Replacement of belts, pulleys, and filters. 5. Any unit which has its serial numbers altered, defaced or removed. The sole obligation of AirPac under this warranty will be to furnish, without charge, a replacement part for a defective part. This warranty does not include installation, transportation, or postage costs associated with installing the replacement part.
- Page 4 Unit is making noise at The fan may be hitting Unit requires repair or to continually challenge us at AirPac to build a better air conditioner. Please give us a call, 888-324-7722 or email us, coolit@airpacinc.com. the evaporator fan. the foam housing.
-
Page 5: Table Of Contents
TROUBLE SHOOTING GUIDE TABLE OF CONTENTS Introduction ................6 PROBLEM CAUSE SOLUTION Equipment Check List ............. 7 Unit does not work Unit not plugged in. Plug in power cord. Inspection of Equipment ............8 Unit Overview ................9 Main power off. Check fuse or circuit breaker. -
Page 6: Introduction
INTRODUCTION PARTS LISTING PART NAME PART NAME The versatility of the COOLIT makes it adaptable for cooling various 1000 applications. The COOLIT is designed to automatically adjust room 1000 Base Pan Float Case temperature, reduce moisture and filter room air. Float Body Holder 1 The COOLIT... -
Page 7: Equipment Check List
PARTS DIAGRAM EQUIPMENT CHECK LIST The first step in preparing the COOLIT for installation is to run 1000 through this check list to ensure you have all the pieces necessary for your installation. Your shipment consists of two boxes: 1. COOLIT Unit Box contains: 1000 COOLIT... -
Page 8: Inspection Of Equipment
If you have shipping damage keep all packaging for inspection by the shipper. If equipment requires return to your AirPac distributor a Call Tag will be issued and pick up will be arranged by the AirPac Distributor. DO NOT OPERATE UNIT. -
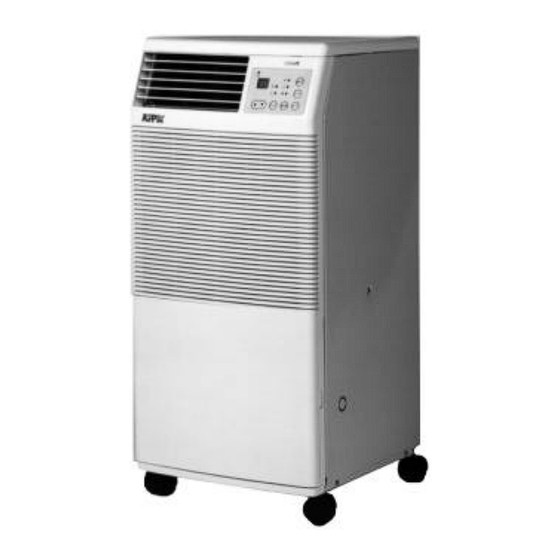
Page 9: Unit Overview
UNIT SPECIFICATIONS UNIT OVERVIEW COOL 1000 Technical Specifications Control Panel Supply Air Vent Cooling Capacity 7,500 BTU/h Power Source 115 V 60 HZ Adjustable Oscillating Horizontal Vertical Grill Rated Current 8.5 Amps Louvers Power Input 950 Watts Evaporator Compressor Type Rotary Return Air Flow... -
Page 10: Preparing Unit For Operation
PREPARING UNIT FOR OPERATION UNIT MAINTENANCE Your new COOLIT unit has passed a double quality assurance Your COOLIT is designed for easy maintenance. Performing 1000 1000 program; once before leaving the factory and again before leaving the routine preventive maintenance will ensure you enjoy years of trouble- regional warehouse. - Page 11 CONDENSATE PUMP KIT - Optional Accessory PREPARING UNIT FOR OPERATION 6. Read instructions packed with the pump for piping the discharge 6. Plug COOLIT unit into wall outlet. 1000 line. Plug unit into wall outlet. Do not plug COOLIT into extension 1000 7.
- Page 12 PREPARING UNIT FOR OPERATION CONDENSATE PUMP KIT - Optional Accessory COOLIT will shut off after the unit has been operating for the This pump kit is an optional accessory for the COOLIT . The 1000 1000 designated number of hours on the timer. To set the timer press condensate pump kit is useful when the COOLIT must be operated 1000...
-
Page 13: Exhaust Kit Installation
UNIT OPERATION DUCT KIT INSTALLATION EXHAUST KIT INSTALLATION Condensate Removal Warm air is exhausted from the rear of the unit when operating in Warm air exhausts from the rear of the unit when operating in cooling cooling mode as an air conditioner. The COOLIT will cool more mode as an air conditioner. - Page 14 DUCT KIT INSTALLATION EXHAUST KIT INSTALLATION UNIT OPERATION 10—12 inches. Put the CEILING ADAPTER into the ceiling tile The temperature displayed in the LED window on the control grid. Make sure the CEILING ADAPTER is positioned properly in panel is the current room temperature, not the set temperature the ceiling grid and cannot fall out.
- Page 15 UNIT OPERATION DUCT KIT INSTALLATION EXHAUST KIT INSTALLATION Power Requirements Follow these step-by-step instructions for installing the exhaust kit through a standard window. The COOLIT has a NEMA 5-15 plug and operates on 115 Volts, 60 1000 cycle electrical outlet. Do not bend the metal prongs on the plug. If 1.
-
Page 16: Control Panel Functions
CONTROL PANEL FUNCTIONS CONTROL PANEL FUNCTIONS Temperature & Timer Button This button allows you to set the temperature and timer. To operate the temperature function press the button once and the temperature indicator light (bottom) will come on. The temperature is adjusted up or down by pressing the arrow buttons.
Need help?
Do you have a question about the COOLIT 1000 and is the answer not in the manual?
Questions and answers