Table of Contents
Advertisement
Quick Links
Advertisement
Table of Contents

Subscribe to Our Youtube Channel
Summary of Contents for Optoma SignShow D5000
- Page 1 Digital Signage Processor SignShow D5000 User Manual...
-
Page 2: Table Of Contents
Table of Contents Safety Instructions Power Cord & adapter Warnings ..........iv Technical Support ..............v Declaration of Conformity FCC Notice ................vi This device complies with part 15 of the FCC Rules. Operation is sub- ject to the following two conditions: ............vi WEEE Notice ................ - Page 3 Table of Contents Play Mode ................18 Schedule ...................19 S-Video ....................19 Network Streaming ................19 Slide Show ..................19 Video Repeat ...................21 Memory Card ................21 IR Control ................22 To lock the remote control ...............22 To unlock the remote control ............23 Hidden Menu ................
- Page 4 Table of Contents Video Input ................43 Hardware Specifications ............45 Error Messages ................. 47 FAQ’s ..................48...
-
Page 5: Safety Instructions
Safety Instructions & Warranty Safety Instructions Use the following safety guidelines to help protect yourself and your Digital Signage Processor. • Do not attempt to service the Digital Signage Processor yourself. Always follow installation instructions closely. • To avoid personal injury from electric shock or fire: •... -
Page 6: Technical Support
Safety Instructions & Warranty • Before you connect the Digital Signage Processor to a power source, ensure that the voltage rating of the AC adapter matches that of the available power source. • 115 V/60 Hz in most of North and South America and some Far Eastern countries such as South Korea and Taiwan. -
Page 7: Declaration Of Conformity
Declaration of Conformity Declaration of Conformity FCC Notice This equipment has been tested and found to comply with the limits for a Class B digital device, pursuant to part 15 of the FCC Rules. These limits are designed to provide reasonable protection against harmful interference in a residential installation. -
Page 8: Weee Notice
Declaration of Conformity • EN61000-3-3. (IEC61000-3-3)-Power Line Flicker • EN60950 (IEC60950). Product Safety Japanese Notice WEEE Notice • The Directive 2002/96/EC on Waste Electrical and Electronic Equipment (WEEE) which entered into force on 13th February 2003, is to ensure that WEEE are recycled using best available treatment, recovery and recycling techniques in order to protect human health and natural resources. -
Page 9: Introduction
Introduction Introduction Overview Thank you for purchasing your Digital Signage Processor. This Digital Signage Processor is a powerful digital engine for high quality video and graphics. It can perform live broadcasts, video/audio files, and display tickers. You can easily control, schedule and deliver multimedia content through network input. -
Page 10: Features
Introduction Features • High Performance. Full HD (1080P) output with hardware video/audio decoder, supports up to 2 videos / 2 graphics/ 2 tickers. • Compact. The compact and rugged case design makes it easy to mount and install. • Network-Manageable. Your Digital Signage Processor can connect remotely through a Local Area Network. -
Page 11: Package Contents
Introduction Package Contents When unpacking, please ensure the following items are included. If any items are missing or damaged, please contact your retailer. Digital Signage Processor Quick Start Manual Remote Control CD ROM SD Card Protector AA Battery x 2 Power Adapter Power Cord DVI-D Cable (optional) -
Page 12: Connectors View
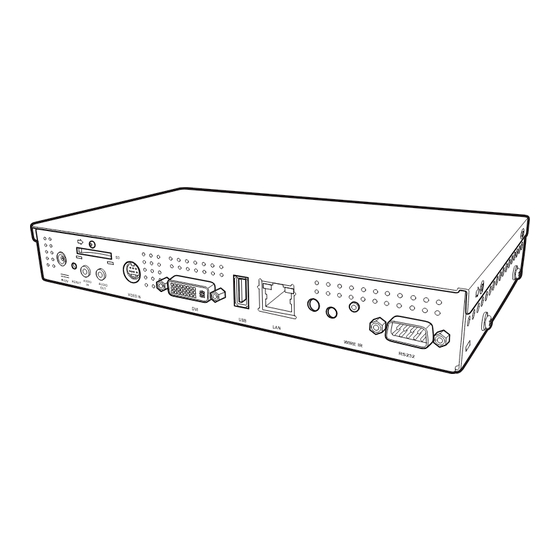
Introduction Connectors View AUDIO AUDIO 1 2 3 Item Description Power socket Use to connect to the power adapter Press to reset the Digital Signage Reset button Processor settings Use to connect to an external device Audio In such as a DVD player or STB Use to connect to an external device Audio Out such as TV line-in or speakers... -
Page 13: Remote Control
Introduction Remote Control The Digital Signage Processor comes with a remote control for inputting commands. The diagram and table below show the keys and basic operation of the remote control. POWER ON Power button STANDBY Standby button Keypad MENU Menu button Arrow keys SET button Exit button... -
Page 14: Getting Started Setting Up New Sd Card Content
Getting Started Getting Started Setting up New SD Card Content You need to set up the contents of the SD card before using it for the first time. The sample media files and system drivers (libxxx.img) for the SD card content can be found in the included CD-ROM. - Page 15 Getting Started 1. Insert the SD card in the card slot with the contacts facing upward. 2. Slide it until it clicks into place. 3. To protect the SD card from damage or accidental loss, screw the SD card protector onto the case. Refer to the diagram below.
-
Page 16: Removing The Sd Card
Getting Started Removing the SD Card 1. Unscrew the SD card protector from the case. 2. Gently push the SD card in until it clicks to release the lock. 3. Remove the card. 4. Screw the SD card protector back. Making Connections Connecting to a Monitor You can connect your Digital Signage Processor to an output... -
Page 17: Connecting To A Network
Getting Started Simply plug in the USB cable of your device to the USB port of the Digital Signage Processor. A USB extension cable is AUDIO AUDIO provided with your Digital Signage Processor package for easy access and connection. Connecting to a Network For rapid content file updates, connect to InfoSAP Creator. -
Page 18: Connecting A Dvd Player Or Tv Stb
Getting Started Connect speakers using the stereo jack on your device. AUDIO AUDIO Audio files must first be edited by using InfoSAP Creator. Note Connecting an Audio In Component Your Digital Signage Processor supports component Audio-in from devices such as a DVD player or set-top box (STB). Connecting a DVD player or TV STB For vivid media content, you can play back video files directly from your DVD player or TV STB. -
Page 19: Led Indicator
Getting Started Media content must first be edited using InfoSAP Creator. Note LED Indicator The LED indicator indicates the status of your Digital Signage Processor. LED Indicator LED Indicator Status Green Power is on On standby mode Green, blinking Preparing to standby... -
Page 20: Menu
Menu Menu The Menu consists of menu options for your Digital Signage MENU Processor. Press on the remote control to activate the Menu. DATE/TIME NETWORK PROGRAM TIMER LANGUAGE VIDEO OUT PLAY MODE MEMORY CARD IR CONTROL Press to change select. Press [Set] to enter submenu. -
Page 21: Network
Menu MENU Press > Date/Time. DATE/TIME Date: NETWORK mm/ dd / yyyy PROGRAM 01 / 01 / 2008 TIMER Time: LANGUAGE hh : mm : ss VIDEO OUT 00 : 00 : 00 PLAY MODE NTP Server: 220 . 130 . 158 . 51 Sync MEMORY CARD Sync Time Everyday... -
Page 22: Program
Menu also remotely control the Digital Signage Processor from DS-Server. MENU Press > Network. DATE/TIME Static IP Select type of connection: NETWORK 196.168.1 .225 DHCP or Static PROGRAM Netmask: 255.255.255 .0 TIMER Gateway: 196.168.1 .254 LANGUAGE DNS: 211.78 .130 .2 VIDEO OUT MAC: 00:16:E8:F1:94:7E... -
Page 23: Previewing A Program
Menu Previewing a Program Program List: DATE/TIME NETWORK DemoCase.xml PROGRAM TIMER LANGUAGE List of the program VIDEO OUT contents in your PLAY MODE storage card. MEMORY CARD IR CONTROL 1 / 1 to preview a program Press [Exit] to return. Press to change page when on the list. -
Page 24: Language
Menu MENU Press > Timer. DATE/TIME Enable Daily Timer NETWORK mm / dd hh : mm PROGRAM Power-On 01 / 01 00 : 00 TIMER Power-Off 01 / 01 00 : 00 LANGUAGE Video-On 01 / 01 00 : 00 VIDEO OUT Video-Off 01 / 01... -
Page 25: Video Out
Menu Video Out In the Video Out submenu, you can: • Select the video output resolution through DVI, Digital Video, VGA • Set to read video frequency from the connected display MENU Press > Video Out. Select Video Output Mode DATE/TIME Current Mode: VGA 1024X768@60... -
Page 26: Play Mode
Menu • 640 x 480 / 60 Hz • 1680 x 1050 / 60 Hz, VESA timing • 1360 x 768 / 60 Hz, VESA timing • 1280 x 1024 / 60 Hz, VESA timing • 1024 x 768 / 60 Hz, VESA timing •... -
Page 27: Schedule
Menu Schedule Schedule is the default mode. Select Schedule mode to play a program with the scheduling function. S-Video You can also select S-Video mode to play back video files directly from your DVD player or TV STB. Network Streaming You can also select Network Streaming mode to get video files... - Page 28 Menu MENU Press > Play Mode > Slide Show. DATE/TIME Select Play Mode: NETWORK Schedule PROGRAM S-Video TIMER Network Streaming LANGUAGE Slide Show Video Repeat VIDEO OUT PLAY MODE MEMORY CARD Display Time per Slide: Seconds IR CONTROL Folder: /. Apply to set the play mode Press [Exit] to return.
-
Page 29: Video Repeat
Menu Video Repeat You can also select Video Repeat mode to repeatedly play video files from USB memory. DATE/TIME Select Play Mode: NETWORK Schedule PROGRAM S-Video TIMER Network Streaming LANGUAGE Slide Show Video Repeat VIDEO OUT PLAY MODE MEMORY CARD Screen Size IR CONTROL Full Screen... -
Page 30: Ir Control
Menu MENU Press > Memory Card. DATE/TIME Memory Card: NETWORK 1.9GB Free PREVIEW 1.8GB Available TIMER LANGUAGE Delete All Content Files VIDEO OUT VIDEO IN MEMORY CARD IR CONTROL SLIDE SHOW to manage the Memory Card storage space Press [Exit] to return. Note Choosing “Delete All Content Files”... -
Page 31: To Unlock The Remote Control
Menu To unlock the remote control 1. Press the following keys on your remote control in order: MENU 2. The message “OSD Menu Unlock” is displayed on the screen to confirm unlocking of the remote control. Hidden Menu The Hidden Menu is used to upgrade the contents of your storage device, display system settings, change passwords and restore factory defaults. -
Page 32: Upgrade
Menu To deactivate the Hidden Menu, turn off your Digital Signage Processor. The Hidden Menu is not displayed on the screen on your next power up. Upgrade MENU Press > Upgrade. DATE/TIME Select Upgrade File: NETWORK System Driver PROGRAM Loader TIMER Kernel LANGUAGE... -
Page 33: Content Update Mode From Usb Memory
Menu Please refer to the picture below. DATE/TIME Select library in the USB memory: NETWORK lib-ds-player_0623.img PROGRAM TIMER LANGUAGE VIDEO OUT PLAY MODE MEMORY CARD IR CONTROL UPGRADE SYSTEM to upgrade the firmware Press [Exit] to return. 3. Select the system driver then press 4. -
Page 34: System
Menu Auto Content Update: Select/deselect “Enable Auto Content Update” to enable/ disable daily auto content update. Once you enable auto content update, you will see the following detail configuration: • FTP server/Folder: The content directory on FTP. • User: The user name for login FTP. •... - Page 35 Menu A password is required for web access. To set up a password, select Change Password. DATE/TIME Change Password for Web Access: (4-8 Characters) NETWORK New Password: ******** PROGRAM Password Confirm: ******** TIMER LANGUAGE VIDEO OUT PLAY MODE MEMORY CARD IR CONTROL UPGRADE SYSTEM...
-
Page 36: How To Use The Digital Signage P O R E C S S R
How to Use the Digital Signage Processor How to Use the Digital Signage Processor Powering On Before powering on the Digital Signage Processor, insert an SD card into the Note SD card slot. After performing the necessary connections, you are now ready to power on your Digital Signage Processor. -
Page 37: Playing Media Files Using Usb Memory
How to Use the Digital Signage Processor Playing media files using USB memory By default, if Slide Show mode is enabled, the Digital Signage Processor first reads the USB memory drive for media content when it boots up. 1. Insert the USB memory drive in the USB slot. 2. -
Page 38: Usb Memory Update
How to Use the Digital Signage Processor The illustration below shows the different content update methods. PC with PC with InfoSAP Creator InfoSAP Creator Digital Signage Box Digital Signage Box Digital Signage Server PC with Digital Signage Box InfoSAP Creator USB Memory Update A media folder is required for a USB memory update. -
Page 39: Manual Rewrite Of Sd Card By Pc
How to Use the Digital Signage Processor You can create content by using InfoSAP Creator. There are two modes for USB update: 1. Mode 1: Delete and copy mode. All content files in the media folder are deleted. The content files in the USB memory are then copied to the SD card. -
Page 40: Rewrite Through Wan
How to Use the Digital Signage Processor Rewrite through WAN 1. Using DS-Server (optional) You can create schedules via InfoSAP Creator or DS-Server and update them to Processors via a DS-Server device. See DS-Server user manual for more information. DS-Server provides enhanced Internet funcitonality. -
Page 41: Internal Storage
Specifications Specifications Internal Storage The Digital Signage Processor uses an SD card for internal storage. The SD card must have only one FAT32 partition. Your Digital Signage Processor supports SD cards with capacities up to 16GB. SD card structure The SD card must have the following files and folders: 1. -
Page 42: Supported Image Formats
Specifications Supported Image Formats The Digital Signage Processor supports BMP, PNG, and JPEG image file formats. • BMP (*.bmp): 24-bpp, R8-G8-B8 • PNG (*.png): 24-bit RGB • JPEG (*.jpg, *.jpeg) Image resolution should be less than 2047 x 2047. Supported Video and Audio Formats Please refer to the table below for video and audio formats supported by the Digital Signage Processor. -
Page 43: Video And Audio Specifications
Specifications Table 1: Supported Video and Audio Format Video(V) Group Codec Container File Extension Audio(A) MPEG-2 Video (Program Stream) MPEG-2 MPEG-1/2 Audio layer 2 .VOB MPEG-1/2 Audio layer 3 DivX 5.0 DivX, .DivX, MPEG-4 MPEG-1/2 Audio layer 2 .AVI MPEG-1/2 Audio layer 3 .MOV, MPEG-4 AVI,... - Page 44 Specifications • Supports MP@HL (Main Profile, High Level) up to 1280x720p30 or 1920x1080p25 resolution. • Supporst AP@L3 (Advanced Profile, L3 Level) up to 1920x1080i25, 1920x1080p25 or 1280x720p60 resolution • Does not support CP (Complex Profile) • Does not support interlaced mode. •...
-
Page 45: Software Layout Utility
Specifications • Supports up to 2.0 Windows Media Audio 9 channels. • Supports up to 5.1 Windows Media Audio 9 Professional channels. 7. AAC (MPEG-4 AAC) • Supports LC (Low Complexity profile). • Supports bit rates up to 384kbps. • Supports up to 5.1 channels. •... -
Page 46: Layout Template
Specifications For more information, please check the software’s User Manual inlcuded in the CD-ROM. You can purchase DS-Server for more powerful Internet functionality. Note Layout Template The Digital Signage Processor supports different types of layouts. Following are some examples: • Image only •... - Page 47 Specifications downward. Images and the ticker can be overlapped. Audio files can be played at the same time. No overlap. Overlapped. Image and ticker are transparent. Video + Ticker A layout can contain a video file and a ticker. The video file can be from an SD card, S-Video input, or network streaming (See and follow steps 1-3 of “...
- Page 48 Specifications If you add an audio file and a video file + image+ticker , the audio source is Note set to audio automatically. The video file’s audio track will not be audible. The video, image and ticker can be overlapped. Overlapped.
- Page 49 Specifications Video (2) + Image + Ticker The Digital Signage Processor supports playback of 2 videos, an image and a ticker. Possible video combinations inlcude: • Video file + S-Video input • Streaming + S-Video input • Video file + Streaming Vertical Ticker The Digital Signage Processor supports playback of 2 videos, weather images, and 2 tickers.
-
Page 50: Software Limitations
Specifications Software Limitations To ensure the output quality of your Digital Signage Processor, take note of the following software limitations. Media file • The maximum video/audio file size is 4GB. • Two images + Two tickers + Two video files may be shown simultaneously. -
Page 51: Video Input
Specifications Schedule file (.SHE) • The maximum number of program and control commands in a scheduling file is 500. Firmware • The maximum firmware filename length is 128 bytes. • The on-screen display only can display 35 files or folders in a directory on the USB drive. Be sure the folder containing the firmware files has fewer than 35 files or folders. - Page 52 Specifications The native resolution video input for NTSC is 720 x 480, while PAL is 720 x 576. Normal mode is automatically set for 640 x 480 and 1024 x 768 resolutions. If the resolution is 1920 x 1080, 1360 x 768, 1680 x 1050 or 1280 x 1024, you have to choose between normal and full screen mode.
-
Page 53: Hardware Specifications
Specifications Hardware Specifications CPU: Sigma SMP863X Processor 8 MB Flash memory 256 MB SDRAM DVI: 1920 x 1080 (1080p) / 60hz, VESA timing 1680 x 1050 / 60hz, VESA timing 1360 x 768 / 60hz, VESA timing 1280 x 1024 / 60hz, VESA timing 640 x 480 / 60hz, VESA timing Digital Video: 1080P / 60hz... - Page 54 Specifications Mini jack: 2.5 (4 pole) Wired IR input Alternative to IR input Operation: GREEN Power LED Standby: RED Reset button System settings reset Input AC 240-100V, 47-63hz AC adapter Output DC 12V 2.5A Power code Japan, 2 pole, 3.0m Power on: Typ 10W (15W max) Power Consumption Standby: 1W max...
-
Page 55: Error Messages
Troubleshooting Troubleshooting Error Messages This section lists common error messages that may arise during the use of the Digital Signage Processor, and provides answers and solutions to these errors. Error Message Solutions • Check if the SD card is inserted. Player failed to access the SD Card. -
Page 56: Faq's
Troubleshooting FAQ’s This section lists some frequently asked questions (FAQ) and the answers to these problems. Question Answer You may be trying to view a video file that is not Why can’t I view my video files? supported by the Digital Signage Processor. See “Supported Video and Audio Formats”...
Need help?
Do you have a question about the SignShow D5000 and is the answer not in the manual?
Questions and answers