
Summary of Contents for AGASIO A622W
-
Page 1: User Manual
Wireless/Wired Network IP Camera Night Vision and Remote Operation A622W Wireless PT Camera User Manual www.agasio.com support@agasio.com Page | 0 713-893-4514... - Page 2 Thank You for Your Purchase! Agasio IP Cameras are designed and equipped primarily for local and remote purposes such as home or office security surveillance. We provide a variety of products suitable for any type of surveillance system setup, including wired/wireless IP outdoor bullet cameras, IP outdoor dome PTZ cameras, and IP Indoor PT cameras.
-
Page 3: Table Of Contents
Dynamic DNS Settings Page 37 E-mail And FTP Settings Page 47 Alarm Settings Page 49 Hard Reset And Firmware Upgrade Page 50 Restoring Factory Defaults Page 51 Rebooting Your Camera Page 52 Warranty Information Page 53 support@agasio.com Page | 2 713-893-4514... -
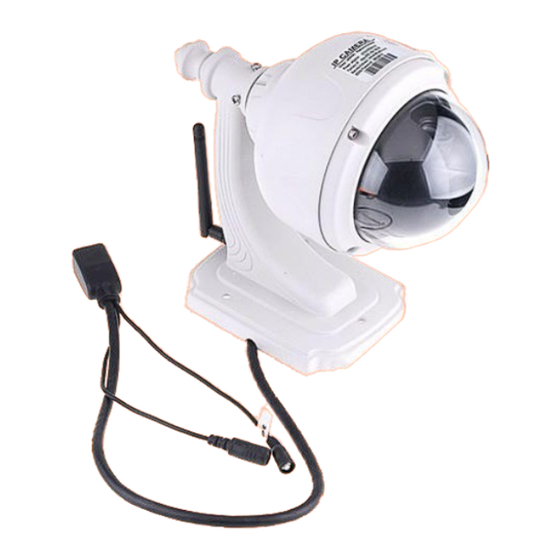
Page 4: Product Introduction
1. Product Introduction The Agasio A622W Wireless Pan/Tilt Outdoor IP Camera features a high quality video sensor combined with a hardened IP66 waterproof enclosure as well as fifty foot night vision range. It also includes an IR- Cut Filter lens for true color images that are not washed out. The camera supports remote internet viewing, motion detection as well as a built in network video recording system. -
Page 5: Product Specifications
This transmitter must not be co-located or operating in conjunction with any other antenna or transmitter. 2. Product Specifications - Agasio cameras adopt high performance, strong function media processors (32-Bit RSIC) - High sensor CMOS - Optimized MJPEG video compression, high-definition image transmission... -
Page 6: Hardware Installation
(indoor models) will remain solid. The yellow LED should continue to flash. Figure 3.1 – Outdoor Camera Wiring (your camera may be slightly different) Figure 3.2 – Indoor Camera Rear Ports (your camera may be slightly different) support@agasio.com Page | 5 713-893-4514... -
Page 7: Software Installation
Firstly, insert the CD into your CD drive, and then open the CD to see the files on your computer. Figure 4.1 – Double-click your CD/DVD Drive to browse the CD files Figure 4.2 – Double Click the “English” folder support@agasio.com Page | 6 713-893-4514... - Page 8 2. Next, click the application named “Search tool.” The program will begin to run automatically from the CD. If you would like, this software can be copied to your desktop. This will be continued in the next section, “Software Operation.” support@agasio.com Page | 7 713-893-4514...
-
Page 9: Software Operation
Note: The Search Tool IP Camera Software searches for cameras directly connected to the Local Area Network (LAN) of the router the computer is connected to. Please make sure the computer you are using Search Tool on is connected to the same router that the camera is connected to. support@agasio.com Page | 8 713-893-4514... - Page 10 By default, the username is “admin” with no password. The camera will then reconfigure itself and will disappear, then reappear in the list. Figure 5.2 – Make Sure Your Subnet Mask, Gateway, and Primary DNS Matches the Camera’s support@agasio.com Page | 9 713-893-4514...
- Page 11 HTTP Port: You can enter a custom port number in this field for the camera; default port number is set to 99. You can change the port number to any number you would like, such as: 98, 211, 9999 etc. Figure 5.3 – Manually set the camera’s information to that under the “Current Computer” section support@agasio.com Page | 10 713-893-4514...
-
Page 12: Viewing Live Video
Figure 5.4 – The camera login page can be opened using the “Open” button 2. To access the camera by IE Browser directly, just type the camera’s IP address, for example, if the camera’s IP address is 192.168.1.99:99, it would be typed as http://192.168.1.99:99. support@agasio.com Page | 11 713-893-4514... - Page 13 Figure 5.5 – Login is required (Default username is admin with no password) Figure 5.6 – You can choose which option to sign in as depending on your browser support@agasio.com Page | 12 713-893-4514...
-
Page 14: Viewing With Internet Explorer
IP Camera software add-on. The page will refresh and you may be asked to login once again. Once logged in again, you should see live video. Figure 7.1 – If you see a red box and a prompt as seen above, please click “Allow” or “Run” support@agasio.com Page | 13 713-893-4514... - Page 15 “Internet Options” Next, click on the tab at the top that reads “Security,” and click on the button near the bottom that reads “Custom Level.” support@agasio.com Page | 14 713-893-4514...
- Page 16 “Enable.” The most important options to keep enabled are the following: Enable: “Download unsigned ActiveX controls” Enable: “Initialize and script ActiveX controls not marked as safe” Enable: “Run ActiveX controls and plug-ins” support@agasio.com Page | 15 713-893-4514...
- Page 17 Note: Make sure that your firewall or anti-virus software is not blocking the camera software or ActiveX. If you are unable to view live video, please try disabling/closing your firewall or anti-virus software and trying to log into the camera again. support@agasio.com Page | 16 713-893-4514...
-
Page 18: Viewing With Chrome, Firefox, Safari
This extension is called IETab, and is an excellent alternative if you’d like to use the camera with all features within Server Push Browsers (IETab does not support Safari). The Control Interface for the cameras in this mode is as pictured below: support@agasio.com Page | 17 713-893-4514... -
Page 19: Main Menu Interface
9. Main Menu Interface Here is a quick overview of the options available on the home screen of the Agasio camera. This navigational circle controls the camera pan and tilt. You can click the arrows around the circle to pan and tilt accordingly. The Pan/Tilt feature will only work if a camera has this function available. - Page 20 OSD entirely. OSD is the option that shows the date and time on the live camera video feed. To find this option, hover over “Device Settings” and hover over “OSD,” which will show you the different options available. support@agasio.com Page | 19 713-893-4514...
- Page 21 * Please refer to section 15. Multi-Device Settings* This feature is only supported by the PTZ IP Camera. Use these buttons to zoom in and out. support@agasio.com Page | 20 713-893-4514...
-
Page 22: Administrative Settings
You can find this option by hovering over “Device Settings,” and clicking “Restore Factory Settings.” Reboot Device: This option simply reboots the camera. You can find this option by hovering over “Device Settings,” and clicking “Reboot Device.” support@agasio.com Page | 21 713-893-4514... -
Page 23: Multi-Device Settings
The first device is the default device, which is the camera that you are currently logged into. To add any of the cameras that appear in the list, click the button that reads “The 2 Device.” More options will appear underneath which include “Alias, Host, HTTP Port, User, and Password.” support@agasio.com Page | 22 713-893-4514... - Page 24 You can repeat this process for up to 9 cameras. If a camera is not located on the LAN, you can simply input its external IP address, port, username and password, and click “Add.” Don’t forget to click “Submit” when finished. support@agasio.com Page | 23 713-893-4514...
- Page 25 4-view or 9-view depending on how many cameras you have added. This option is seen pictured below. Figure 11.2 – An example of using 4 cameras simultaneously on the same screen support@agasio.com Page | 24 713-893-4514...
-
Page 26: Basic Network Settings
It is usually recommended to set the IP address yourself rather than allowing the IP to be set by the DHCP server. 13. Wireless Settings In this section, we will cover making the camera wireless once it is fully set up by RJ-45 cable. support@agasio.com Page | 25 713-893-4514... - Page 27 Network Type – This field describes the type of network the camera is running on. There are two options, Infra and Adhoc. Currently, Adhoc networks are not supported by the cameras, so this option must remain on Infra. support@agasio.com Page | 26 713-893-4514...
- Page 28 The most popular encryptions are WEP, WPA, and WPA2. You can find this information by going to the Control Panel on your computer and navigating to “Network and Internet.” Figure 13.2 – Navigate to Manage Wireless Networks, right click on your network, click Properties support@agasio.com Page | 27 713-893-4514...
- Page 29 In the case of Figure 13.3, we can see that the share key is “Agasio.” The share key is the same value as your Network Security Key.
- Page 30 Search Tool software. You may need to click “Find” several times or restart the program if the camera is not seen after a minute. support@agasio.com Page | 29...
-
Page 31: Adsl Settings
You can also use a highly recommended resource at www.portforward.com to find out how to port forward on your exact router, which comes with screenshots of each step as well. support@agasio.com Page | 30 713-893-4514... - Page 32 These are default values; if these do not work consult the router’s user manual. If you have changed the username and password, please use those values instead. Then click OK. Next, proceed to click on the category “Applications & Gaming,” then click on “Single Port Forwarding” support@agasio.com Page | 31 713-893-4514...
- Page 33 The IP address there is your external IP address, which you will use in your URL bar along with the port number to access the camera from any browser or on your smart phone using 3G or 4G. support@agasio.com Page | 32 713-893-4514...
- Page 34 15.2 Belkin Routers To begin, open a web browser and type "192.168.2.1" in the address bar and press Enter on your keyboard. 1. Click on Login in the upper right hand corner of the page. support@agasio.com Page | 33 713-893-4514...
- Page 35 Check the box under the category that reads “Enabled.” Type a general description of the application; in this case it will be an Agasio Camera, so type IPCAM. Type the port(s) that you have specified in the Inbound Port category. For our example in this manual, we used port 99.
- Page 36 For example, we would type in our browser the following: “50.79.253.205:99” and push Enter. This should take us to our camera. Remember to always add a colon and the port number after the external IP address. support@agasio.com Page | 35 713-893-4514...
- Page 37 After this is done your camera should be set up to be remotely viewed! You can double check if your port is forwarded by going to http://www.canyouseeme.org and typing in your port and checking that way. support@agasio.com Page | 36 713-893-4514...
-
Page 38: Dynamic Dns Settings
(Oray, 3322.org, etc.). To navigate to the Dynamic DNS Service Settings page, hover over “Network Settings,” and click on “DDNS Service Settings.” support@agasio.com Page | 37 713-893-4514... - Page 39 Enter the following URL into your browser: http://dyn.com/dns/dyndns-pro-free-trial/. You will see the following image near the top of the page, click “Start the Trial” to begin. support@agasio.com Page | 38 713-893-4514...
- Page 40 You will be asked to add a new hostname. You can type a custom name for the hostname and use any type of ending for the last part of the URL. In this case, we used “dyndns.org,” and used “Agasio” as our custom hostnames.
- Page 41 Enter a Username and Password you would like to use with your Dyn.com account. In this example we used the username “Agasio” and password “Agasio.” Enter your e-mail address and type in the numbering on the security image. Make sure to check the box which reads “I accept the terms of Dyn’s Acceptable Use Policy etc.”...
- Page 42 Figure 16.4 – Confirm validation of your trial account by clicking the verification link found in your e-mail support@agasio.com Page | 41 713-893-4514...
- Page 43 14 days to keep one free host name, which is all you need for an unlimited number of cameras. Once your account has processed and confirmed, you will see the following screens confirming your host names. You will be able to cancel your trial immediately if you’d like. support@agasio.com Page | 42 713-893-4514...
- Page 44 Figure 16.6 – The screens above indicate the completion of your trial account setup, note that you can always cancel your trial and keep one hostname free, without a charge. support@agasio.com Page | 43 713-893-4514...
- Page 45 Figure 16.7 – As seen above, cancelling your trial has no effect on the first host name you register, thus allowing you to use this host name for free for your cameras. support@agasio.com Page | 44 713-893-4514...
- Page 46 URL bar as follows: “Agasio.dyndns.org:99” Note: Remember that you always have to enter your port number with a colon at the end of the URL if you are not using port 80.
- Page 47 The update client automatically updates your IP address as it changes so that the hostname will always be updated with the external IP address, even if it changes. You can locate the download page at www.dyn.com/support/clients/. Figure 16.9 – DynDNS update client download page support@agasio.com Page | 46 713-893-4514...
-
Page 48: E-Mail And Ftp Settings
SMTP Server – The SMTP server is going to be the last part of your e-mail address with the word “mail” in the front. For example, our e-mail, Agasio@gmail.com, the SMTP server will be “mail.gmail.com.” SMTP Port – Usually the SMTP port is 25, however for certain e-mail providers the SMTP port differs. - Page 49 “SMTP User” and “SMTP Password,” you would put in your e-mail account username and password in these fields. For example, we would put “Agasio” (without the @gmail.com at the end) into the SMTP User field and the password into the SMTP password field.
-
Page 50: Alarm Settings
15 minute time frame for each hour in the day and for every day of the week. “0” refers to 12:00 AM and “13 – 23” refers to 1:00 – 11:00 PM. support@agasio.com Page | 49 713-893-4514... -
Page 51: Hard Reset And Firmware Upgrade
FTP settings, or Alarm Settings. The hard reset allows you to set the camera back to default factory settings when you are not able to access the camera anymore. Figure 19.1 – The bottom of an Agasio indoor model camera, the reset button is located on the right To perform a hard reset, take the end of a paper clip and push the button that is located at the bottom of the camera (indoor cameras), hold this button down for 20 –... -
Page 52: Restoring Factory Defaults
WebUI could result in some features of your camera not working correctly if you update the wrong version. If you are unsure of which firmware or WebUI to upgrade, don’t hesitate to contact us at support@agasio.com. You can find the Upgrade Firmware page when hovering over “Device Settings,” then clicking on “Upgrade Device Firmware.”... -
Page 53: Rebooting Your Camera
21.1 will appear, click OK to confirm and wait about one minute for the camera to reboot. The camera should appear again within one minute of rebooting. Figure 21.1 – Confirmation window asking to confirm a camera reboot support@agasio.com Page | 52 713-893-4514... -
Page 54: Warranty Information
If a returned product is determined to be damaged or misused, it will be left to the discretion of Agasio Digital Technologies LLC to determine if the product is replaceable. Accidental damage or misused products will not be repaired or replaced under the product warranty.
Need help?
Do you have a question about the A622W and is the answer not in the manual?
Questions and answers