
Summary of Contents for GMC RT300
- Page 1 ROUTER TABLE RT300 INSTRUCTION MANUAL Black Magenta Cyan Yellow Code: RT300 Date: 060907 Edition: 06 Op: BR...
-
Page 2: Table Of Contents
Attaching the infeed and outfeed fence Attaching the guard to the fence Adjusting the mitre gauge Mounting an R1200 router Mounting a router other than the R1200 Attaching a table insert Operation Adjusting the depth of cut Using the starting pin... -
Page 3: Dear Customer
is a Warranty claim, spare part or user information, please phone our Help Line for an immediate response. Phone 1300 880 001 in Australia or 0800 445 721 in New Zealand. Introduction Your new GMC power tool will more than satisfy your expectations. -
Page 4: General Safety Instructions
General safety instructions To use this tool properly, you must observe the safety regulations, the assembly instructions and the operating instructions to be found in this Manual. All persons who use and service the machine have to be acquainted with this Manual and must be informed about its potential hazards. -
Page 5: Additional Safety Rules For Router Tables
Additional safety rules for router tables • Fully assemble and tighten all fasteners required for this table. Do not use the router table until it is fully assembled. Check the table and the router to make sure fasteners are still tight before each use. -
Page 6: Assembly
• Guide the workpiece by the fence to maintain control. Do not place material between the router bit and fence while routing the edge. This will cause the material to become wedged, making kickback possible. • Use push sticks, vertical and horizontally mounted feather boards and other jigs to hold the workpiece. -
Page 7: Unpacking
20. Lock knobs (3 large, 4 small) (1 large knob already fitted to adjustable fence bracket) 21. Philips head screws (8) 22. Spring washers (8) 23. Flat washers (8) 24. Nuts (8) 25. Philips head screws for attaching switch box (2) 26. Router plate screws (4) -
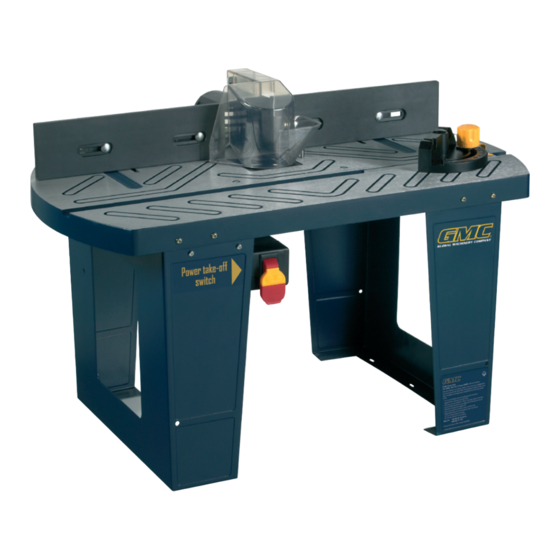
Page 8: Know Your Product
Know your product Before using the router table, familiarise yourself with all the operating features and safety requirements. 1. Table 2. Left table leg 3. Right table leg 4. Table inserts (x3) 5. On/off switch 6. Switch disabling insert 7. Rear fence 8. -
Page 9: Attaching The Legs
The infeed (9) and outfeed (10) fence attach to the rear fence. 1. Position the router table so you are facing the rear of the table. 2. Align the rear fence (7) over the channel openings in the table. -
Page 10: Attaching The Infeed And Outfeed Fence
Attaching the guard to the fence The guard (13) protects the operator from the cutting edge of the router bit. A pin secures the guard to a support on the fence. The guard will move freely when it is attached properly to the fence. -
Page 11: Mounting A Router Other Than The R1200
Mounting a router other than the R1200 1. If there is no combination of screw holes in the router plate that match perfectly the mounting requirements of the router, it is necessary to drill extra holes. -
Page 12: Operation
5. Turn the router switch to the ON position and lock the switch on. 6. Flip the router table switch to the ON position to turn on and operate the router (fig. S). 7. Push the switch to the OFF position to turn off the router. -
Page 13: Maintenance
4. Never use caustic agents to clean plastic parts. CAUTION. Do not use cleaning agents to clean the plastic parts of the router table. A mild detergent on a damp cloth is recommended. Water must never come into contact with the router table. - Page 16 GMC customer assist If your product needs repairing, replacing, technical service or you simply need help or advice, please contact us on our Customer Assist Line 1300 880 001 (Australia) or 0800 445 721 (New Zealand). For prompt service we suggest you log your service request online at www.gmcservice.com.au.
Need help?
Do you have a question about the RT300 and is the answer not in the manual?
Questions and answers