Table of Contents
Advertisement
Quick Links
Advertisement
Table of Contents

Related Manuals for Suunto AMBIT


Summary of Contents for Suunto AMBIT
- Page 1 SUUNTO AMBIT USER GUIDE...
-
Page 2: Table Of Contents
6.2 Updating your Suunto Ambit ........ - Page 3 9.2 Matching profile to activity ........36 9.2.1 Setting profiles .
- Page 4 13.1 Service menu ........... 66 13.2 Changing language .
-
Page 5: Safety
1 SAFETY Types of safety precautions WARNING: - is used in connection with a procedure or situation that may result in serious injury or death. CAUTION: - is used in connection with a procedure or situation that will result in damage to the product. NOTE: - is used to emphasize important information. - Page 6 WARNING: DO NOT ENTIRELY RELY ON THE GPS OR BATTERY LIFETIME, ALWAYS USE MAPS AND OTHER BACKUP MATERIAL TO ENSURE YOUR SAFETY. CAUTION: DO NOT APPLY SOLVENT OF ANY KIND TO THE PRODUCT, AS IT MAY DAMAGE THE SURFACE. CAUTION: DO NOT APPLY INSECT REPELLENT ON THE PRODUCT, AS IT MAY DAMAGE THE SURFACE.
-
Page 7: Welcome
Personalize your device, selecting just what you need to get the most out of your next adventure. The new Suunto Ambit conquering new territory with the world’s first GPS for Explorers. -
Page 8: Display Icons And Segments
/ increase heart rate next / confirm exercise mode down / decrease For a complete list of icons in Suunto Ambit, see Chapter 15 Icons on page 72. -
Page 9: Using Buttons
4 USING BUTTONS Suunto Ambit has five buttons which allow you to access all the features. [Start Stop]: ● access the exercise menu ● pause or resume an exercise ● keep pressed to stop and save an exercise ● increase a value or move up in the settings [Next]: ●... -
Page 10: Using Backlight And Button Lock
[View]: ● change views in mode and during exercise TIME ● keep pressed to invert the display from light to dark and vice versa [Back Lap]: ● return to the previous step ● add a lap during exercise TIP: When changing the values, you can increase the speed by keeping [Start Stop] or [Light Lock] pressed until the values start to scroll faster. -
Page 12: Getting Started
Start by charging the battery. Your Suunto Ambit wakes up automatically when you attach it to your computer using the supplied USB cable. The device can also be woken up by attaching it to a mains socket using the optional Suunto wall charger. -
Page 13: Customizing Your Suunto Ambit
Suunto Ambit to Movescount and customize the device to best meet your needs. TIP: Connect to Movescount to get the latest software to your Suunto Ambit, in case there is an update available. Start by installing Moveslink: 1. -
Page 14: Updating Your Suunto Ambit
Movescount and in the device will be synchronized. 6.2 Updating your Suunto Ambit You can update your Suunto Ambit software automatically in Movescount. NOTE: When you update your Suunto Ambit software, all the existing logs are automatically moved to Movescount and deleted from the device. -
Page 15: Custom Modes
1. Go to www.movescount.com/moveslink and install the Moveslink application. 2. Connect your Suunto Ambit to your computer with the Suunto USB cable. The Moveslink application will automatically check for software updates. If an update is available, your device will be updated. -
Page 16: Inverting Display
6.4 Inverting display You can invert the display of your Suunto Ambit from light to dark or vice versa. To invert the display in the settings: 1. Keep [Next] pressed to enter the settings. 2. Press [Next] to enter the settings. -
Page 17: Using Time Mode
7 USING TIME MODE mode includes time measurement functions. TIME mode shows you the following information: TIME ● top row: date ● middle row: time ● bottom row: toggle between seconds, dual time and weekday with [View]. 7.1 Changing time settings To access the time settings: 1. - Page 18 Setting time The current time is shown in the middle row of the the mode display. TIME To set the time: 1. In the settings, go to , then to Time/date and Time. GENERAL 2. Change the hour and minute values with [Start Stop] and [Light Lock]. Accept with [Next].
- Page 19 To set the date: 1. In the settings, go to , then to Time/date and Date. GENERAL 2. Change the year, month and day values with [Start Stop] and [Light Lock]. Accept with [Next]. 3. Go back to the settings with [Back Lap], or keep [Next] pressed to exit the settings.
- Page 20 Setting alarm You can use your Suunto Ambit as an alarm clock. To access the alarm clock and set the alarm: 1. In the settings, go to , then to Time/date and Alarm. GENERAL 2. Set the alarm on or off with [Start Stop] or [Light Lock]. Accept with [Next].
- Page 21 When the alarm sounds, you can: ● Select Snooze by pressing [Light Lock]. The alarm stops and restarts every 5 minutes until you stop it. You can snooze up to 12 times for a total of 1 hour. ● Select Stop by pressing [Start Stop]. The alarm stops and restarts the same time the following day, unless you switch the alarm off in the settings.
-
Page 22: Navigation
GPS incorporates a set of satellites that orbit the Earth at an altitude of 20,000 km at the speed of 4 km/s. The built-in GPS receiver in Suunto Ambit is optimized for wrist use and receives data from a very wide angle. - Page 23 NOTE: When you activate GPS for the first time, or have not used it for a long time, it might take longer than usual to get a GPS fix. Subsequent GPS starts will take less time. TIP: To minimize GPS initiation time, hold the device steady with GPS facing up and make sure you are in an open area so that the device has a clear view of the sky.
-
Page 24: Gps Grids And Position Formats
8.1.2 GPS grids and position formats Grids are lines on a map that define the coordinate system used on the map. Position format is the way the GPS receiver's position is displayed on the device. All the formats relate to the same location, they only express it in a different way. -
Page 25: Checking Your Location
NOTE: The MGRS grid is only implemented south of 84°N and north of 80°S. 8.2 Checking your location Suunto Ambit allows you to check your current location using GPS. To check your location: 1. Press [Start Stop] to enter the exercise menu. -
Page 26: Adding Waypoints
[Next] pressed to access the exercise options. 8.3 Adding waypoints Suunto Ambit allows you to save your current location as a waypoint. You can store up to 100 waypoints in the device. You can select a waypoint type (icon) and waypoint name from a pre-defined list and freely name the waypoints in Movescount. -
Page 28: Navigating To A Waypoint
TIP: You can create waypoints in Movescount by selecting a location on a map or inserting the coordinates. Waypoints in your Suunto Ambit and in Movescount are always synchronized when you connect the device to Movescount. 8.4 Navigating to a waypoint Suunto Ambit includes GPS navigation which enables you to navigate to a pre-defined destination stored as a waypoint. - Page 29 ● your distance from the destination ● your deviation from the heading in degrees (0° is the correct heading), or alternatively your current heading in cardinal ( ) and half-cardinal ( ) points. 8. Approximately 50 meters before the waypoint location the device informs you that you are arriving at your destination.
-
Page 31: Deleting A Waypoint
NOTE: Navigation shows the deviation from the north arrow of the watch bezel in low speeds (<10 km/h) and the deviation from course direction in high speeds (>10 km/h). When standing still, you can rotate the device until you see 0 indicating the correct direction. - Page 33 NOTE: When you delete a waypoint in Movescount and synchronize your Suunto Ambit, the waypoint is deleted from the device but only disabled in Movescount.
-
Page 34: Using Alti & Baro Mode
ALTI & BARO how Suunto Ambit calculates altitude and sea level air pressure. Suunto Ambit constantly measures absolute air pressure. Based on this measurement and reference values, it calculates altitude or sea level air pressure. -
Page 35: Getting Correct Readings
9.1.1 Getting correct readings If you are engaged in an outdoor activity that requires accurate sea level air pressure or altitude, you will first need to calibrate your Suunto Ambit by entering either your current altitude or the current sea level air pressure. -
Page 36: Matching Profile To Activity
Barometer profile to the Altimeter profile when you started moving in the morning.You know that the current altitude readings given by your Suunto Ambit are wrong. So, you hike to the nearest location shown on your topographic map for which an altitude reference value is provided. You correct your Suunto Ambit altitude reference value accordingly and switch from Barometer to Altimeter profile. -
Page 37: Setting Profiles
To get correct readings, you need to match the profile to your activity. You can either let Suunto Ambit decide a suitable profile for the activity, or choose a profile yourself. NOTE: You can define the profile as part of the custom mode settings in Movescount, or in your Suunto Ambit. -
Page 38: Using Altimeter Profile
3. Scroll to Reference with [Light Lock] and enter with [Next]. 4. Scroll to Altitude or Sea level with [Light Lock] and enter the setting with [Next]. 5. Set the known reference value using [Start Stop] and [Light Lock]. 9.3 Using Altimeter profile The Altimeter profile calculates altitude based on reference values. -
Page 39: Using Barometer Profile
NOTE: If you are wearing your Suunto Ambit on your wrist, you will need to take it off in order to get an accurate temperature reading because your body temperature will affect the initial reading. 9.4 Using Barometer profile The Barometer profile shows the current sea level air pressure. This is based on the reference values added in the settings and the constantly measured absolute air pressure. -
Page 40: Using Automatic Profile
● the latest altitude logged in the Automatic profile before changing to the Barometer profile. NOTE: If you are wearing your Suunto Ambit on your wrist, you will need to take it off in order to get an accurate temperature reading because your body temperature will affect the initial reading. - Page 41 It is not possible to measure weather and altitude changes at the same time, as both cause a change in the surrounding air pressure. Suunto Ambit senses vertical movement and switches to measuring altitude, when needed. When altitude is shown, it is updated with a maximum delay of 10 seconds.
-
Page 42: Using 3D Compass
10 USING 3D COMPASS Suunto Ambit has a 3D compass that allows you to orient yourself in relation to magnetic north. The tilt-compensated compass gives you accurate readings even if the compass is not horizontally level. mode includes the following information: COMPASS ●... - Page 43 To access the compass calibration: 1. Keep [Next] pressed to enter the settings. 2. In the settings, scroll to using [Light Lock] and enter with [Next]. GENERAL 3. Scroll to Compass using [Start Stop] or [Light Lock] and enter with [Next]. 4.
-
Page 44: Setting Declination Value
10.2 Setting declination value To ensure correct compass readings, set an accurate declination value. Paper maps point to true north. Compasses, however, point to magnetic north a region above the Earth where the Earth’s magnetic fields pull. Because magnetic North and true North are not at the same location, you must set the declination on your compass. - Page 45 5. Turn the declination off by selecting , or select (west) or (east). 6. Set the declination value with [Start Stop] or [Light Lock]. 7. Press [Next] to accept the setting.
-
Page 46: Using Exercise Modes
11 USING EXERCISE MODES Use the exercise modes to record exercise logs and view various information during your exercise. You can access the exercise modes by pressing [Start Stop] in the TIME ALTI mode, or in the mode after the compass has been calibrated. &... -
Page 47: Additional Options In Exercise Modes
During exercise the predefined exercise modes give you information that is useful for that particular sport: ● Cycling: speed, distance, cadence and heart rate related information ● Mountaineering: altitude, distance and speed related information (60 sec GPS fix) ● Trail running : altitude, heart rate, pace and distance related information ●... -
Page 48: Using Heart Rate Belt
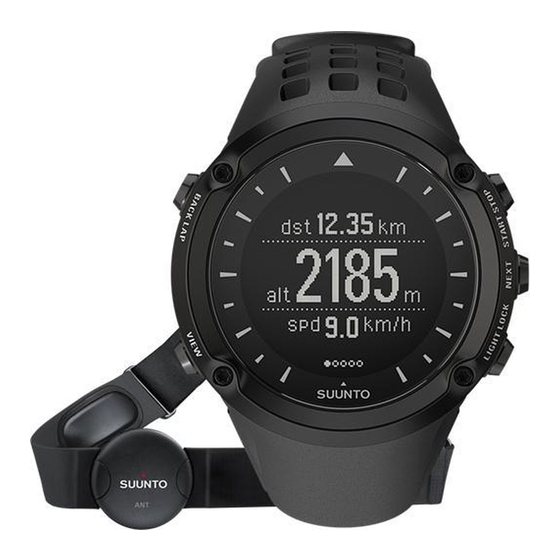
11.3 Using heart rate belt A heart rate belt can be used during exercise. When you use a heart rate belt, Suunto Ambit gives you more information about your activities. Using a heart rate belt enables the following additional information during exercise: ●... -
Page 49: Putting On Heart Rate Belt
● Machine-wash the textile strap of the heart rate belt regularly. 11.4 Putting on heart rate belt NOTE: Suunto Ambit is compatible with Suunto ANT Comfort Belt. Adjust the strap length so that the heart rate belt is tight but still comfortable. -
Page 50: Starting Exercise
We strongly advise you to consult your doctor prior to beginning a regular exercise program. NOTE: Suunto Ambit cannot receive the heart rate belt signal under water. TIP: Machine-wash the heart rate belt regularly after use to avoid unpleasant odor and to ensure good data quality and functionality. - Page 51 After the heart rate signal the device automatically starts searching for a GPS signal. Wait for the device to notify that the GPS signal has been found, or press [Start Stop] to exercise without GPS. 6. Press [Start Stop] to start recording your exercise. To access additional exercise options, keep [Next] pressed (see Section 11.2 Additional options in exercise modes on page 47).
-
Page 53: During Exercise
Depending on the exercise mode you have selected, your Suunto Ambit allows you to record various information during exercise. If you are using GPS while recording a log, Suunto Ambit will also record your track and you can view it in Movescount. When you are recording your track,... -
Page 54: Making Laps
During your exercise, you can make laps either manually or automatically by setting the autolap interval in Movescount. When you are making laps automatically, Suunto Ambit records the laps based on the distance you have specified in Movescount. To make laps manually, press [Back Lap] during the exercise. - Page 55 later. You can also make laps during recording. Your laps are stored in the device memory and you can access them later in Movescount. You can view the lap type, lap number, split time and distance. To record altitude: 1. Make sure that the Altimeter profile is activated. 2.
-
Page 57: After Exercise
11.7 After exercise To stop recording and view the summary information: 1. Keep [Start Stop] pressed to stop and save the exercise. Alternatively, you can press [Start Stop] to pause the recording. After pausing the log, confirm stopping by pressing [Back Lap], or continue recording by pressing [Light Lock]. -
Page 58: After Exercise With Heart Rate Belt
11.7.1 After exercise with heart rate belt When you use a heart rate belt during exercise, the summary includes the following information: ● start time and date of the log ● duration ● number of laps ● distance (exercise with GPS) ●... -
Page 59: After Exercise Without Heart Rate Belt
11.7.2 After exercise without heart rate belt When you exercise without a heart rate belt, the summary includes the following information: ● start time and date of the log ● duration ● number of laps ● distance (exercise with GPS) ●... -
Page 60: Fusedspeed
If you temporarily lose GPS signal, for example, because buildings block the signal, Suunto Ambit is able to continue showing accurate speed readings with the help of the GPS calibrated accelometer. - Page 61 NOTE: FusedSpeed is meant for running and other similar type of activities. TIP: To get the most accurate readings with FusedSpeed , only glance shortly at the device when needed. Holding the device in front of you without moving it reduces the accuracy.
-
Page 62: Use Example: Running And Biking With Fusedspeed Tm
● floorball ● football The other exercise modes use the basic GPS speed data. Use example: Running and biking with FusedSpeed When you change from running to biking, FusedSpeed notices that the wrist acceleration is not giving valid speed readings. The device automatically deactivates FusedSpeed and provides purely GPS-based speed data for biking. -
Page 63: Adjusting Settings
13 ADJUSTING SETTINGS To access and adjust the settings: 1. Keep [Next] pressed to enter the settings menu. 2. Scroll the settings menu with [Start Stop] and [Light Lock]. 3. Press [Next] to enter a setting. 4. Press [Start Stop] and [Light Lock] to adjust the setting values. 5. - Page 64 settings PERSONAL ● Weight ● Max HR settings GENERAL Formats ● Unit system: ○ Metric ○ Imperial ○ Advanced: Allows you to customize a mix of imperial and metric settings according to your own liking in Movescount. ● Time format: 12 h or 24 h ●...
- Page 65 NOTE: The alarm will sound even when all tones are off. ● Backlight Mode: ○ Normal: The backlight is switched on for five seconds when you press [Light Lock] and when the alarm sounds. ○ Night: The backlight is switched on for five seconds when you press any button and when the alarm sounds.
-
Page 66: Service Menu
○ Sleep mode: allows to put the device to sleep. ○ GPS reset: allows you to reset GPS. ● INFO ○ Air pressure: shows the current absolute air pressure and temperature. ○ Versions: shows the current software version of your Suunto Ambit. - Page 67 NOTE: Service menu content is subject to change without notice during updates. Sleep mode You can put your Suunto Ambit into sleep mode, if you are not using it for a while to save battery duration. To put the device into sleep mode: 1.
-
Page 68: Changing Language
13.2 Changing language The default language in your Suunto Ambit is English. To change the language, connect the device to your computer and download additional language packs from Movescount. The languages available in spring 2012 are French, Spanish... -
Page 69: Pairing Pod/Heart Rate Belt
[Start Stop] and [Light Lock]. 5. Press [Next] to select a POD or heart rate belt and start pairing. 6. Hold your Suunto Ambit close to the POD/belt (<30 cm) and wait for the device to notify that the POD/belt has been paired. -
Page 71: Calibrating A Pod
● Check that the electrode contact areas of the heart rate belt are moist. 14.1 Calibrating a POD You can calibrate Suunto Bike POD with Suunto Ambit for accurate speed and distance measurement. Perform the calibration on an accurately measured distance, for instance, on a 400 m running track. -
Page 72: Icons
15 ICONS For example the following icons are displayed in Suunto Ambit: barometer altimeter chronograph settings GPS signal strength pairing heart rate exercise mode alarm button lock... - Page 73 Waypoint icons The following waypoint icons are available in Suunto Ambit: building/home car/parking camp/camping food/restaurant/cafe...
- Page 74 lodging/hostel/hotel water/river/lake/coast mountain/hill/valley/cliff forest crossroad sight begin geocache waypoint road/trail...
- Page 75 rock meadow cave...
-
Page 76: Terminology
16 TERMINOLOGY Autolap With , you can define laps in distance instead of AUTOLAP time. Format The way in which the GPS receiver's position will be displayed on the wrist unit. Commonly displayed as latitude/longitude in degrees and minutes, with options for degrees, minutes and seconds, degrees only, or one of several grid formats. - Page 77 Peak Training Effect. Position Exact map coordinates of a given position. Split time Time from log start at any given point during exercise. Track Track is the path traversed by the user. Waypoint Position coordinates stored in Suunto Ambit memory.
-
Page 78: Care And Maintenance
Suunto Ambit is water resistant. Its water resistance is tested to 100 m/330 ft according to ISO 2281 standard (www.iso.ch). This means that you can use Suunto Ambit for swimming, but it should not be used for any form of diving. -
Page 79: Charging The Battery
● never knock or drop the device. 17.2 Charging the battery The battery duration on a single charge depends on how Suunto Ambit is used. The duration ranges from 15 to 50 hours or more. With basic watch functionality this can be up to 30 days. For more information on battery life, see Chapter 18 Technical specifications on page 82. - Page 80 10 %, the battery icon blinks for 30 seconds. When the battery charge level is less than 2 %, the battery icon blinks continuously. Charge the battery by attaching it to your computer with the Suunto USB cable, or charge with the USB-compatible Suunto wall charger. It takes approximately 2-3 hours to fully charge an empty battery.
-
Page 81: Replacing Hr Belt Battery
TIP: Go to Movescount to change the GPS fix and recording rate of an exercise mode to save battery life. 17.3 Replacing HR belt battery Replace the battery as illustrated here:... -
Page 82: Technical Specifications
COMPASS *GPS tracking mode with new battery in +20° C. Memory ● waypoints: max. 100 Radio receiver ● Suunto ANT compatible, communication frequency 2.465 GHz, modulation method GFSK ● range: ~2 m/6 ft Barometer ● display range: 950...1060 hPa/28.34...31.30 inHg ●... -
Page 83: Trademark
● technology: SiRF star IV ● resolution: 1 m/3 ft 18.1 Trademark Suunto Ambit, its logos, and other Suunto brand trademarks and made names are registered or unregistered trademarks of Suunto Oy. All rights are reserved. 18.2 FCC compliance This device complies with Part 15 of the FCC Rules. Operation is subject to the... -
Page 84: Rss And Ices
Suunto brand trademarks and names are registered or unregistered trademarks of Suunto Oy. This document and its contents are proprietary to Suunto Oy and are intended solely for the use of clients to obtain knowledge and information regarding the operation of Suunto products. -
Page 85: Patent Notice
18.7 Warranty SUUNTO LIMITED WARRANTY Suunto warrants that during the Warranty Period Suunto or a Suunto Authorized Service Center (hereinafter Service Center) will, at its sole discretion, remedy defects in materials or workmanship free of charge either by a) repairing, or b) replacing, or c) refunding, subject to the terms and conditions of this Limited Warranty. - Page 86 4. has been exposed to chemicals including but not limited to mosquito repellents. Suunto does not warrant that the operation of the Product will be uninterrupted or error free, or that the Product will work with any hardware or software provided by a third party.
- Page 87 If you have questions or doubts, a comprehensive range of support materials is available there, or you can post a question directly to Suunto Help Desk. Alternatively, you may contact Suunto Help Desk at the phone number listed on the last page of this document. Suunto’s qualified customer support staff will help you and, if needed, troubleshoot your product during the call.
-
Page 89: Index
Index buttons, 9 adjusting display contrast, 67 after exercise, 57 59 calibrating with heart rate belt, 58 compass, 42 without heart rate belt, 59 PODs, 71 alarm, 20 charging the battery, 12 Alti & Baro mode, 34 compass, 42 Altimeter profile, 38 calibrating, 42 Automatic profile, 40 declination value, 44... - Page 90 exercise modes, 15, 46 Movescount, 13 additional options, 47 navigating, 28 FusedSpeed, 60 troubleshooting, 23 GPS, 22 pairing, 69 resetting, 67 troubleshooting, 23 calibrating, 71 grids, 24 pairing, 69 position formats, 24 heart rate belt, 48 49 pairing, 69 recording altitude, 54 recording tracks, 53 resetting GPS, 67 icons, 72...
- Page 91 time mode, 17 time settings, 17 troubleshooting heart rate signal, 48 updating, 14 waypoint adding, 26 deleting, 31 waypoint icons, 73...
- Page 92 SUUNTO CUSTOMER SUPPORT Support material available at www.suunto.com/support Questions & Answers and videos at www.suunto.com/ambit INTERNATIONAL +358 2 284 1160 AUSTRALIA 1-800-197570 (toll free) AUSTRIA 0800677410 (toll free) CANADA 1-800-267-7506 (toll free) FINLAND 02 284 1160 FRANCE 0170729897 GERMANY 06922222954...
Need help?
Do you have a question about the AMBIT and is the answer not in the manual?
Questions and answers