Table of Contents
Advertisement
Advertisement
Table of Contents

Subscribe to Our Youtube Channel
Summary of Contents for Netstreams Musica MU5066
- Page 1 Multi-Room Audio System Installation and User’s Guide...
- Page 2 THIS DOCUMENT WAS WRITTEN AND PREPARED BY Multi-Room Audio System Any Music, from any source, in any room, any time you want it. All Rights Reserved Copyright@2005 NetStreams All brand names, product names, and trademarks are properties of their respective owners. 3600 W.
-
Page 3: Table Of Contents
TABLE OF CONTENTS IMPORTANT SAFEGUARDS! SINGLE/MULTI-ZONE MULTI-ZONE MODES ...1 ........25 MPORTANT AFETY NSTRUCTIONS AND PRECAUTIONS TO CHANGE THE ULTI ONE MODE FEATURES DIGITAL FM TUNER CARD 5066 ............2 ..26 SOURCES ROOMS INSERTING THE MU DFMT DIGITAL FM TUNER CARD ..........2 ............ -
Page 4: Important Safeguards
IMPORTANT SAFEGUARDS WARNING: TO REDUCE THE RISK OF FIRE OR ELECTRIC SHOCK, DO NOT EXPOSE THIS APPLIANCE TO RAIN OR MOISTURE. CAUTION: TO REDUCE THE RISK OF ELECTRIC SHOCK, DO NOT REMOVE COVER. NO USER - SERVICEABLE PARTS INSIDE. REFER SERVICING TO QUALIFIED SERVICE PERSONNEL. -
Page 5: Features
Add Local FM Tuner Listening to Any Room with the NetStreams Digital FM Tuner Card Each Musica MU5066 keypad/amplifier features a slot for an optional Digital FM Tuner Card (sold separately) so any room can have its’ own private FM Tuner listening. The Digital FM Tuner card kit includes a between-stud antenna featuring a RG6 connection for easy connection to a roof-top or attic-mounted antenna. -
Page 6: Net Streams S Hhh! Technology
NetStreams’ Shhh! Technology & Sleep Timer Musica MU5066 keypads also feature NetStreams’ proprietary Shhh! Technology, featuring a gentle sleep timer so the volume level of the audio gradually decreases in the room as you drift to sleep, finally shutting off. -
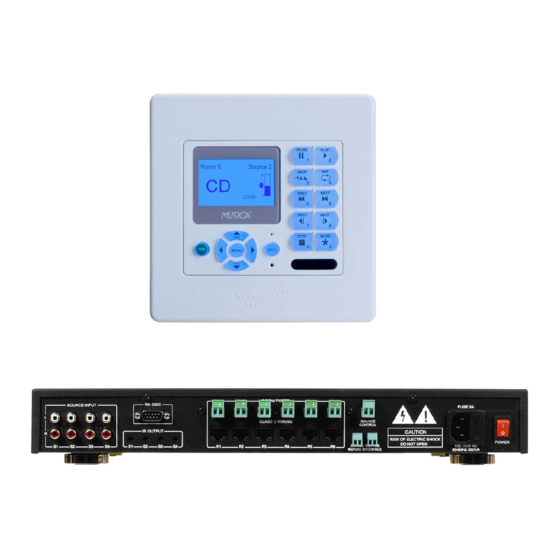
Page 7: Mu5066Adc Audio Distribution Center Guide Mu 5066 Adc Components
MUSICA AUDIO DISTRIBUTION CENTER GUIDE Musica MU5066ADC Audio Distribution Center Components 1. LED Lamp Indicates the state of system mode. Red: Standby mode or Green: Operating mode. 2. Source Input Provides the inputs from the 4 home-wide sources. 3. IR Output Provides outputs for the IR Emitters. -
Page 8: Mu 5066 Adc Specifications
MUSICA AUDIO DISTRIBUTION CENTER GUIDE Specifications for the Musica MU5066ADC Audio Distribution Center Component Type: Line level Audio Multi Room Controller Source Inputs: 4, stereo paired Connector: Gold-plated RCA Connectors Input Level: 150mV Input Impedance: 47KOhms Connector 1 (Data): 8-pin RJ45 Data Jack EIA/TIA 568A Connector 2 (Power): 2-pin 5mm Phoenix type Output Level:... -
Page 9: Remote Control
MUSICA AUDIO DISTRIBUTION CENTER GUIDE Remote Control The ergonomically designed, simple to use Musica remote control duplicates all functions of the wall-mounted keypad. The remote control also features a mute button, and discrete power on/off buttons. One Musica Remote MU4601RC is included with each Musica MU5066ADC Audio Distribution Center. -
Page 10: Ir Emitters
MUSICA AUDIO DISTRIBUTION CENTER GUIDE IR Emitter IR emitters are connected to the Musica ADC and run and installed at the house-wide sources. The IR emitters will deliver the IR codes programmed into a Musica keypad, and stored in the ADC. Four (4) IR Emitters MU4601IRE are provided with the Audio Distribution Center. -
Page 11: Wide - Screen High Resolution Lcd
MUSICA KEYPAD AMPLIFER OVERVIEW The interactive in-wall keypad/amplifier features a wide-screen graphic LCD that aids in easy operation of the system by providing feedback to the user on the status of the system. It responds visually to any press of any button confirming the action to the user. The menu screen uses a “look-and-follow”... -
Page 12: Source Functions
MUSICA KEYPAD AMPLIFER OVERVIEW • ROOM Accesses other rooms in the system to turn them ON or OFF and adjust sources. • EXT (External Audio) Controls direction of the audio signal (input/output) of an external component such as a local room audio source when the room is expanded utilizing the Audio Port (EIM). -
Page 13: Musica Keypad Amplifier Parts Guide
MUSICA KEYPAD AMPLIFIER PARTS GUIDE MU5066KP Keypad with Digital Amplifier Wide-screen graphic LCD user interface. Room system power ON/OFF button; whole system ON/OFF. Menu Menu offers total freedom in selecting sound, naming source, adjusting backlight brightness, and allows you to program audio sources from remotes. -
Page 14: Mu 5066 Kp Menu List
MUSICA KEYPAD AMPLIFIER MENU LIST Keypad Menu List Sound: Provide control over the sound such as: Balance and Loudness Balance: 15 steps from left to right, including center. Loudness: ON/OFF 5-band graphic equalizer: 100 Hz, 300 Hz, 1 k Hz, 3 k Hz, 10 k Hz. 3D Sound mode: ON/OFF (MU5066KP50 only). -
Page 15: Mu 5066 Kp Specifications
MUSICA KEYPAD AMPLIFIER SPECIFICATIONS Specifications for Musica MU5066KP Keypads Musica MU5066KP25S: Output Power: 25 Watts RMS/channel @ 4 ohms with both channels driven, 18 watts RMS/channel @ 8 ohms, 20 – 20 kHz +/- 3 dB Load Impedance: 8, 6 or 4 ohms (user selectable) Signal to Noise: >102dB (A-weighted ref: 1 Vrms, 1 KHz) Distortion:... -
Page 16: Mu5066Kp Display Screens Connecting , Initial And Basic Screens
MUSICA KEYPAD DISPLAY SCREENS The Musica MU5066KP Display Screens The Connection Screen The first time the MU5066 Keypads are connected to the ADC are powered up, a connection screen with a progress bar will briefly appear as the keypads attempt to communicate with the ADC. This screen will not appear anytime afterwards unless there is trouble with the connection. - Page 17 MUSICA KEYPAD DISPLAY SCREENS Volume Up/Down in Basic Screen Displays the current level of volume with graphical view Shows the status of volume adjusting when pressing volume UP/DOWN Mute Function in Basic Screen Displays the current state of volume. Stops the output of the audio signals and Audio Level Meter.
-
Page 18: Menu Screens
MUSICA KEYPAD DISPLAY SCREENS Menu Screen This screen shows the system settings for the local room. Enter and Exit by MENU key. The Menu screen consists of four sections Main Menu: You can select six menu items for the adjustment or setup. SOUND, NAME, IR, ADJ, ROOM, EXT (Audio Port-EIM, FM TUNER) Sub 1 Menu: Select the sub-items for adjustment... - Page 19 MUSICA KEYPAD DISPLAY SCREENS 4.2 Name Menu: You can select any of the following names for source names, Audio Port names, Room names, or Tuner preset names (*requires Digital FM Tuner card): 52 Default names are in the memory of the NS-MU5066 System: CD / AUX / Tape / Tuner / Escient/ AM / FM / MP3 / Blues / Children / Classic / Country / DAD / Dance / DVD / Lights / Internet / Jazz / ReQuest / MOM / XM Radio / POP / R&B / Rap / Radio / Rock / SAT / Xiva / Soul / iPOD / Talk / News / Sirius / Traffic / Weather / Sports / NPR / DSS / M-Server / {Blank} [All presets default] / Ext...
- Page 20 MUSICA KEYPAD DISPLAY SCREENS 4.3 IR Menu: Displays the screen for IR Learning. Can Register 20 commands for each audio source. (Source 1, 2, 3, 4). SRC functions cannot be registered for external audio systems (EXT). Also Adjusts the IR Frequency 4.3.1 Adjusting the IR Frequency for each source: Select between 38 kHz and 56 kHz per source input.
- Page 21 MUSICA KEYPAD DISPLAY SCREENS Step 4: The results of the registration of the IR code on the button are displayed. Normal Mode: Indicates the completion of registration. Error Mode: Indicates error during IR code learning • The previous screen returns automatically after 3 seconds •...
- Page 22 MUSICA KEYPAD DISPLAY SCREENS 4.4.3 Adjusting the Color of the backlight *Note: The MU5066KP25S keypad features amber or green backlighting 4.4.4 Adjusting the Backlight Time out settings 4.4.5 Adjusting the Sleep Timer settings: All specifications subject to change without notification. All rights reserved. Copyright©2007 NetStreams Main +1 512.977.9393 / fax +1 512.977.9398 / 3600 W.
- Page 23 MUSICA KEYPAD DISPLAY SCREENS 4.5 Room Menu Screens: View other rooms and see what source they’re listening to. Change a source in another room by selecting the room and then hitting the source key. Turn off another room by selecting the room from the menu and hitting the right arrow button. Turn ALL ROOMS ON by first selecting a source and then pressing and holding the SRCE button for 2 seconds.
- Page 24 MUSICA KEYPAD DISPLAY SCREENS 4.6 EXT (External Input / Output) Menu Screens (Audio Port or DFMT must be connected): Defines the direction of the audio signal when the Audio Port (EIM) is in use. ROOM: Only the amplifier in the keypad will be used. ROOM + EXT: Uses both the keypad amp and external amp.
-
Page 25: 4.9 Programming Macros
MUSICA KEYPAD DISPLAY SCREENS 4.9 Programming Macros All Musica MU5066 keypads have the capability to program two individual macros per input source to begin programming: 1. Completely learn the IR codes into all source buttons on all four source pages (FM tuner excluded). - Page 26 MUSICA KEYPAD DISPLAY SCREENS 4.9 Programming Macros continued The Musica MU5066KP50 also has the capability for an additional 10 macros per global source. These macros will work with any IR controlled equipment. This is particularly useful when you have an IR connecting block to multiple pieces of equipment off of 1 global source.
-
Page 27: Program Ir Codes For The Equipment
MUSICA KEYPAD DISPLAY SCREENS 4.9 Programming Macros continued To program in the IR codes for the equipment: 1. First, make sure you’re on a global source input selected on the MU5066KP50 keypad. 2. Select IR from the Menu screen and hit the arrow pointing right. 3. -
Page 28: To Change The Multi -Zone Mode
MUSICA SINGLE / MULTI-ZONE OPERATION MODES The Musica MU5066 keypads feature two operations modes which can be selected from the menu on the MU5066 keypad: Single-Zone and Multi-Zone modes. The Multi-Zone mode is the default mode and allows for the keypad to access global sources connected to the Audio Distribution Center. -
Page 29: Inserting The Mu 5066 Dfmt Digital Fm Tuner Card
MUSICA DIGITAL FM TUNER CARD The Musica MU5066 keypads also feature an expansion slot for a Musica Digital FM Tuner Card (sold separately) for FM Tuner listening in the local room in which the keypad is installed. 5.1 Inserting the MU5066DFMT Digital FM Tuner Card into the socket on the keypad:... -
Page 30: 5.3 Programming Fm Station Presets
MUSICA DIGITAL FM TUNER CARD 5.3 Programming FM Station Presets: Once the Digital FM Tuner card is inserted in the keypad, you can program in up to 8 FM Station presets for easy selection. To do this, tune to the station you want to program in, then press and hold the MODE key on the keypad until the “P”... -
Page 31: Adjusting The Settings For The Fm Tuner
MUSICA DIGITAL FM TUNER CARD 5.5 EXT Menu Display Screens - Adjusting the settings for the FM Tuner Once the Musica Digital FM Tuner card is inserted, additional adjustment screens will appear in the EXT menu on the Musica 5066 keypad. The screens allow you to adjust the following: •... -
Page 32: Audio Port Components
AUDIO PORT All specifications subject to change without notification. All rights reserved. Copyright©2007 NetStreams Main +1 512.977.9393 / fax +1 512.977.9398 / 3600 W. Parmer Lane Suite 100, Austin, TX 78727 / www.netstreams.com NS-0505-7121... -
Page 33: Mu290 Power Amplifier
MU290 POWER AMPLIFIER If more power is required (especially for larger rooms or outdoor zones), the MU290 power amplifier is the perfect complement to your Musica system. The MU290 provides 90W of stereo power (200W bridged) and features two RJ45 (EIM) ports which connect to the EIM port on the back of the MU5066 keypad. -
Page 34: Mu 290 Daisy Chain Configuration
MU290 POWER AMPLIFIER 6 MU290’s in daisy chain configuration: NOTE: Make sure the RJ45 Terminator (included) is plugged into the EIM output on the last MU290 amplifier in the chain. All specifications subject to change without notification. All rights reserved. Copyright©2007 NetStreams Main +1 512.977.9393 / fax +1 512.977.9398 / 3600 W. -
Page 35: Musica Wiring Diagrams
MUSICA WIRING DIAGRAMS Wiring the System Run CAT5e & 14/4 or CAT5e & 16/4 Siamese cable (as outlined in EIA/CEA 2030) between each Musica keypad and the Musica ADC. 1. Run a CAT5e cable between each Musica keypad/amplifier and Musica Audio Port (EIM) installed. 2. -
Page 36: Wiring The Source Components
MUSICA WIRING DIAGRAMS Wiring for Source Components Wiring for RS-232 and Doorbell/Telephone Sensors All specifications subject to change without notification. All rights reserved. Copyright©2007 NetStreams Main +1 512.977.9393 / fax +1 512.977.9398 / 3600 W. Parmer Lane Suite 100, Austin, TX 78727 / www.netstreams.com NS-0505-7121... -
Page 37: Musica Possible Configurations
MUSICA POSSIBLE CONFIGURATIONS All specifications subject to change without notification. All rights reserved. Copyright©2007 NetStreams Main +1 512.977.9393 / fax +1 512.977.9398 / 3600 W. Parmer Lane Suite 100, Austin, TX 78727 / www.netstreams.com NS-0505-7121... -
Page 38: Operate The System
HOW TO OPERATE THE SYSTEM Balloon indicated the operation in the room system or remote control Basic Screen: Displays the room and source selected, and the volume level. All specifications subject to change without notification. All rights reserved. Copyright©2007 NetStreams Main +1 512.977.9393 / fax +1 512.977.9398 / 3600 W. -
Page 39: Control The Volume
HOW TO CONTROL THE VOLUME A. Press button to turn up the volume, or button to turn down the volume. B. Keep pressing the button until the desired volume level is achieved. C. If volume level is “0”, it shows system in mute state. It is released by using button. -
Page 40: Select A Source For Playback
HOW TO SELECT A SOURCE FOR PLAYBACK Press the “SRCE” button to scroll through global and local sources. All specifications subject to change without notification. All rights reserved. Copyright©2007 NetStreams Main +1 512.977.9393 / fax +1 512.977.9398 / 3600 W. Parmer Lane Suite 100, Austin, TX 78727 / www.netstreams.com NS-0505-7121... -
Page 41: Troubleshooting
TROUBLESHOOTING “Check the Cable” Message appears on the MU5066 keypad upon power up: Upon first power up, if the “Check the Cable” message appears, this indicates that the something is wrong with the CAT5 cable termination or the CAT5 cable itself. Step 1: Turn OFF the power on the Audio Distribution Center Step 2: Test your CAT5 cable connection at both ends with a cable tester and reterminate the cable. - Page 42 TROUBLESHOOTING Upon First Power Up, the keypad does nothing and there is no backlight on the LCD window on the keypad: If this happens, the polarity may be incorrect for the power connection from the ADC to the keypad. You’ll be able to hear the relay clicking on the ADC, which means that 1 of the keypads is connected backwards.
- Page 43 NOTES All specifications subject to change without notification. All rights reserved. Copyright©2007 NetStreams Main +1 512.977.9393 / fax +1 512.977.9398 / 3600 W. Parmer Lane Suite 100, Austin, TX 78727 / www.netstreams.com NS-0505-7121...
- Page 44 www.netstreams.com 3600 W. Parmer Lane Austin, TX 78727 (512)977-9393 (512)977-9398 fax support@netstreams.com All specifications subject to change without notification. All rights reserved. Copyright©2005 NetStreams Main +1 512.977.9393 / fax +1 512.977.9398 / 3600 W. Parmer Lane Suite 100, Austin, TX 78727 / www.netstreams.com NS-0505-7121...
Need help?
Do you have a question about the Musica MU5066 and is the answer not in the manual?
Questions and answers