
Related Manuals for Briel Computers Replica I


Summary of Contents for Briel Computers Replica I
- Page 1 Setup and Users Manual Revision C JANUARY 2005 5392 Cornell Blvd North Ridgeville, OH 44039 Copyright 2005 Briel Computers All Rights Reserved...
- Page 2 Setup and Users Manual INDEX Chapter 1: Unpacking and setting up Chapter 2: Getting started Chapter 3: Programming your Replica I Chapter 4: How is the rev c board different? Chapter 5: Reference material on the net Chapter 6: Using a PS/2 keyboard...
-
Page 3: Chapter 1: Unpacking And Setting Up System
Next you need to plug in the power supply to the Replica I. Make sure you have not plugged in the power supply to the wall socket yet. There are several groups of wires, and you need to locate the 2 that stand out differently from the rest. - Page 4 You may use one or the other type but you CANNOT use both types at the same time. Attempting to do so may result in damage to your Replica I. If you are going to attach a standard PS/2 keyboard, locate the keyboard connector located next to the video connector.
- Page 5 Turn on the TV or Monitor and then turn on the power supply for the Replica I. A block cursor should appear in the bottom left corner of the screen. If you do not get this block cursor, power the computer back off and recheck all of your connections.
-
Page 6: Chapter 2: Getting Started
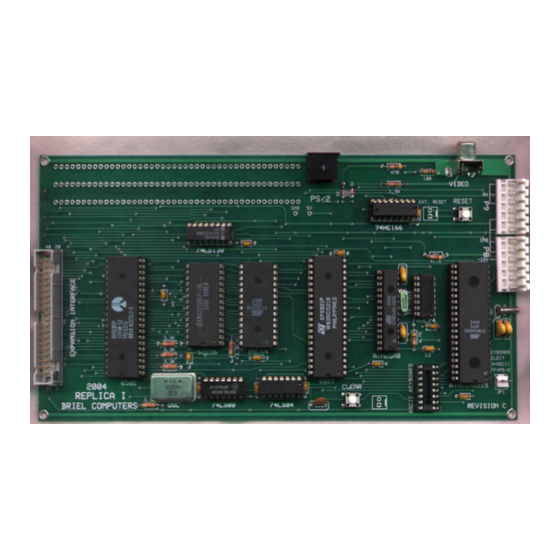
Power on the replica 1 system, and look for the cursor block located in the upper left hand corner of the display. Press ‘RESET’ on the keyboard or on the system board to get the backslash. Refer to Figure 3 for where to find the reset button on the Replica I system board. - Page 7 0000: 00 01 03 D0 00 00 05 A0 0008: DF 07 00 00 0C 01 01 11 0010: 00 01 03 D0 00 A0 50 00 0018: CF C0 70 10 11 01 01 01 0020: 00 30 D0 80 C1 11 11 11 0028: 10 00 30 0D 05 A0 00 00 Examining a block will display 8 bytes across the page.
-
Page 8: Chapter 3: Programming Your Replica
Chapter 3: Programming your Replica 1 There are a couple of ways you can program your Replica I. One way is to enter machine language programs from Woz’s monitor program and run them as described in Chapter 2. There are sites dedicated to the 6502 such as http://www.6502.org, which supports the processor for development and experimenting, has information available on how to program the CPU, and has discussion groups for help. -
Page 9: Chapter 4: How Is The Rev C Board Different
Chapter 4: How is the rev c board different? Appearance: The revision c board is very similar and almost exactly the same as the prior revision boards. The main difference is the addition of a clear screen key. This key allows the user to clear the screen at any given time without interrupting the computer. -
Page 10: Chapter 5: Reference Material On The Internet
Apple I owners as well as stories, pictures and other information. There is also a forum to discuss the Apple I as well as the Replica I. 6502 CPU related information: There is a user group at http://www.yahoo.com... -
Page 11: Chapter 6: Using A Ps/2 Keyboard
The only key that is not on a PS/2 keyboard that was on ASCII keyboards is the “RESET” button. Because of the need for a PS/2 keyboard, a reset button was added to the Replica I so that the circuit could be reset as needed. -
Page 12: Chapter 7: Kit Assembly Instructions
I have carefully assembled all parts into separate containers for ease of assembly. Check each bag to ensure that all parts are there. If you find anything missing, please contact Briel Computers. IC’s: 6502 or 65C02 CPU 40 pin IC... - Page 13 Resistors: R1 – 470 Ohm (yellow, violet, brown) R2– 1.5K Ohm (brown, green, red) R3 – 100 Ohm (brown, black, brown) R4 & R5 – 4.7K Ohm (yellow, violet, red) R6 – R10 – 3.3K Ohm (orange, orange, red) Capacitors: C1, C2, C4, C5 – 18pF (newer revision C are now 22pF) C3 - .1uF C6 –...
- Page 14 Any parts that get accidentally damaged during the building process can be replaced at the owner’s expense. Contact Briel Computers for any replacement parts needed. Use the rest of this page to document any notes needed for installation...
-
Page 15: Chapter 8: Serial I/O Board
Installing the serial I/O board on the replica I Install the serial I/O board in the socket where the 6821 IC was located on your replica I board. Make sure the serial 9 pin port faces the same direction as your video connector. If needed;... -
Page 16: Setting Up Hyper Terminal
Setting up Hyper Terminal Start a new session of Hyper Terminal and select a name for your session. Click on OK. Next, select which COM port you are connected to and select OK. Next, set up your COM port as shown: 2400, N,8,1 Select OK and continue on to starting Hyper Terminal. - Page 17 Next, click on “File” in the menu bar and select “Properties” from the drop-down menu list. You should then get a screen that looks like this: Click the “Settings” tab at the top, then select the “ASCII setup” button. Set up your settings exactly as shown in the picture above. Select “OK” to close the ASCII Setup screen.
- Page 18 Transferring files with Hyper Terminal To send a file to your replica, simply click on the “Transfer” tab and select “Send Text File” from the drop down list. Find the file on your PC and select “OK”. At this point Hyper Terminal will send the file your replica and your replica will treat the file as if you were typing it in.
-
Page 19: Appendix A: Ascii Keyboard Pin Out
Appendix A: ASCII Keyboard pin out Replica I keyboard port from the 16 pin DIP connector. Pin 1 is 5V. Apple 1 keyboard port from the 16 pin DIP connector. Pin 1 is Reset. -
Page 20: Appendix B: Onboard Jumper And Nvram
I try not to reset the circuit while it is running a program. There is now just 1 jumper on the Replica I main board next to the ATMEGA8515 keyboard controller. The default setting is for a PS/2 keyboard with no jumper installed. -
Page 21: Appendix C: At Power Supply Pin Out
Appendix C: AT Power Supply Pin Out The +5V pins are closer to the Video Connector on the Replica 1. -
Page 22: Warranty
Briel Computers be held liable for the loss of time, effort, or transportation costs, nor for loss of potential...
Need help?
Do you have a question about the Replica I and is the answer not in the manual?
Questions and answers