
Related Manuals for Blueant CT


Summary of Contents for Blueant CT
- Page 1 CONNECT USER GUIDE Read Me to Get the Most Out of Your Device... • ENGLISH • FRANÇAIS • ESPAÑOL...
- Page 2 TO GET STARTED Turn The Connect On Put It On Listen In Model: CT...
-
Page 3: Table Of Contents
Contents Charge Your Earpiece Wearing the Connect Pair Your Earpiece Use Your Voice to Control the Connect Making Calls Taking Calls Volume Control Changing the Ear Bud Using 2 Phones (Multipoint) Call Waiting and Conferencing* Listening to Audio Reset the Connect Free Android Application ... - Page 4 Help and Support Terms and Conditions Contact Us ...
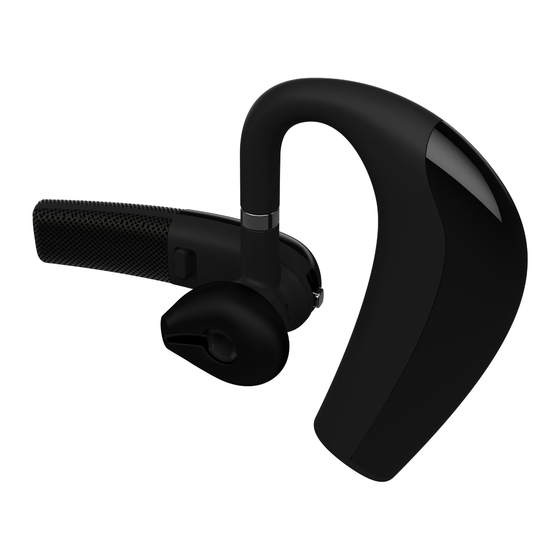
- Page 5 Welcome to the BlueAnt Connect: the most brilliantly designed ergonomic earpiece, featuring BlueAnt’s intuitive voice user interface. Designed for comfortable extended wear, the Connect also comes with Siri and Google Voice Actions integration, rapid charge technology to keep you connected, and high quality true-to-life audio.
-
Page 6: Charge Your Earpiece
Charge Your Earpiece Your earpiece has been given an initial partial charge to get you started, but for best results we recommend you fully charge it using the supplied USB cable and adaptor. > Charge the Connect whenever it announces that the battery Very Low. -
Page 7: Wearing The Connect
Wearing the Connect You can wear the Connect in either ear. For best results: > Rotate the ear gel as shown here. > Make sure that the earpiece is angled towards your mouth. LEFT RIGHT Pair Your Earpiece To use the Connect you need to pair it with your phone. 1. -
Page 8: Use Your Voice To Control The Connect
straight to pairing mode. The voice prompts will start to talk you through the pairing process. For subsequent pairings, click the Command button and wait for the Connect to ask you to Say A Command. Then Pair 3. Follow the voice prompts to pair the Connect with your phone. - Page 9 2. Wait for the Connect to ask you to Say A Command 3. Say the command: Command Description Am I The Connect will check if your phone is Connected? connected, and attempt to connect if not. Call Back Calls back the last incoming call. Check Battery Tells you the battery level on the Connect.
-
Page 10: Making Calls
Command Description Phone Activates your phone’s voice dialing Commands feature (if supported). Depending on your phone model, you may need to record voice tags on the phone to use this feature. On the iPhone 4S this command activates Siri. On Android devices this command activates Google Voice Actions. -
Page 11: Other Ways To Make Calls
dialing feature (if available). Once you have activated this feature, you are using your phone’s voice recognition software. Please check your phone manual to fi nd out what commands your phone supports. > On the iPhone 4S this feature activates Siri. There’s no need to touch or unlock your iPhone. -
Page 12: Taking Calls
Taking Calls When the phone rings, wait for the prompt to ask you if you want to take the call, and then say Answer or Ignore. Or: > To accept the call click the Command button once. > To reject the call double click the Command button. -
Page 13: Changing The Ear Bud
If you prefer to wear your earpiece in your left ear, follow these simple steps to swap the volume orientation so that you can still push up for volume up and down for volume down: 1. Put the Connect in your left ear. 2. -
Page 14: Using 2 Phones (Multipoint)
Using 2 Phones (Multipoint) Up to 2 devices can connect to the earpiece at the same time. If either phone rings, you can answer it with the earpiece. Use the Pair Me command to put your Connect back into pairing mode to pair another phone. Any currently connected phone will be disconnected during pairing, so you will need to reconnect afterwards. - Page 15 Do This End the active call and Click the Command button answer the incoming call Keep the active call, reject Double click the Command the incoming call button Put the active call on hold, Hold the Command button answer the incoming call for about 1 second Switch between the active Hold the...
-
Page 16: Listening To Audio
Listening to Audio The Connect supports A2DP audio streaming. If your phone supports the A2DP profi le then simply start playing music or any other audio (including turn-by-turn directions from a GPS application on your phone) and it will automatically transfer to the earpiece. -
Page 17: Reset The Connect
Reset the Connect If you are having problems with the Connect, you can reset it and start again. Resetting the Connect will clear all the stored pairing settings, reset the volume orientation to the default and put the device back into pairing mode. To reset the Connect: 1. -
Page 18: Free Android Application
Reads your incoming text messages > Helps with pairing and setup Go to the Android Market and search for “BlueAnt” to download and install this free application. Once the application is installed you will hear your text messages read aloud automatically on your BlueAnt device as they come in. -
Page 19: Reconnecting To The Earpiece
Reconnecting to the Earpiece If you take your phone out of range of the earpiece for more than 2 minutes, the Connect will go into “sleep mode” to save battery. When you bring your phone back into range, simply double click the Command button to reconnect. - Page 20 Function Do This When Answer a call Click the Command Phone ringing button End a call Click the Command During an active button call End the active call Click the Command Phone ringing and answer an button during an active incoming call call Reject a call...
- Page 21 Function Do This When Conference held Hold the Command During an active and active call button for about 3 call (with call on seconds hold) Enter pairing Hold the Command Earpiece mode button for about 1 switched on but second not connected to any phones Cancel pairing...
-
Page 22: Help And Support
Please contact us before returning the Connect to a store and we will help you through any diffi culty you may have. Terms and Conditions By using this product, you are agreeing to BlueAnt’s terms and conditions, available at www.blueantwireless.com and on the supplied warranty information card. - Page 23 BlueAnt and other trademarks are trademarks of BlueAnt and other organizations and may not be used without permission. The BlueAnt logo is registered in the U.S. Patent and Trademark Office and globally with the World Intellectual Property Organization under the Madrid protocol.
- Page 24 Contact Us North America: 1 855 9 258 3268 UK: 0800 285 1272 Australia: 1300 669 049 France: 0800 913 467 New Zealand: 0800 443 122 Spain: 900 838 030 Singapore: 800 130 1940 India: 000 800 100 4103 Thailand: 001 800 13 203 2852 Hong Kong: 800 905 394 Taiwan: 00 801 127 405 China: 400 120 0974...
- Page 25 POUR COMMENCER Allumez le dispositif Connect Mettez-le Écoutez Modèle: CT...
- Page 26 Table des matières Mise en charge Porter l’oreillette Appairer votre oreillette Utilisez votre voix pour contrôler Connect Passer des appels Recevoir des appels Contrôle du volume Changement de l’écouteur Multipoint Appel en attente* Écoute de l’audio Réinitialisation de Connect Application Android Gratuite Reconnecter à...
- Page 27 Aide et assistance Conditions générales Nous contacter ...
- Page 28 Bienvenue à BlueAnt Connect : l’écouteur ergonomique le mieux conçu, équipé de l’interface utilisateur vocale intuitive de BlueAnt. Conçu pour un port prolongé confortable, le dispositif Connect intègre également les assistants vocaux Siri et Google Voice Actions, une technologie de chargement rapide (pour maintenir la connexion) et une exceptionnelle qualité...
-
Page 29: Mise En Charge
Mise en charge Connect a reçu une charge partielle initiale pour vous permettre de commencer. Pour obtenir des résultats optimisés, nous vous recommandons de le charger en utilisant le câble et l’adaptateur USB inclus. > Il faut recharger Connect lorsqu’il annonce que sa pile est Very Low (très faible). -
Page 30: Porter L'oreillette
batterie pour micro-casque iPhone vous permettant de vérifi er l’état de votre batterie en un coup d’oeil. Porter l’oreillette Vous pouvez porter l’oreillette sur une oreille ou l’autre. Pour de meilleurs résultats : > Positionnez le contour d’oreillette et l’embout en gel tel qu’illustré. -
Page 31: Appairer Votre Oreillette
Appairer votre oreillette Pour utiliser Connect, vous devez l’appairer avec votre téléphone. 1. Allumez l’oreillette en glissant l’interrupteur d’alimentation et placez l’oreillette dans votre oreille. 2. Lors de votre première utilisation de l’oreillette, elle se mettra automatiquement en mode appairage et vous guidera oralement durant tout le processus d’appairage. -
Page 32: Utilisez Votre Voix Pour Contrôler Connect
Utilisez votre voix pour contrôler Connect Phone Commands Say A Command Connect est contrôlé par la voix. 1. Cliquez sur le bouton Commande 2. Attendez que Connect vous dise Say A Command 3. Dites la commande : Command Description Am I Connect vérifi... - Page 33 Command Description Call Back Rappelle le numéro du dernier appel entrant. Check Battery Vous indique le niveau de charge de la batterie de Connect. Pair Me Place Connect en mode d’appairage. Tout téléphone appairé est déconnecté. Phone Active la fonction vocale de composition Commands de numéro de téléphone (le cas échéant).
-
Page 34: Passer Des Appels
Command Description Redial Recompose le numéro du dernier appel passé. What Can I Lecture à voix haute de la liste de toutes Say? les commandes proposées sur le menu actuel. Passer des appels Composition vocale Double-cliquez sur le bouton Commande ou utilisez la commande vocale Phone Commands... -
Page 35: Recevoir Des Appels
n’avez pas à toucher ni à déverrouiller votre téléphone. Remarque : Siri doit être activé sur votre téléphone. Allez à Réglages > Général sur votre iPhone et vérifi ez que Siri est réglé sur ON. > Cette commande active les actions vocales de Google sur les appareils Android. -
Page 36: Contrôle Du Volume
Ignore (ignorer). Ou : > Cliquez sur le bouton Commande une fois pour accepter l’appel. > Double-cliquez sur le bouton Commande pour rejeter l’appel. En cours d’appel, cliquez sur le bouton Commande pour terminer l’appel. Contrôle du volume Commande Utiliser le dispositif de réglage de Volume à... - Page 37 gauche? Le contrôle du volume du dispositif Connect est réglé par défaut, pour les utilisateurs qui portent l’écouteur sur l’oreille droite. Si vous préférez porter l’écouteur sur l’oreille gauche, suivez les étapes indiquées ci-après, pour modifi er l’orientation du volume, afi n de pouvoir également augmenter le volume en poussant vers le haut et baisser le volume en poussant vers le bas.
-
Page 38: Changement De L'écouteur
Changement de l’écouteur Votre Connect est fournie avec des écouteurs de différentes tailles pour vous permettre de choisir celui le mieux adapté à vos oreilles. Si vous souhaitez changer d’écouteur, retirez celui qui est fi xé en le soulevant doucement pour le détacher de Connect. -
Page 39: Appel En Attente
vous pouvez toujours répondre à un appel entrant sur l’un ou l’autre téléphone. Si vous lancez un appel par l’entremise de Connect (par exemple en disant Phone Commands), l’appel a lieu sur le téléphone principal : celui qui a été connecté à Connect en premier. -
Page 40: Écoute De L'audio
Do This Basculer entre les appels Appuyez sur le bouton Commande pendant environ 1 seconde Mettre deux appels actifs en Appuyez sur le bouton conférence Commande pendant environ 3 secondes Si vous utilisez le multipoint, les deux téléphones sont connectés pendant les appels, vous pouvez donc utiliser les contrôles pour passer d’un appel à... - Page 41 automatiquement transférée à Connect. Si le téléphone sonne, l’audio sera mis en sourdine. Vous pouvez utiliser la commande vocale pour répondre ou ignorer l’appel. Ou : > Cliquez sur le bouton Commande pour accepter l’appel. > Double-cliquez sur le bouton Commande pour rejeter l’appel.
-
Page 42: Réinitialisation De Connect
Réinitialisation de Connect Si vous avez des problèmes avec Connect, vous pouvez réinitialiser-le et redémarrer. La réinitialisation de Connect efface tous les paramètres d’appairage mémorisés. Cela réinitialise également l’orientation du volume par défaut et replace l’appareil en mode d’appairage. Pour réinitialiser : 1. -
Page 43: Application Android Gratuite
Une fois le programme installé, vous pourrez entendre vos SMS entrants lus automatiquement à haute voix sur votre appareil BlueAnt au fur et à mesure que vous les recevez. Compatible avec les combinés Android utilisant Android version 2.1 ou une version supérieure. -
Page 44: Reconnecter À Connect
Reconnecter à Connect Si vous prenez votre téléphone hors de portée pour plus de deux minutes, Connect se met en mode «veille» pour économiser la batterie. Lorsque vous revenez vous devez double-cliquez sur le bouton Commande pour reconnecter. Ou, utiliser l’interrupteur d’alimentation physique pour éteindre Connect lorsque vous sortez de la voiture, puis rallumer Connect lorsque vous revenez. -
Page 45: Référence Des Fonctions
Référence des fonctions Fonction Bouton Quand Activer la fonction Double-cliquez Connecté à un de composition sur le bouton appareil sans vocale, Siri ou les Commande être en appel actions vocales de Google (si disponible) sur le téléphone primaire Répondre à un Cliquez sur le Sonnerie appel... - Page 46 Fonction Bouton Quand Rejeter un appel Double-cliquez Sonnerie sur le bouton Commande Conserver l’appel Double-cliquez Appel actif avec actif et rejeter sur le bouton l’appel entrant l’appel entrant Commande en sonnerie Conserver l’appel Appuyez sur le Appel actif avec actif et passer à bouton Commande l’appel entrant...
- Page 47 Fonction Bouton Quand Entrer en mode Appuyez sur le Connect n’est d’appairage bouton Commande pas branché à pendant environ 1 un appareil seconde Annuler le mode Cliquez sur le Mode d’appairage bouton Commande d’appairage Modifi er Maintenez Connect n’est l’orientation les boutons pas en appel du contrôle du...
- Page 48 Veuillez protéger vos oreilles. Tous les appareils BlueAnt sont conçus de manière à atteindre des volumes allant jusqu’à 100 décibels. L’utilisation prolongée à volumes élevés peut affecter votre capacité auditive (perte auditive provoquée par le bruit).
- Page 49 BlueAnt et d’autres organisations et ne peuvent pas être utilisées sans permission. Le logo BlueAnt est enregistré au Bureau des brevets et marques de commerce des États-Unis et dans le monde entier auprès de l’Organisation mondiale de la propriété intellectuelle en vertu...
- Page 50 Nous contacter Amérique du Nord : Royaume-Uni : 1 855 9 258 3268 0800 285 1272 Australie : 1300 669 049 France: 0800 913 467 Nouvelle-Zélande : 0800 443 122 Espagne : 900 838 030 Singapour : 800 130 1940 Inde : 000 800 100 4103 Thaïlande : 001 800 13 203 2852 Hong Kong: 800 905 394...
- Page 51 CÓMO EMPEZAR Encienda Connect Colóqueselo Escuche Modelo: CT...
- Page 52 Contenido Cargue el Auricular Cómo colocarse Connect Empareje el Auricular Hacer llamadas Cómo contestar llamadas Control de volumen Cómo cambiar la almohadilla Cómo usar 2 teléfonos (Multipunto) Llamada en espera* Cómo escuchar audio Reiniciar Connect Aplicación Android Gratuita Volver a conectarse al auricular Referencias de funciones ...
- Page 53 Términos y condiciones Comuníquese con nosotros ...
- Page 54 Connect: el auricular con el diseño ergonómico más brillante, que cuenta con la interfaz de usuario con voz intuitiva de BlueAnt. Con un diseño adaptado para el uso prolongado y cómodo, Connect también viene integrado con Voice Actions de Google y Siri, una tecnología de carga rápida para mantenerse...
-
Page 55: Cargue El Auricular
Cargue el Auricular Su Connect ha recibido una carga inicial parcial para que pueda empezar a usarlo, pero para obtener mejores resultados le recomendamos que lo cargue usando el cable USB y el adaptador provistos: > Deberá cargar Connect cuando le indique que la batería está... -
Page 56: Cómo Colocarse Connect
Cómo colocarse Connect Puede llevar Connect en cualquier oreja. Para obtener mejores resultados: > Colóquese el gancho del auricular y adaptador de gel como se muestra aquí. > Asegúrese de que Connect quede orientado hacia la boca. OREJA IZQUIERDA OREJA DERECHA Empareje el Auricular Para usar Connect, debe emparejarlo con su teléfono. - Page 57 2. Si es la primera vez que utiliza Connect irá directamente al modo de emparejamiento y lo guiará durante el proceso de emparejamiento. Para emparejamientos posteriores, haga clic en el botón Comando, espere a que Connect le solicite Say A Command (diga un comando) y luego diga Pair Me (emparéjeme).
- Page 58 Connect es controlado por voz. Simplemente: 1. Haga clic en el botón Comando 2. Espere a que Connect le solicite Say A Command 3. Diga el comando: Command Description Am I Connect comprobará si su teléfono está Connected? conectado e intentará conectarlo en caso de no ser así.
-
Page 59: Hacer Llamadas
Command Description Phone Activa la función de marcación por voz Commands (si la hubiera) de su teléfono. Según el modelo de su teléfono, posiblemente necesite grabar etiquetas de voz en el teléfono para usar esta función. En el iPhone 4S, este comando activa Siri. En dispositivos Android, este comando activa Google Voice... - Page 60 marcado por voz del teléfono (si está disponible). La característica de marcado por voz, una vez activada, utiliza el software de reconocimiento de voz del teléfono. Consulte el manual del teléfono para conocer los comandos de voz que admite el teléfono. >...
-
Page 61: Cómo Contestar Llamadas
Cómo contestar llamadas Cuando el teléfono suene, usted puede contestar con la voz; espere la indicación que le pregunta si desea tomar la llamada, y luego diga Answer (responder) o Ignore (ignorar). O bien: > Haga clic en el botón Comando una vez para aceptar la llamada. -
Page 62: Cómo Cambiar La Almohadilla
¿Desea usar Connect en la oreja izquierda? Los controles de volumen están predeterminados para usuarios que usan el auricular en la oreja derecha. Si prefi ere usarlo en la izquierda, siga estos sencillos pasos para cambiar la orientación del volumen y así subir el oscilador para subir el volumen y bajarlo para bajar el volumen: 1. -
Page 63: Cómo Usar 2 Teléfonos (Multipunto)
Si desea cambiar la almohadilla, quite la que está colocada desprendiéndola suavemente de Connect. Presione con cuidado la almohadilla de reemplazo en Connect y afírmela para asegurarla en su lugar. Cómo usar 2 teléfonos (Multipunto) Se pueden conectar hasta 2 dispositivos a Connect al mismo tiempo. -
Page 64: Llamada En Espera
teléfono: el que se conectó primero a Connect. Llamada en espera* Si recibe una llamada mientras está con otra llamada, Connect reproducirá un tono para advertirle. Para Haga esto Finalizar la llamada en Haga clic en el botón curso y contestar la llamada Comando entrante Continuar la llamada en... -
Page 65: Cómo Escuchar Audio
Para Haga esto Llamar en conferencia Mantenga oprimida el botón Comando durante 3 segundos Si utiliza multipunto podrá usar estos controles para pasar de una llamada a la otra en ambos teléfonos. Nota: Solo puede usar la función de conferencia con las llamadas que reciba en el mismo teléfono (aunque puede mantener llamadas de conferencia en ambos teléfonos al mismo tiempo). -
Page 66: Reiniciar Connect
en su teléfono) y el audio se transferirá automáticamente. Si el teléfono suena, se silenciará el audio. Puede utilizar su voz para responder o ignorar la llamada. O bien: > Haga clic en el botón Comando para aceptar la llamada. >... -
Page 67: Aplicación Android Gratuita
Reiniciar Connect eliminará todas las confi guraciones de emparejamiento almacenadas en Connect, reiniciará la orientación de volumen a la confi guración predeterminada y devolverá al dispositivo al modo de emparejamiento. Para reiniciar Connect: 1. Elimine toda información existente del emparejamiento de su teléfono y apáguelo y vuelva a encenderlo para actualizar la memoria del teléfono. -
Page 68: Volver A Conectarse Al Auricular
Mercado Android (Android Market) y busque “BlueAnt”. Una vez que la aplicación esté instalada, eschuchará automáticamente sus mensajes de texto en voz alta en su dispositivo BlueAnt conforme los recibe. Compatible con los dispositivos portátiles Android que funcionen con versión Android 2.1 o superior Escanear el código en su... -
Page 69: Referencias De Funciones
Cuando regrese deberá haga doble clic en el botón Comando para connectar de nuevo. También puede utilizar el interruptor para apagar Connect cada vez que salga del coche y luego vuelva a encenderlo de nuevo cuando vuelva. Connect se conectar automáticamente a su teléfono. - Page 70 Función Haga esto Momento Finalizar la Haga clic en el Llamada activa llamada botón Comando Finalizar la Haga clic en el Llamada activa llamada en curso botón Comando con llamada y contestar la entrante llamada entrante Rechazar la Haga doble clic en Sonando llamada entrante el botón...
- Page 71 Función Haga esto Momento Llamar en Mantenga Llamada activa conferencia oprimido el botón con llamada Comando durante entrante que 3 segundos está sonando o llamada en espera Entrar en Mantenga Encendido modo de oprimido el botón pero no está emparejamiento Comando durante conectado...
-
Page 72: Ayuda Y Soporte Técnico
Función Haga esto Momento Cambiar la Mantenga Encendido pero orientación oprimido el no tiene una de control del botón Comando llamada volumen Vol - durante 3 segundos Reiniciar Mantenga Encendido oprimido el pero no está botón Comando conectado Vol + durante 5 a ningún segundos... - Page 73 Protéjase los oídos. Todos los dispositivos BlueAnt están diseñados para alcanzar volúmenes de hasta 100 decibeles. El uso prolongado de dispositivos con volumen alto puede afectar su capacidad auditiva y puede ocasionar una pérdida de la audición inducida por el ruido (noise induced hearing loss,...
- Page 74 Limited. BlueAnt y otras marcas registradas son marca registrada de BlueAnt y otras organizaciones, y no se podrán utilizar sin autorización. El logotipo de BlueAnt está registrado en la Ofi cina de Patentes y Marcas Registradas en los EE. UU. y a nivel mundial en la Organización Mundial de la Propiedad...
- Page 75 Comuníquese con nosotros América del Norte: Reino Unido: 1 855 9 258 3268 0800 285 1272 Australia: 1300 669 049 Francia: 0800 913 467 Nueva Zelanda: 0800 443 122 España: 900 838 030 Singapur: 800 130 1940 India: 000 800 100 4103 Tailandia: 001 800 13 203 2852 Hong Kong: 800 905 394 Taiwan: 00 801 127 405...
- Page 76 BlueAnt Technical Support team. North Australia America Zealand 1 855 9 1300 669 0800 0800 285 258 3268 443 122 1272 Visit www.blueantwireless.com/buy to buy BlueAnt products, accessories and spare parts. © 2012 BlueAnt Wireless. All Rights Reserved.
Need help?
Do you have a question about the CT and is the answer not in the manual?
Questions and answers