
Related Manuals for GENUS Vero 1

Summary of Contents for GENUS Vero 1
- Page 1 Genus Vero Model-1 DAB/FM Stereo Radio with Alarm Clock USER GUIDE All rights Reserved © 2005 Genus Digital Genius Consultancy and Marketing Limited Page 1/16...
-
Page 2: Table Of Contents
Introduction to Genus Vero Model-1 ... 3 Safety Instructions – PLEASE READ CAREFULLY ... 4 Cleaning ...4 Servicing...4 Product Diagrams ... 5 Getting Started ... 6 Switching On for the First Time ...6 Auto Scan / Full Scan ...6 No Stations Available...6 Using DAB Radio... -
Page 3: Introduction To Genus Vero Model-1
1 Introduction to Genus Vero Model-1 Thank you for choosing the Genus Vero Model-1 Stereo DAB/FM Radio with Alarm Clock. The Vero-1 offers everything you would expect from a DAB/FM Radio – great sound quality, ease of use and beautiful design. The Vero-1 can be used as an alarm clock offering the choice of waking up each morning to crystal clear DAB radio in stereo sound or if you prefer, an alarm buzzer. -
Page 4: Safety Instructions - Please Read Carefully
Safety Instructions – • DO NOT use your VERO-1 near water • DO NOT allow your VERO-1 to get wet • DO NOT use the VERO-1 near heat sources • Ensure that cables are NOT positioned in a manner in which they may suffer abrasion, be walked on or trapped. -
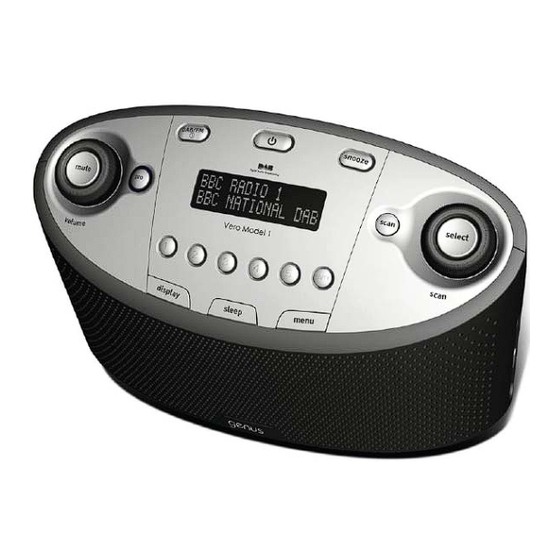
Page 5: Product Diagrams
3 Product Diagrams CONTROL PANEL SIDE PANEL Page 5/16... -
Page 6: Getting Started
4 Getting Started 4.1 Switching On for the First Time • For best reception fully extend the antenna on the VERO-1. • Connect the power adapter provided to the VERO-1. Now plug into the mains socket and switch mains on. •... -
Page 7: Using Dab Radio
• Try adjusting the antenna or relocating the radio in the room (e.g. closer to a window) • Your VERO-1 will provide you with menu options to repeat the scanning process or to allow you to tune manually • If you still fail to find stations please check that you have DAB coverage in your area by visiting www.digitalradionow.com 5 Using DAB Radio 5.1 Finding &... -
Page 8: Changing The Information On The Display
To store a station as a preset: • Tune the radio to the station you wish to store. • To store the station, press and hold down the chosen PRESET button until you see the message ‘preset x saved’. The station you were tuned into is now stored. -
Page 9: Menu Options
• If required move the antenna around until the filled blocks move past the empty block. 6 Menu Options To select a menu option press the ‘MENU’ button then scroll through the options using the ‘SCAN KNOB’. When you have found the menu option you require press ‘SELECT’... -
Page 10: Software Version
• Move the antenna around until the filled blocks move past the empty block. When you have a good signal the display will show the multiplex name and add its stations to the list NB You can display the signal level at any time by pressing the SELECT button while you are listening to a station 6.3 Software Version If you call requiring technical support you may be asked to give these details... -
Page 11: Fm Radio
7 FM Radio Your Vero also has an FM radio for listening to any stations that are not available on DAB radio. To switch your radio into FM mode press the DAB/FM button. To tune into a station you can either Autoscan or manually •... -
Page 12: Clock & Alarm Functions
8 Clock & Alarm Functions 8.1 Setting the Clock To set the clock: • Press & hold the DAB/FM button on your radio • Use the SCAN KNOB to choose ‘Set Clock’ • Press SELECT • Use the SCAN KNOB to adjust each time item •... -
Page 13: To Turn An Alarm Off
• Having enabled or Disabled the alarm the VERO-1 will automatically return to its previous state 8.4 To turn an ALARM OFF: • Press the DAB/FM button 8.5 SNOOZE Function: It is possible to change the duration of ‘Snooze’ time. Snooze – is defined as a way of silencing an alarm alert for a given number of minutes and can be changed from 1 –... - Page 14 • Press SELECT • Use the SCAN KNOB to set sleep mode as ON, and then confirm with SELECT button • Pressing SLEEP button will change display to normal listening mode • The radio will ‘sleep’ (go into standby state) after the corresponding number of minutes Page 14/16...
-
Page 15: Performing A Reset
Press the ‘PRO’ button on the VERO 1 and hear the difference for yourself. G-PRO is automatically enabled on your radio. Press the PRO button to switch off the function. -
Page 16: Technical Specification
12 Technical Specification • General: DAB stereo alarm clock radio capable of receiving all DAB band III transmissions • Frequency: DAB Band III with fast auto tune • F-TYPE Antenna connector: Telescopic antenna supplied • Power supply: 9V DC external power supply •...
Need help?
Do you have a question about the Vero 1 and is the answer not in the manual?
Questions and answers