Table of Contents
Advertisement
Quick Links
USER'S MANUAL
Thank you very much for purchasing this product.
To ensure correct and safe usage with a full understanding of this product's performance, please be
sure to read through this manual completely and store it in a safe location.
Unauthorized copying or transferral, in whole or in part, of this manual is prohibited.
The contents of this operation manual and the specifications of this product are subject to change
without notice.
The operation manual and the product have been prepared and tested as much as possible. If you
find any misprint or error, please inform us.
Roland DG Corp. assumes no responsibility for any direct or indirect loss or damage which may
occur through use of this product, regardless of any failure to perform on the part of this product.
Roland DG Corp. assumes no responsibility for any direct or indirect loss or damage which may
occur with respect to any article made using this product.
Advertisement
Table of Contents

Summary of Contents for Stika SV-15
- Page 1 Roland DG Corp. assumes no responsibility for any direct or indirect loss or damage which may occur through use of this product, regardless of any failure to perform on the part of this product.
- Page 2 This is a Class A product. In a domestic environment this product may cause radio interference in which case the user may be required to take adequate measures. Roland DG Corp. has licensed the MMP technology from the TPL Group.
-
Page 3: Table Of Contents
Contents Read This First ............................3 Machine Functions ................................ 3 To Ensure Safe Use ........................6 Important Notes on Handling and Use ................... 10 Chapter 1: Setup Preparation ......................11 1-1 Included Items ..............................12 1-2 Part Names ................................13 Main Unit ............................ - Page 4 6-4 Locations of the Power Rating and Serial Number Labels ................ 59 6-5 Specifications ................................. 60 CutStudio is a trademark of Roland DG Corp. Windows® is either a registered trademark or trademark of Microsoft® Corporation in the United States and/or other countries.
-
Page 5: Read This First
Read This First Machine Functions For Windows You can use the included cutting software "Roland CutStudio" to create stickers and stickers with images. • CutStudio Overview, Installation Method User's Manual (this document) p 18 You can use your own designs to create original stickers. - Page 6 Read This First You can use the included CorelDRAW software plug-in "CutStudio Plug-in for CorelDRAW" to send data created in CorelDRAW to CutStudio and create stickers. • Software plug-in overview, installation method Windows Advanced Guide (electronic format) You can create stickers with data created in CorelDRAW. Windows Advanced Guide (electronic format) CorelDRAW CutStudio...
- Page 7 Read This First For Macintosh You can use the included software plug-in "CutStudio Plug-in for Adobe Illustrator" to make stickers with data created in Illustrator. • Software plug-in overview, installation method User's Manual (this document) p 23 You can create stickers with data created in Illustrator. Macintosh Cutting Guide (electronic format) Illustrator STIKA...
-
Page 8: To Ensure Safe Use
To Ensure Safe Use Improper handling or operation of this machine may result in injury or damage to property. Points which must be observed to prevent such injury or damage are described as follows. About WARNING and CAUTION Notices Used for instructions intended to alert the user to the risk of death or severe WARNING injury should the unit be used improperly. - Page 9 To Ensure Safe Use Incorrect operation may cause injury WARNING CAUTION Keep children away from the machine. Caution: cutting tool. The machine includes areas and components This machine has an internal tool. To avoid in- that pose a hazard to children and may result in jury, handle the tool with care.
- Page 10 Never use a combustible aerosol spray Continuing to use the machine may result in fire, nearby. Never use in any location where electrical shock, or injury. Contact your autho- gases can accumulate. rized Roland DG Corp. dealer. Combustion or explosion may be a danger.
- Page 11 To Ensure Safe Use Important notes about the power cord, plug, and electrical outlet Never place any object on top or subject to Never allow to get wet. damage. Never bend or twist with undue force. Never make hot. Never pull with undue force. Dust may cause fire.
-
Page 12: Important Notes On Handling And Use
Important Notes on Handling and Use This machine is a precision device. To ensure the full performance of this machine, be sure to observe the following important points. Failure to observe these may not only result in loss of performance, but may also cause malfunction or breakdown. -
Page 13: Chapter 1: Setup Preparation
Chapter 1: Setup Preparation... -
Page 14: Included Items
1-1 Included Items The following items are packed together with the unit. Make sure they are all present and accounted for. AC adapter: 1 Power cord: 1 USB cable: 1 Replaceable blade protector: 1 * The shape depends on the model. Blade holder: 1 Test-use material Test-use application tape... -
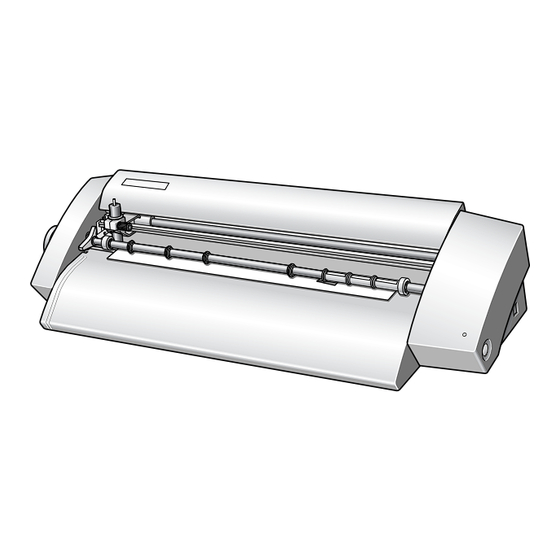
Page 15: Part Names
* Sheet adjustment lever USB connector Power button Power light * The SV-15 has sheet adjustment levers on the left and right. The SV-12/8 has a sheet adjustment lever only on the right. Sheet feed knob Chapter 1: Setup Preparation... -
Page 16: Installing
1-3 Installing Deciding On an Installation Site Install in a stable location offering good operating conditions. An unsuitable location can cause accident, faulty operation, or breakdown. Never use out of doors or in any location where exposure to water or high humid- WARNING ity may occur. -
Page 17: Removing The Packing Materials
1-3 Installing Removing the Packing Materials Tape and packing materials are attached to the machine to protect it from shocks during transportation. When instal- lation is complete, remove these materials. Remove all packing materials. Any that remain may cause faulty operation or breakdown when the power is switched on. -
Page 18: Connecting The Cables
1-3 Installing Connecting the Cables Connect to an electrical outlet that complies with this machine's ratings (for volt- WARNING age, frequency, and current). Incorrect voltage or insufficient current may cause fire or electrical shock. WARNING Handle the power cord, plug, and electrical outlet correctly and with care. Never use any article that is damaged. -
Page 19: Chapter 2: Installing Software
Chapter 2: Installing Software This section describes how to install the included software. -
Page 20: About The Included Software
It is automatically installed when the STIKA driver is installed. Roland CutStudio Roland CutStudio is software that allows you to create cutting data and easily perform cutting operations. CutStudio Plug-in for Adobe Illustrator This is an Illustrator software plug-in that lets you cut from data created in Adobe Illustrator. -
Page 21: If You're Using A Windows
1) Computers preinstalled with Windows 98 SE/Me/2000/XP at the time of purchase (This includes such computers later upgraded to Windows Me/2000/XP.) 2) Computers on which USB operation is assured by the manufacturer of computers System Requirements for the Roland CutStudio Operating Systems Windows 98 SE (Second Edition)/Me/2000/XP... -
Page 22: Installing The Software
2-2 If You're Using a Windows Installing the Software Installing the Driver STIKA Navi is installed along with the driver. Do Not Connect to Computer Until Instructed Do not connect the machine to the computer until instructed to do so. Failure to follow the correct procedure may make installation impossible. - Page 23 Next, you install the Windows Advanced Guide. Viewing the Roland CutStudio Online Help Click [Start], point to [All Programs] (or [Programs]), then point to [Roland CutStudio], point to [CutStudio Help]. * You can also display the Online Help from the CutStudio menu.
- Page 24 At the setup menu, go to the upper right and click the [X] to close the window. Viewing the Windows Advanced Guide Click [Start], point to [All Programs] (or [Programs]), then point to [Roland SV Series Manual], point to [Advanced Guide].
-
Page 25: If You're Using A Macintosh
Procedure Insert the included CD-ROM into the CD-ROM drive. Double-click the [Roland SV Series] icon that appears on the desktop. Double-click the "Install_e.html" icon. The [Mac OS Installation and Setup Guide] appears. -
Page 27: Chapter 3: Performing Cutting
Chapter 3: Performing Cutting This describes basic cutting operations under Windows. For other opera- tions not covered in this chapter, refer to the "Windows Advanced Guide" (electronic format). -
Page 28: What To Know Before Cutting
3-1 What to Know Before Cutting Useable Material Types The following materials can be used with this machine. SV-15 SV-12 SV-8 Width: 360 to 381 mm Width: 280 to 305 mm Width: 200 to 215 mm Size (14-1/8 to 15 in.) (11 to 12 in.) - Page 29 3-1 What to Know Before Cutting Chapter 3: Performing Cutting...
-
Page 30: Cutting
SV-15/12 ··· Sideways (Landscape) SV-8 ··· Lengthwise (Portrait) If you are using the SV-15 model, change the loadable material width to 280 to 305 mm (11 to 12 in.). p 29 "Changing Loadable Material Width (for SV-15)" Chapter 3: Performing Cutting... - Page 31 Changing Loadable Material Width (for SV-15) In the SV-15 model, you can change the loadable material width to match the material being loaded (360 to 381 mm (14-1/8 to 15 in.) or 280 to 305 mm (11 to 12 in.)). Change the pinch roller location and driver settings to change the width.
-
Page 32: Step 2: Create Cutting Data
Step 2: Create Cutting Data Use the cutting software "CutStudio" to create cutting data. Refer to "Roland CutStudio Online Help" for a detailed explanation of CutStudio operations and features. If you are using Windows 2000/XP, log on to Windows as "Administrator" right. - Page 33 Set the cutting range to match the loaded material size. For the width, click [ ] to select either 250 (9.84 in.) or 340 mm (13.39 in.) (SV-15 only). (* Set to 250 mm (9.84 in.) if you are using the included test-use material.) The width cannot be changed on the SV-12/8 models.
- Page 34 3-2 Cutting Insert text and shapes to create the cutting data. In this example, we'll enter the word "SALE" as the text and draw a frame around it to make it easier to peel off later. Click [ Click anywhere in the white area, then type in "SALE."...
- Page 35 3-2 Cutting Click [ Use the mouse to select an area containing the text and the rectangle. When you select this, the line turns blue. Move the position to the top of the window, near the origin point. Origin point Move the pointer to inside the text.
-
Page 36: Step 3: Perform Cutting
3-2 Cutting Step 3: Perform Cutting Before cutting, verify that Step 1 "Load Material" and Step 2 "Create Cutting Data" preparation have been completed. Procedure Press the power button and turn the machine The power light flashes. The cutting carriage moves to the left edge of the machine. - Page 37 3-2 Cutting Press the power button and turn power off. Verify that the power light extinguishes. Turn the sheet feed knob and remove the ma- terial. To Stop Cutting While in Progress Press the power button and turn the machine off.
-
Page 38: Step 4: Apply The Cut Material
3-2 Cutting Step 4: Apply the Cut Material Use application tape to affix the cut material. Cut the application tape to the required size for use. Before applying, thoroughly clean the surface where you want to affix the material to remove any dust or grease. Procedure Remove the excess tape so that only text re- mains. -
Page 39: Chapter 4: Mastering The Stika
Chapter 4: Mastering the STIKA This describes in details how to adjust the blade extension amount, how to correct the angle of the loaded material, and how to create cutting data. -
Page 40: Optimizing The Cutting Quality For The Material
4-1 Optimizing the Cutting Quality for the Material Check the Cutting Quality for the Material Perform a cutting test to check the cutting quality for the material. Perform a cutting test when changing the material type and when adjusting the blade extension. Make sure to load material before performing a cutting test. -
Page 41: Adjusting The Blade Extension Amount
4-1 Optimizing the Cutting Quality for the Material Adjusting the Blade Extension Amount Do not touch the tip of the blade with your fingers. CAUTION Doing so may result in injury. Procedure Turn the machine off. Blade holder Loosen the screw, remove the blade holder. Screw Adjust the blade extension amount. -
Page 42: Correcting The Angle Of The Loaded Material
4-2 Correcting the Angle of the Loaded Material If it is not loaded parallel into the machine, the material may come loose during cutting. You can use the sheet adjustment lever to correct the angle of the material without removing it from the machine. Procedure Raise the sheet adjustment lever. -
Page 43: About Creating Cutting Data
To change the text design, click the [ ] in the field under- neath Font and select the desired font. Click [OK]. The font design and size are modified. For more information about the [Properties] screen, refer to "Roland CutStudio Online Help." Chapter 4: Mastering the STIKA... - Page 44 4-3 About Creating Cutting Data Click [ Draw a rectangle around the characters. Drawing a square around the text will make the mate- rial easier to peel off. When cutting small text, draw a square around each character. Drag. Click [Save]. The [Save As] screen appears.
-
Page 45: Creating Contour Data By Reading A Bmp/Jpg Format File
4-3 About Creating Cutting Data Creating Contour Data by Reading a BMP/JPG Format File Windows BMP/JPG files can be read by CutStudio, the contours of the image detected, and the resulting image cut. It may be difficult to detect the contours of certain types of read images. Keep the following conditions in mind when selecting images to be read by CutStudio. - Page 46 The image contour is detected. You can use the object tool to reshape the im- age if needed. For more information about how to use the object tool, refer to "Roland CutStudio Online Help." Object tool Chapter 4: Mastering the STIKA...
-
Page 47: Deleting Undesired Cutting Lines
4-3 About Creating Cutting Data Deleting Undesired Cutting Lines CutStudio can be used to delete contour line that is not needed. Procedure Select the detected contour line. Click [Object] – [Break Polyline]. The image contour is separated. Click on the undesired cutting line. Click [Edit] –... -
Page 48: Applying Large Materials
4-4 Applying Large Materials As the size of the material to be applied increases, it will become increasingly difficult to keep the entire material from slipping during application and to prevent air bubbles from becoming trapped between the material and application surface. -
Page 49: Chapter 5: Maintenance
Chapter 5: Maintenance This describes how to clean the machine and replace the blade. -
Page 50: Maintenance
5-1 Maintenance When cleaning, unplug the machine's power cord and remove all material. Cleaning the Blade Tip CAUTION Do not touch the tip of the blade with your fingers. Doing so may result in injury. Dust and material adhesive can collect on the tip of the blade and degrade cutting performance. Remove any dust or material adhesive adhering to the blade tip. -
Page 51: Replacing Consumables
5-2 Replacing Consumables Replacing the Blade If you adjust the blade amount and implement a cutting test several times, and the machine still does not properly cut the material, the blade tip may be worn or damaged. Replace with a new blade. Before replacing the blade, remove the material. -
Page 52: Replacing The Blade Protector
Peel the blade protector from the main unit. Use a commercially available retractable knife to fa- cilitate removal. If you are using the SV-15, raise the left/right sheet adjustment levers and remove the blade protector. * Do not place your hands in front of the direction that you are moving the retractable knife. - Page 53 5-2 Replacing Consumables Peel off the double-sided tape and affix the blade protector. For the SV-15, lower the left/right sheet adjust- ment levers. Sheet adjustment levers Chapter 5: Maintenance...
-
Page 55: Chapter 6: Appendix
Chapter 6: Appendix... -
Page 56: What To Do If
6-1 What to Do If This section describes what to do if you encounter a prob- Is there a build-up of material adhesive or dust within lem while using the machine. Refer to this first, before as- the blade holder? Take off the tip of the blade holder and remove any pieces suming that a malfunction has occurred. -
Page 57: The Material Shifts During Cutting
6-1 What to Do If Is the blade extension amount optimal? Display [System Properties]. Check whether the blade extension amount has been ad- justed. Windows XP p 39 "Adjusting the Blade Extension Amount" Click the [Start] menu, then right-click [My Computer]. -
Page 58: Uninstalling The Driver
6-1 What to Do If Close the [Device Manager] and click [OK]. Type in the information shown below, then click [OK]. Detach the USB cable connected to the com- puter. Restart Windows, and refer to "Uninstalling the driver" below to uninstall the driver. Redo the installation from the beginning. -
Page 59: Shaft Lubrication
6-2 Shaft Lubrication The material may not cut properly if dust and material adhesive adhere to the cutting carriage guide shaft. If the following symptoms are present, remove the shaft cover and lubricate the shaft located as indicated in the figure. Use a machine oil to lubricate. -
Page 60: Cutting Range
1100 mm SV-8 (6-1/4 in.) (39-5/16 in.) (7-13/16 to 8-7/16 in.) (43-1/4 in.) · The required margin to send the material forward/back is taken. When using the SV-15 When using the SV-12/8 Pinch rollers Pinch rollers Blade holder Blade holder Margin... -
Page 61: Locations Of The Power Rating And Serial Number Labels
6-4 Locations of the Power Rating and Serial Number Labels Serial number This is required when you seek maintenance, servicing, or support. Never peel off the label or let it get dirty. Power rating Use an electrical outlet that meets the requirements for voltage, frequency, and amperage given here. -
Page 62: Specifications
6-5 Specifications SV-15 SV-12 SV-8 Cutting method Media-moving method Maximum cutting Width: 340 mm (13-3/8 in.) Width: 250 mm (9-13/16 in.) Width: 160 mm (6-1/4 in.) range Length: 1000 mm (39-5/16 in.) Length: 1000 mm (39-5/16 in.) Length: 1000 mm (39-5/16 in.) - Page 64 Please read this Agreement before unpacking the media. Software license agreement Roland DG Corporation (hereinafter referred to as the "Company") shall grant you a non-transferable, non-exclu- sive right to use the Software supplied with this Agreement, on the condition that you agree to the following provisions.
Need help?
Do you have a question about the SV-15 and is the answer not in the manual?
Questions and answers