Table of Contents
Advertisement
Quick Links
Advertisement
Table of Contents

Related Manuals for Celestron CGEM DX

Summary of Contents for Celestron CGEM DX
- Page 1 CGEM DX C oMputErizED ount INSTRUCTION MANUAL ENGLISH...
-
Page 2: Table Of Contents
able of onTenTs Introduction . . . . . . . . . . . . . . . . . . . . . . . . . . . . . . . . . . . . . 1 Goto R .A/ Dec . -
Page 3: Introduction
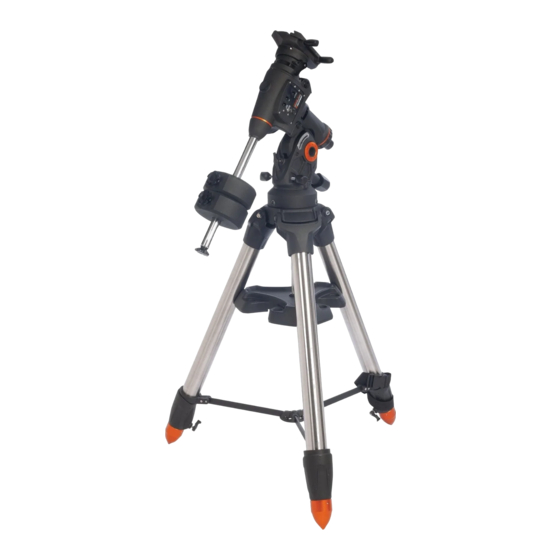
Sky Tour feature, which commands the mount to find the most interesting objects in the sky and automatically The CGEM DX mount is designed to give you years of fun slews to each one . Or if you are an experienced amateur, you and rewarding observations . - Page 4 2-1 – CgeM DX M igure ount ount ontrol anel 1. Equatorial Mount 5. Tripod Center Leg A. On/Off Switch Brace/Accessory Tray 2. Latitude Adjustment B. 12v Input Jack Knob 6. Counterweight(s) C. Hand Control Port 3 . Tripod 7. Counterweight Bar D.
-
Page 5: Assembly
2 . Thread one knob into each of the holes located on either The CGEM DX tripod comes with an all metal center leg brace / side of the mount . accessory tray to give rock solid support to the mount . -
Page 6: Installing The Counterweight Bar
Safety Screw 1 . Locate the counterweight bar locking nut from the box containing the CGEM DX mount (see Fig 2-5) . 2 . Thread the counterweight bar through the rounded end of locking nut until the threads pass all the way through and the 2-5 –... -
Page 7: Attaching The Hand Control Holder
The CGEM DX mount is equipped with a mounting plate that r.a. alanCinG thE ount in accepts the Celestron CGE style (3”) dovetail bar . Before you attach the optical tube, make sure that the declination and... -
Page 8: Balancing The Mount In Dec
12v AC adapter . Use only adapters The actual process of polar alignment, that is making the supplied by Celestron . Using any other adapter may damage telescope’s axis of rotation parallel to the Earth’s, is described the electronics or cause the telescope not to operate properly, later in this manual in the section on “Polar Alignment .”... -
Page 9: Hand Control Operation
A complete list of all 88 constellations . This section describes the basic hand control procedures 5 . Info: Displays coordinates and useful information about needed to operate all Celestron computerized telescopes . objects selected from the telescope database . These procedures are grouped into three categories: 6 . -
Page 10: Startup Procedure
Two Star Align uses the entered time/location information and allow you to select the closest city to your observing allows the user to select which two alignment stars the telescope site from a list of either international or U .S . location . will automatically slew to . -
Page 11: East/West (E/W) Filtering
2 . Once the telescope is finished slewing to your first alignment olar yStEM liGn star, the display will ask you to use the arrow buttons to align Solar System Align is designed to provide excellent tracking the selected star with the cross hairs in the center of the and GoTo performance by using solar system objects (Sun, finderscope . -
Page 12: Quick-Align
alignment star to be replaced . It is usually best to replace uiCK liGn the star closest to the new object . This will space out your Quick-Align uses all the date and time information entered at alignment stars across the sky . startup to align the telescope . -
Page 13: Tour Mode
Tour Mode telescope . While holding that button down, press the opposite directional button . This will increase the slew rate to the The telescopes include a tour feature which automatically maximum slew rate . allows the user to choose from a list of interesting objects The direction that a star moves in the eyepiece when a direction based on the date and time in which you are observing . -
Page 14: Get Ra/Dec
either GoTo Sky Obj or Goto Land the field of view of your eyepiece . Additionally, Identify Mode Obj and enter the number of the object can be used to find other celestial objects that are close to you wish to select and press ENTER . The the objects you are currently observing . -
Page 15: Filter Limits
horizon . As a result, when scrolling through the database lists (or selecting the Tour function), the hand control will SCOPE SETUP display only those objects that are known to be above the horizon when you are observing . You can customize the object SET UP TIME -SITE database by selecting altitude limits that are appropriate for ANTI-BACKLASH... -
Page 16: Ota Orientation
OTA Orientation — Some users may wish to use an optional • DEC Index - This is the declination index error value tandem bar adapter which allows you to attach to the mount that is stored when calibration stars are added after your two optical tubes at the same time . -
Page 17: Utility Features
takes to center an object can be changed. To change the Hibernate — Hibernate allows the telescope to be completely telescopes slewing direction, see Goto Approach under powered down and still retain its alignment when turned the Scope Setup menu. back on . -
Page 18: Periodic Error Correction (Pec)
hand control database to find the coordinates of a celestial the worm gear errors and improving the tracking accuracy of object for a future or past dates you would need to turn the the drive . This feature is for advanced astrophotography and RTC off in order to manually enter a time other than is used when your telescope is accurately polar aligned . - Page 19 LIST ALIGN MENU NAME STAR TRACKING MODE ALIGNMENT STARS EQ NORTH EQ SOUTH CALIB. STARS SOLAR SYSTEM RATE TOUR SIDEREAL POLAR ALIGN SOLAR VARIABLE STARS LUNAR ALIGN MOUNT ABELL VIEW TIME -SITE ASTERISM SCOPE SETUP DISPLAY ALIGN SETUP TIME -SITE CALDWELL ANTI -BACKLASH CCD OBJECTS...
-
Page 20: Astronomy Basics
sTronomy asICs Up to this point, this manual covered the assembly and basic the largest circles rising in the east and setting in the west . operation of your telescope . However, to understand your Moving toward the north celestial pole, the point around which telescope more thoroughly, you need to know a little about the stars in the northern hemisphere appear to rotate, these the night sky . -
Page 21: All-Star Polar Align
All-Star Polar Align For additional all sky pointing accuracy, it’s a good idea to The CGEM DX mount has a polar alignment function align on at least one additional calibration star located on the called “All-Star” polar alignment that will help you polar opposite side of the Meridian . -
Page 22: Finding The North Celestial Pole
the celestial pole, you can simply point the polar axis of your reside . For example, in the northern hemisphere all stars move telescope at Polaris . Although this is by no means perfect around the north celestial pole . When the telescope’s polar alignment, it does get you within one degree and is suitable for axis is pointed at the celestial pole, it is parallel to the Earth’s visual observing and short exposure piggyback photography . -
Page 23: Optional Accessories
. Switching-type AC-to-DC power adapter provides more power with less weight than transformer-style power adapter A full description of all Celestron accessories can be found in the Celestron Accessory Catalog (#93685). Polar Axis Finderscope (#94224) — This useful accessory... -
Page 24: Appendix A - Technical Specifications
– T ppendIX eCHnICal peCIfICaTIons CGem dX m ounT Double line, 16 character Liquid Crystal Display; Hand Control 19 fiber optic backlit LED buttons Motor: Type DC Servo motors with encoders, both axes Max Slew Speed 5º/second Software Precision 24 bit, 0 .08 arcsec calculation... - Page 25 Aperture The diameter of a telescope’s primary lens or D – mirror; the larger the aperture, the greater the Declination The angular distance of a celestial body telescope’s light–gathering power . (DEC) north or south of the celestial equator . It may Apparent A measure of the relative brightness of a be said to correspond to latitude on the Magnitude star or other celestial object as perceived...
- Page 26 Messier A French astronomer in the late 1700’s who Resolution The minimum detectable angle an optical was primarily looking for comets . Comets are system can detect . Because of diffraction, hazy diffuse objects and so Messier cataloged there is a limit to the minimum angle, objects that were not comets to help his resolution .
-
Page 27: Appendix C - Rs-232 Connection
C - rs-232 C ppendIX onneCTIon Description PC Command ASCII Hand Control Response Notes Useful to check Echo communication 10 characters sent . B=Command, 12AB=Azm, comma, 4000=Alt . If Goto Azm-Alt B12AB, 4000 command conflicts with slew limits, there will be no action . - Page 28 rs232 C ddITIonal ommands rS232 2 . Separate POSITION_24BIT into three bytes such that raCK hrouGh (POSITION_24BIT = PosHigh x 65536 + PosMed x 256 otor ontrol + PosLow) . 1 . Multiply the desired tracking rate (arcseconds/second) by 4 . Exampe: PosHigh = 156, PosMed = 113, PosLow = 199 Example: if the desired trackrate is 150 arcseconds/second, 3 .
-
Page 29: Appendix D - Maps Of Time Zones
d – m ppendIX ones... - Page 37 A . Celestron warrants this telescope to be free from defects CELESTRON DISCLAIMS ANY WARRANTIES, EXPRESS OR in materials and workmanship for two years . Celestron IMPLIED, WHETHER OF MERCHANTABILITY OF FITNESS will repair or replace such product or part thereof which,...
- Page 38 2835 Columbia Street • Torrance, CA 90503 U.S.A. Telephone: 310.328.9560 • Fax: 310.212.5835 ©2011 Celestron All rights reserved. • Printed in China • 01-11 (Product design and specifications are) 91528-INST • $10.00 subject to change without prior notification .)
Need help?
Do you have a question about the CGEM DX and is the answer not in the manual?
Questions and answers