Advertisement
Available languages
Available languages
Quick Links
All listed brands are trademarks of the corresponding companies. Errors and omissions excepted,
and subject to technical changes. Our general terms of delivery and payment are applied.
00052468bda.indd Abs1:2
00052468bda.indd Abs1:2
PO Box 80 · 86651 Monheim/Germany
Phone: +49 9091 502-0
Fax: +49 9091 502-458
hama@hama.de
http://www.hama.com
20.04.2007 10:50:36 Uhr
20.04.2007 10:50:36 Uhr
Advertisement

Subscribe to Our Youtube Channel
Related Manuals for Hama M3030


Summary of Contents for Hama M3030
- Page 1 PO Box 80 · 86651 Monheim/Germany Phone: +49 9091 502-0 Fax: +49 9091 502-458 hama@hama.de http://www.hama.com All listed brands are trademarks of the corresponding companies. Errors and omissions excepted, and subject to technical changes. Our general terms of delivery and payment are applied.
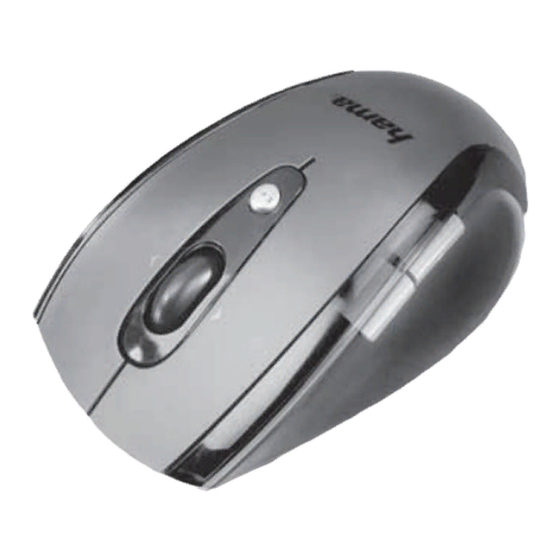
- Page 2 C O M P U T E R Wireless Laser Mouse »M3030« Laser-Funkmaus Souris radio Laser 00052468 00052468bda.indd Abs2:1 00052468bda.indd Abs2:1 20.04.2007 10:50:37 Uhr 20.04.2007 10:50:37 Uhr...
- Page 3 d Installationshinweise 1. Hardware Installation 3. DPI-Umschalter 1.1 Einlegen der Batterie Betätigen Sie den DPI-Umschalter (abb2) um zwischen a) Entfernen Sie die Batteriefach-Abdeckung und legen die 800 - 1600 dpi umzuschalten. Batterie polrichtig in das Batteriefach (abb. 1). 4. 4-Wege-Scrollrad Das 4-Wege-Scrollrad ist ideal zum Anzeigen großer Bilder, Do- kumente oder Tabellenkalkulationen.
-
Page 4: Installation Hints
g Installation hints 1. Hardware Installation 3. DPI switch 1.1 Inserting the battery Press the DPI switch (fi g. 2) to toggle between 800 and 1600 DPI. a) Remove the battery compartment cover and insert the battery in the correct direction in the battery 4. - Page 5 f Indications d‘installation 1. Installation du matériel 3. Commutateur dpi 1.1 Mise en place des pile Actionnez le commutateur dpi (ill. 2) afi n de commuter entre a) Ouvrez le couvercle du compartiment et insérez les pile 800 et 1600 dpi (ppp). en respectant la polarité...
- Page 6 La declaración de conformidad según la directiva R&TTE 99/5/CE la encontrará en www.hama.com De conformiteitsverklaring conform de R&TTE-richtlijn 99/5/EG vindt u onder www.hama.com La dichiarazione di conformità secondo la direttiva R&TTE 99/5/CE è disponibile sul sito www.hama.com A declaração de conformidade segundo a directiva R&TTE 99/5/CE pode ser consultada em www.hama.com Konformitetsförklaring enligt R&TTE riktlinje 99/5/EG fi...
Need help?
Do you have a question about the M3030 and is the answer not in the manual?
Questions and answers