Advertisement
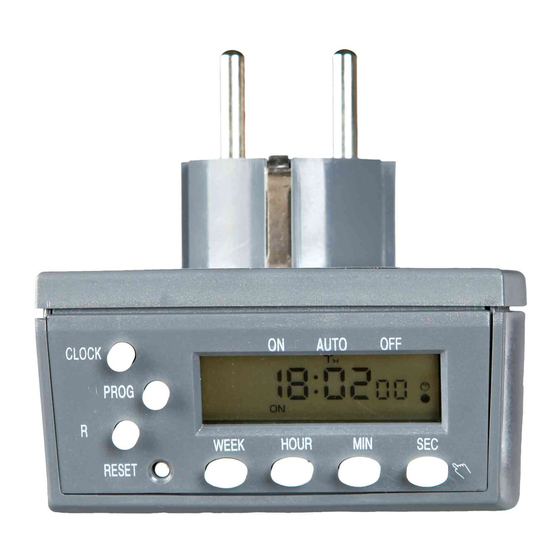
Zeitschaltuhr
Gebrauchsanweisung
Einstellen von Tag und Uhrzeit
1. „CLOCK" drücken und gleichzeitig mit der
Taste „WEEK" den Wochentag einstellen.
2. „CLOCK" drücken und gleichzeitig mit der
Taste „HOUR" die Stunden einstellen.
3. „CLOCK" drücken und gleichzeitig mit der
Taste „MIN" die Minuten einstellen.
4. „CLOCK" loslassen. Wochentag und Uhr-
zeit werden im Display angezeigt.
Programmieren des Timers
1. „PROG" drücken, um in den Programmier-
modus zu gelangen. Im Display erscheint
„1 ON" (1. Einschaltzeit).
2. „WEEK" drücken, um zwischen verschiede-
nen Wochentagen bzw. Wochentagkombi-
nationen zu wählen. Die gewählten Tage
erscheinen am oberen Rand des Displays.
3. Mit „HOUR", „MIN" und „SEC" die Ein-
schaltzeit eingeben. Die Taste „R" löscht
die Eingabe bzw. stellt sie beim zweiten
Drücken wieder her.
4. „PROG" erneut drücken, um die Aus-
schaltzeit („1 OFF") einzugeben. Hierzu
wieder „WEEK", „HOUR", „MIN" und „SEC"
verwenden. Achten Sie darauf, dass die
„WEEK"-Angabe
von
Einschalt-
Ausschaltzeit übereinstimmt.
5. Taste „PROG" erneut drücken, um bis zu 7
weitere Schaltzeiten zu programmieren
(hierzu Schritt 2.–4. wiederholen).
6. Zum Beenden des Programmiermodus
„CLOCK" drücken. Wird 1 Minute lang
keine Taste gedrückt, schaltet das Gerät
automatisch in den Betriebsmodus zurück.
7. Zur sofortigen Aktivierung des Automatik-
Modus per „SEC" Taste erst „OFF" Modus
und dann „AUTO" Modus anwählen. Bei
einer Aktivierung über „ON" Modus zu
„AUTO" Modus wird der Stromfluss sofort
freigegeben und erst bei der nächsten
Abschaltzeit unterbrochen.
Umschalten zwischen Sommer- und Winter-
zeit
Drücken Sie die Tasten „Hour'' und „Min''
gleichzeitig, um von Sommerzeit auf Winter-
zeit zu wechseln. Im Display erscheint über
dem schwarzen Punkt ein Uhrensymbol.
Ein- und Ausschalten
Mit „SEC" können Sie auch zwischen „AUTO"
(automatisches Ein- und Ausschalten nach
Programmierung), „OFF" (komplett ausge-
schaltet) und „ON" (komplett eingeschaltet)
wechseln.
Random (zufällige Schaltzeiten)
„WEEK" und „HOUR" gleichzeitig drücken, um
den Random-Modus zu starten. Im Display
erscheint ein weiterer Kreis. Dieser Modus
verlängert die programmierten Ein- und
Ausschaltzeiten nach dem Zufallsprinzip um
2–32 Minuten. Durch erneutes, gleich-
zeitiges Drücken von „WEEK" und „HOUR"
wird die Random-Funktion wieder deaktiviert.
Reset
„Reset" drücken, um alle programmierten
Einstellungen zu löschen (inkl. aktueller Tag
und Zeit).
Digitale
Instructions for Use
Setting Day and Time
1. Hold down the button 'CLOCK' and set
the day of the week by pressing 'WEEK' at
the same time.
2. Hold down the button 'CLOCK' and set
the hour by pressing 'HOUR' at the same
time.
3. Hold down the button 'CLOCK' and set
the minutes by pressing 'MIN' at the same
time.
4. Release 'CLOCK'. Weekday and time will
be shown in the display.
Programming the Timer
1. Press 'PROG' to go into programming
mode. The display will show '1 ON' (Turn-
on time 1).
2. Press 'WEEK' to choose between diffe-
rent weekdays and combinations of
weekdays. The days you have chosen will
be displayed at the top of the display.
3. Enter the turn-on time with buttons
'HOUR', 'MIN', 'SEC'. The button 'R' de-
letes your input or undeletes it if pressed
twice.
4. Press 'PROG' again to enter turn-off time
und
'1 OFF'. Use buttons 'WEEK', 'HOUR',
'MIN', 'SEC' as before. Pay attention that
the 'WEEK' is the same for turn-on and
turn-off times.
5. Press 'PROG' again to enter up to 7 more
programmed times (repeat steps 2–4).
6. To end programming mode press 'CLOCK'.
If no buttons are pressed for 1 minute, the
timer automatically returns to operating
mode.
7. For immediate activation of automatic
mode with the 'SEC' button, first select
'OFF' mode and then 'AUTO' mode. In case
of a direct activation by switching from
'ON' mode to 'AUTO' mode, the electrical
current will start flowing at once and only
be interrupted at the next switch off time.
Changing between summer time and winter
time
Press 'Hour' and 'Min' at the same time in
order to change from summer time to winter
time. A clock symbol will appear in the display
above the black dot.
Switching On and Off
With 'SEC' you can also change from 'AUTO'
(automatic switching on and off after
programming), to 'OFF' (completely switched
off) or 'ON' (completely switched on).
Random
Press 'WEEK' and 'HOUR' simultaneously to
start random-mode. The display will show
another circle. This mode extends the
programmed turn-on/turn-off times ran-
domly by 2–32 minutes. Deactivate the
random-mode by pressing 'WEEK' and
'HOUR' simultaneously once more.
Reset
Press 'Reset' to delete all programmed
settings (this includes date and time).
TRIXIE Heimtierbedarf · D-24963 Tarp · www.trixie.de
Digital
Timer
Mode d'emploi
Réglage du jour et de l'heure
1. Maintenir enfoncé le bouton 'CLOCK' et
définir le jour de la semaine en pressant
sur 'WEEK' simultanément.
2. Maintenir enfoncé le bouton 'CLOCK' et
définir l'heure en pressant sur 'HOUR'
simultanément.
3. Maintenir enfoncé le bouton 'CLOCK' et
définir les minutes en pressant sur 'MIN'
simultanément.
4. Relacher 'CLOCK'. Le jour de la semaine et
l'heure s'afficheront sur l'écran.
Programmation du Timer
1. Appuyer sur 'PROG' pour entrer dans le
mode de programmation. L'écran va
afficher '1 ON' (régler sur temps 1).
2. Appuyer sur 'WEEK' pour choisir entre les
différents jours de la semaine, et les
combinaisons des jours. Le jour choisi
s'affichera en haut de l'écran.
3. Entrer l'heure de départ à l'aide de
fonctions 'HOUR', 'MIN', 'SEC'. Le bou-
ton 'R' annule votre entrée ou votre
annulation en appuyant deux fois.
4. Appuyer sur 'PROG' à nouveau pour
entrer l'heure d'arrêt '1 OFF'. Utiliser les
boutons 'WEEK', 'HOUR', 'MIN', 'SEC',
comme auparavant. Faire attention à ce
que la semaine 'WEEK' soit la même pour
le départ et l'arrêt.
5. Appuyer sur 'PROG' à nouveau pour
programmer jusqu'à 7 heures supplémen-
taires (répéter les étapes 2–4).
6. Pour finir la programmation, appuyer sur
'CLOCK'. Si aucun bouton n'est appuyé
pendant 1 minute, le timer revient
automatiquement sur le mode program-
mation.
7. Pour activer le mode automatique avec le
bouton 'SEC', sélectionner d'abord le
mode 'OFF' puis le mode 'AUTO'. En cas
d'activation directe du mode 'ON' au
mode 'AUTO', le courant électrique
commencera à circuler, et s'arrêtera au
prochain mode 'OFF'.
Passer du mode Eté au mode Hiver
Appuyer simultanément sur les boutons
'HOUR' et 'MIN' pour passer du mode été au
mode hiver. Le symbole 'horloge' apparaîtra
sur l'écran au dessus des pointillés noirs.
Allumer/On et éteindre/off
Avec 'SEC' on peut aussi passer de 'AUTO'
(commutation automatique on et off après la
programmation), à 'OFF' (totalement éteint)
ou ON (totalement allumé).
Mode Aléatoire
Appuyer sur 'WEEK' et 'HOUR' simultané-
ment pour démarrer le mode aléatoire.
L'écran affichera un autre cercle. Ce mode
prolonge les heures de départ et d'arrêt
programmées de façon aléatoire entre 2 et 32
minutes. Désactivez le mode aléatoire en
appuyant de nouveau sur 'WEEK' et 'HOUR'
simultanément.
Réinitialiser
Appuyer sur 'Reset' pour annuler toutes les
programmations (ceci inclus la date et
l'heure).
Programmateur
Digital
Advertisement
Table of Contents

Subscribe to Our Youtube Channel
Related Manuals for Trixie Digital Timer

Summary of Contents for Trixie Digital Timer
- Page 1 „Reset“ drücken, um alle programmierten settings (this includes date and time). Réinitialiser Einstellungen zu löschen (inkl. aktueller Tag und Zeit). Appuyer sur ‘Reset’ pour annuler toutes les programmations (ceci inclus la date et l’heure). TRIXIE Heimtierbedarf · D-24963 Tarp · www.trixie.de...
- Page 2 ‘HOUR’ a la vez de nuevo. Reset Premete ‘Reset’ per cancellare tutti i pro- Reset grammi inseriti (inclusi anche data e ora). Presione ‘Reset’ para eliminar todas las progra- maciones (esto incluye la fecha y hora). TRIXIE Heimtierbedarf · D-24963 Tarp · www.trixie.de...
Need help?
Do you have a question about the Digital Timer and is the answer not in the manual?
Questions and answers