Table of Contents
Advertisement
Quick Links
Download this manual
See also:
Service Manual
ABOUT THIS MANUAL
ABOUT THIS MANUAL
담
당
박만기님
공장모델
KOG-8A0R5S
BUYER
BUYER모델
KOG-8A0R5S
1차
2차
일
정
3차
4차
5차
제
판
한( )
규
격
MEMO 접수: (총 28p)
06.9.11-표지,1,3,4,5,6,7,11,12,13,17,20_(신규12p)
06.9.13-7,8,9,10,13_(신규3p)
06.9.19-6,12,17_(신규3p)
06.9.25-10,17_수정
06.9.28-9,12(텍스트수정)_수정
06.10.16-12_수정_(신규1p)(박만기님)
07.04.12-4p수정-(신규1p)
V V I I S S I I O O N N C C R R E E A A T T I I V V E E , , I I N N C C . .
브 랜 드
언
어
06.9.11
06.9.13
인 인
쇄 쇄
연락처
VISION
담 당
TEL: 730-0660 FAX: 730-3788
서울 종로구 통의동
6번지 이룸빌딩 4층
DAEWOO
영어기본
전 지 현
Advertisement
Table of Contents

Related Manuals for Daewoo KOG-8A0R5S


Summary of Contents for Daewoo KOG-8A0R5S
- Page 1 V V I I S S I I O O N N C C R R E E A A T T I I V V E E , , I I N N C C . . 서울 종로구 통의동 6번지 이룸빌딩 4층 담 당 박만기님 공장모델 KOG-8A0R5S 브 랜 드 DAEWOO BUYER 언 어 영어기본...
- Page 2 MICROWA VE OVEN KOG-8A0R5S OPERATING INSTRUCTIONS & COOK BOOK Before operating this oven, please read these instructions completely.
-
Page 3: Table Of Contents
PRECAUTIONS TO AVOID POSSIBLE EXPOSURE TO EXCESSIVE MICROWAVE ENERGY (a) Do not attempt to operate this oven with the door open since open-door operation can result in harmful exposure to microwave energy. It is important not to defeat or tamper with the safety interlocks. (b) Do not place any object between the oven front face and the door or allow soil or cleaner residue to accumulate on sealing surfaces. -
Page 4: Important Safety Instructions
IMPORTANT SAFETY INSTRUCTIONS READ CAREFULLY AND KEEP FOR FUTURE REFERENCE WARNING : To prevent fire, burns, electric shock and other warnings: Listed below are, as with all appliances, certain rules to follow and safeguards to assure high performance from this oven: 11. -
Page 5: Earthing Instructions
EARTHING INSTRUCTIONS This appliance must be earthed. In the event of an IMPORTANT electrical short circuit, earthing reduces the risk of The wires in this mains lead fitted to this appliance electric shock by providing an escape wire for the are colored in accordance with the following code. -
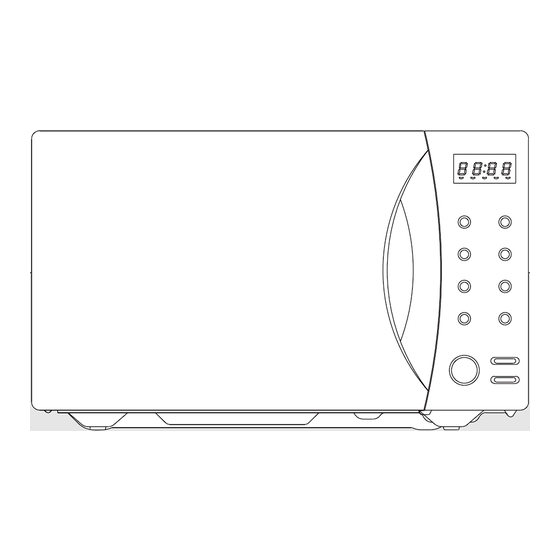
Page 6: Features Diagram
FEATURES DIAGRAM 3 4 5 1 Door seal - Door seal maintains the 9 Roller guide - This must always be used microwave energy within the oven cavity for cooking together with the glass cooking and prevents microwave leakage. tray. 2 Reflector (Insulator Heater) 0 Glass cooking tray - Made of special heat resistant glass. -
Page 7: Features Diagram (Continued)
FEATURES DIAGRAM (continued) 1 Display - Cooking time, power level, 7 Grill / Combi -Used to cook Grill/Combi. indicators and present time are displayed. 8 Quick defrost - Used to defrost food very 2 AUTO COOK - Used to cook using a Quickly. -
Page 8: Operation Procedure
OPERATION PROCEDURE This section includes useful information about oven operation. Plug power supply cord into 230V AC 50Hz power When the STOP/CLEAR button is pushed during outlet. the oven operation, the oven stops cooking and all information retained. To erase all information After placing the food in a suitable container, open (except the present time), push the STOP/CLEAR the oven door and put it on the glass tray. -
Page 9: Controls
CONTROLS SETTING THE CLOCK When the oven is first plugged in, the display will flash “ :0” and a tone will sound. If the AC power ever turns off, the display shows “ :0” when the power comes back on. 1. -
Page 10: Setting Cooking Times & Power Levels
SETTING COOKING TIMES & POWER LEVELS 1.Push the Micro power button to set the power level. Push the Micro power button repeatedly to select the power level you want. 2. Turn the Dial knob to set the cooking times. You can set a time from 10 seconds to 60 minutes. 3. -
Page 11: Defrosting Automatically
DEFROSTING AUTOMATICALLY To thaw frozen food, set the weight of the food and the microwave automatically sets the defrosting time, power level. 1. Push the AUTO DEFROST button to set the item. Push the AUTO DEFROST button repeatedly to select the item you want. (Refer to the AUTO DEFROST chart below) 2. -
Page 12: Auto Cook
AUTO COOK 1. Push the AUTO COOK button to set the item. Push the AUTO COOK button repeatedly to select the item you want. (Refer to the AUTO COOK chart below) 2. Turn the Dial knob to set the weight of the food. 3. -
Page 13: Grill/Combi
GRILL COOKING This function allows you to brown food quickly. The heating element is located in the top of the oven. There is no pre-heating the oven for grill cooking. Place food inside the oven when setting the controls. 1. Push Grill/Combi button. The Grill indicator lights and “... -
Page 14: Chilled Meal
CHILLED MEAL 1. Push the Chilled meal button. The display shows “A--1”. 2. Turn the Dial knob to set the weight of the food. You can set a weight from 300g to 500g every 100g. 3. Push the START button to start cooking. FROZEN MEAL 1. -
Page 15: Child Safety Lock
CHILD SAFETY LOCK The safety lock prevents unwanted oven operation such as by small children. To set, push and hold the STOP/Clear for 3 seconds. To cancel, push and hold the STOP/Clear for 3 seconds. TO SET POWER SAVE MODE 1.When “... -
Page 16: Care Of Your Microwave Oven
CARE OF YOUR MICROWAVE OVEN The oven should be cleaned regularly and any food deposits removed. Failure to maintain the oven in a clean condition could lead to deterioration of the surface that could adversely affect the life of the appliance and possibly result in a hazardous situation. Turn the oven off before cleaning. -
Page 17: Questions And Answers
QUESTIONS AND ANSWERS * Q : I accidentally ran my microwave oven * Q : What does “standing time” mean? without any food in it. Is it damaged? A : “Standing time” means that food should be A : Running the oven empty for a short time will removed from the oven and covered for not damage the oven. -
Page 18: Before You Call For Service
BEFORE YOU CALL FOR SERVICE Refer to following checklist, you may prevent an unnecessary service call. * The oven doesn’t work : * Sparking in the cavity; 1. Check that the power cord is securely plugged 1. Check utensils. Metal containers or dishes with metal trim should not be used. -
Page 19: Specifications
SPECIFICATIONS POWER SUPPLY 230V~50Hz, SINGLE PHASE WITH EARTHING MICROWAVE 1200 W POWER GRILL 1050 W CONSUMPTION COMBINATION 2200 W MICROWAVE ENERGY OUTPUT 800W MICROWAVE FREQUENCY 2450MHz OUTSIDE DIMENSIONS (W x H x D) 465 x 287 x 376mm CAVITY DIMENSIONS (W x H x D) 298 x 230 x 330mm CAVITY VOLUME 23 L... -
Page 20: Cooking Instructions
COOKING INSTRUCTIONS Only use the utensils that are suitable for use in microwave ovens. UTENSILS TEST Place the utensil in question next to a glass measure filled with water, in the microwave oven. Microwave at high power for 1-2 minutes. If the water heats up, but the utensil remains cool, the utensil is microwave-safe. However if the utensil becomes warm, microwaves are being absorbed by the utensil and it should not be in the microwave oven. -
Page 21: Use Your Microwave Oven Safely
USE YOUR MICROWAVE OVEN SAFELY General Use Do not operate the oven if door seals or sealing Do not attempt to defeat or tamper with safety surfaces are damaged; or if door is bent; or if hinges interlocks. are loose or broken. Do not place any object between the oven front Do not operate the oven empty. -
Page 22: Microwaving Principles
MICROWAVING PRINCIPLES Microwave energy has been used in this country to cook and reheat food since early experiments with RADAR in World War ll. Microwaves are present in the atmosphere all the time, both naturally and manmade sources. Manmade sources include radar, radio, television, telecommunication links and car phones. HOW MICROWAVES COOK FOOD Microwave oven is a Group 2 ISM equipment in which radio frequency energy is intentionally generated and used in the form of electromagnetic radiation for the treatment of material. -
Page 23: Cooking Techniques
COOKING TECHNIQUES STANDING TIME STARTING TEMPERATURE Dense foods e.g. meat, jacket potatoes and The colder the food, the longer it takes to heat up. cakes, require standing time(inside or outside of Food from a fridge takes longer to reheat than the oven) after cooking, to allow heat to finish food at room temperature. -
Page 24: Defrosting Guide
DEFROSTING GUIDE ▶ Do not defrost covered meat. Covering might allow ▶ When defrosted, food should be cool, but softened in cooking to take place. Always remove outer wrap and all areas. If still slightly icy, return to microwave oven tray. -
Page 25: Cooking & Reheating Chart
COOKING & REHEATING CHART Cooking chart Power Cooking Time Item Special Instruction Level Per lb./450g MEAT - Chilled meat and poultry should be removed from Beef joint -Rare P-80 8-10 min. the refrigerator at least 30 minutes before -Medium P-80 9-11 min. -
Page 26: Reheating Chart
Reheating chart • Baby food particularly needs to be checked carefully before serving to prevent burns. • When heating pre-packaged ready-cooked foods, always follow the pack instructions carefully. • If you freeze foods which were bought from the fresh or chilled counters, remember that they should be thoroughly thawed before following the heating instructions on the packed. -
Page 27: Vegetable Chart
VEGETABLE CHART Use a suitable glass pyrex bowl with lid. Add 30-45ml cold water(2-3 tbsp.) for every 250g unless another water quantity is recommended - see table. Cook covered for the minimum time - see table. Continue cooking to get the result you prefer. Stir once during and once after cooking. Add salt, herbs or butter after cooking. -
Page 28: Recipes
RECIPES TOMATO & ORANGE SOUP 1 oz.(25g) butter 1. Melt the in a large bowl at P-HI for 1 minute. 1 medium onion, chopped 2. Add the onion, carrot and potato and cook at P-HI for 6 minutes. stir halfway through cooking. 1 large carrot &... - Page 29 BLUE CHEESE & CHIVE JACKETS 2 baking potatoes, 1. Prick each potato in several places. Cook at P- (approx.9 oz.(250g) each) HI for 10-11 minutes. Halve and scoop the flesh 2 oz.(50g) butter into a bowl, add the butter, cheese, chives, 4 oz.(100g) blue cheese, chopped mushrooms, salt and pepper, mix thoroughly.
- Page 30 SCRAMBLED EDD oz.(15g) butter 1. Melt the butter in a bowl at P-HI for 1 minutes. 2 eggs 2. Add the eggs, milk and seasoning and mix well. 2 tbsp(30ml) milk 3. Cook at P-HI for 2 minutes, stirring every 30 salt &...
Need help?
Do you have a question about the KOG-8A0R5S and is the answer not in the manual?
Questions and answers