Table of Contents
Advertisement
Quick Links
Advertisement
Table of Contents

Subscribe to Our Youtube Channel
Related Manuals for Echo Audio Echo 2

Summary of Contents for Echo Audio Echo 2
- Page 1 User Guide...
- Page 2 Echo 2. Do not use the Echo 2 near water or any heat sources such as heaters, stoves, or amplifiers. Protect the power cord from being damaged in any way.
-
Page 3: Table Of Contents
Echo 2 User Guide Contents INTRODUCTION ..................4 ................. 4 ACKAGE ONTENTS ECHO 2 CONNECTIONS ................5 ..................... 5 NPUTS ..................7 UTPUTS ................. 7 EADPHONE UTPUT ..................... 8 OWER USB......................8 TOUCH PANEL ..................9 ..................10 NPUT ELECTION .................. -
Page 4: Introduction
This User Guide will show you how to connect and use the Echo 2 to get the most of what it has to offer. We encourage you to register your product online at: http://www.echoaudio.com/support/register.php... -
Page 5: Echo 2 Connections
This will set up the internal preamp to match the incoming signal. If you prefer to use an external preamp, simply connect the preamp directly to the Echo 2’s input, and set it for line level with unity gain. This will preserve any unique sonic coloration or nuance. - Page 6 Echo 2 User Guide...
-
Page 7: Main Outputs
Echo 2 User Guide Main Outputs There are two output jacks labeled “OUT L” and “OUT R”. These are standard low impedance, balanced outputs that can be connected directly to a mixer board or powered speaker. Headphone Output A high quality stereo headphone output is provided by the front jack: You can set the headphone volume using the touch panel. -
Page 8: Power
When used for digital audio recording and playback, the Echo 2 connects to a computer using the USB mini-B jack on the rear of the case. The Echo 2 requires a cable that has been certified for USB 2.0 high-speed operation. -
Page 9: Touch Panel
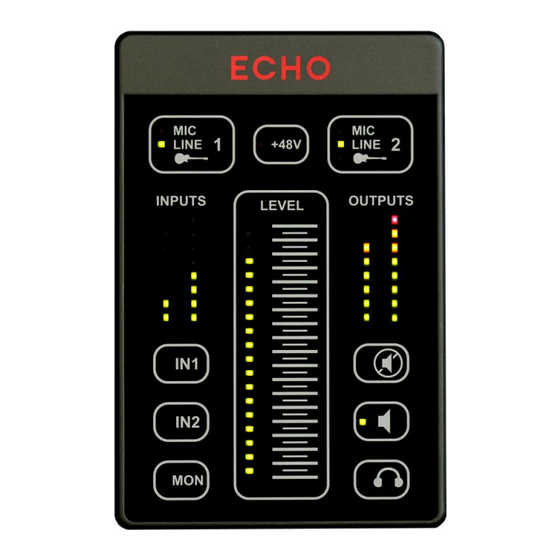
Echo 2 User Guide Touch Panel The touch panel gives easy access to virtually all of Echo 2’s functionality. The panel uses capacitive touch technology to sense the touch of a finger. A light touch is all that is needed; the panel can’t differentiate between a light or hard press. The active area for each touch control is in the center of the rounded gray rectangle to the right of the LED indicator. -
Page 10: Input Selection
LINE or GUITAR. In addition, phantom power will be turned off when the Echo 2 first powers up. Please note that the use of phantom power may require powering your Echo 2 with the external power adapter instead of relying on computer USB power. Further details are... -
Page 11: Input Set Up
Echo 2 User Guide Input set up If you're unsure how to set up your inputs, please refer to the following table: Signal source Echo 2 input mode +48V Dynamic microphone Condenser microphone Keyboard LINE Mixer board LINE MP3 player/iPod... -
Page 12: Levels
Echo 2 User Guide Levels Input gains, monitoring, and output volumes are all controlled using the “slider” control in the middle of the touch panel. Touch one of the selector buttons to select what the slider does: Input 1 gain... -
Page 13: Main Mute
Echo 2 User Guide The range of the slider control will change depending on your selection. The various ranges for the slider are shown below: Input Gain (dB) Output Attenuation (dB) Line Guitar +75 ── ── +65 ── ── +54 ──... -
Page 14: Ez Trim
While it is possible to use the input gain slider control to set the gain while shouting into a microphone, pounding on drums, or wailing on a guitar, it’s both quicker and more accurate to let the Echo 2 do it automatically for you with EZ Trim. -
Page 15: Saving Settings
Flashing LED – Headphones are output channels 1and 2. Saving Settings Settings are automatically saved. The Echo 2 will wait 30 seconds after your last change and then save your settings. The panel will flash briefly during the save operation. - Page 16 Echo 2 User Guide Computer Operation...
-
Page 17: Specifications
Echo 2 User Guide Specifications Analog inputs The tip connector is the Hot (+) signal while the ring connector is the Cold (-) signal. The shield is always ground. The input characteristics change depending on which type of input is selected:... - Page 18 Echo 2 User Guide Warranty...
-
Page 19: Declarations Of Conformity
Echo 2 User Guide Declarations of Conformity This equipment has been tested and found to comply with the limits of a Class B digital device, pursuant to Part 15 of the FCC Rules. These limits are designed to provide reasonable protection against harmful interference in a residential installation. This... - Page 20 Echo 2 User Guide This product complies with the European Unicon Council Directives and Standards relating to electromagnetic compatibility EMC Directive (2006/95/EC) and the Low Voltage Directive (2004/108/EC) RoHS Notice Echo Digital Audio has conformed and this product conforms, where applicable, to the European Union’s Directive 2002/95/EC on Restrictions of Hazardous Substances...
Need help?
Do you have a question about the Echo 2 and is the answer not in the manual?
Questions and answers