Table of Contents
Advertisement
Advertisement
Table of Contents

Related Manuals for Magellan eXplorist 350H


Summary of Contents for Magellan eXplorist 350H
- Page 1 ® 350H Magellan eXplorist User Manual ® ®...
-
Page 2: Federal Communication Commission Interference Statement
IN THE INTERESTS OF SAFETY, DO NOT USE THIS NAVIGATION DEVICE WHILE DRIVING A VEHICLE. Please do not try to change any settings on the Magellan eXplorist while driving. Come to a complete stop or ask a passenger make any changes. Taking your eyes off the road is dangerous and can result in an accident in which you or others could be injured. - Page 3 The Magellan eXplorist must be installed and operated at a distance no closer then 8 inches (20 cm) from the user. This Class B digital device meets all requirements of the Canadian Interference-Causing Equipment Regulations.
- Page 4 The information provided in this document is subject to change without notice. Improvements and enhancements to the product may occur without any formal notification. Check the Magellan website (www.magellanGPS.com for product updates and additional information. Maximum normal use temperature is 66°C.
-
Page 5: Table Of Contents
Contents Magellan eXplorist 350H........1 Batteries ................... 2 Installing Batteries ....................2 Setting Battery Type ....................2 POWER ..................... 3 Main Menu ..................4 Map Screen ..................4 Connecting to a Computer .............. 5 Updates .................... 5 Hunting ............6 TRACK ME ..................6 Starting a Hunt TRACK ME Trip................6... - Page 6 Adding a Field Note to a Trip ................10 Quickly Accessing Map Settings ..............10 Quickly Access All Settings ................10 Returning to the Trip Start Point (Backtrack) ..........10 Saving the Trip ....................11 Assigning a Name to a Trip ................11 Viewing the Waypoint Details for the Trip ...........
- Page 7 View Options ...................... 17 Adding a Field Note to a Trip ................18 Quickly Accessing Map Settings ..............18 Quickly Access All Settings ................18 Returning to the Trip Start Point (Backtrack) ..........18 Saving the Trip ....................19 Assigning a Name to a Trip ................19 Viewing the Waypoint Details for the Trip ...........
- Page 8 Power Off Timer ....................25 Battery Type ......................25 TIME Settings ................. 26 UNITS of Measure ................26 Distance Units of Measure ................26 Speed Units of Measure ..................26 Elevation Units of Measure ................26 ALERTS ................... 26 Setting OFF COURSE Alert ................26 Setting ARRIVAL Alert ..................
- Page 9 CALENDAR ..................30 Viewing Calendar Information ................ 30 VOLUME & BRIGHTNESS ............... 31 Setting Display Brightness ................31 Setting Speaker Volume ................... 31 Setting BACKLIGHT TIMER ................31 MEMORY ..................31 LANGUAGE SELECTION ..............32 PRODUCT INFORMATION ............32 Viewing Product Information ................. 32 DEMO ....................
-
Page 10: Magellan Explorist 350H
Magellan eXplorist 350H Power Button Power On: Press and hold Power Off: Press quickly to view the Power Off screen. (Press and hold to skip the standby option) MENU Button BACK Button When a menu is available Use to step back to the for a screen the MENU previous screen. -
Page 11: Batteries
Batteries The Magellan eXplorist 350H receiver uses two AA batteries (lithium, alkaline or rechargeable). Magellan recommends using lithium batteries for optimum battery life. Installing Batteries Lift the battery door up and remove from Turn the battery door lock the device. -
Page 12: Power
POWER To apply power to the Magellan eXplorist 350H receiver press and hold the POWER button for 2-3 seconds. The start up screen will be POWER displayed while the software loads. Button Turning the receiver off: Press the POWER button to turn the receiver off. -
Page 13: Main Menu
Main Menu All activities in the Magellan eXplorist 350H begin at the MAIN MENU. Knowing what each option is will help you decide the option best suited for your upcoming activity. TRACK ME HUNT - Tracks your current hunting activity. -
Page 14: Connecting To A Computer
Manuals and Software Downloads > Magellan Outdoor > eXplorist Series. Available updates can be found under eXplorist 350H. Download the updater and run it on your computer with the Magellan eXplorist 350H receiver connected. Updating via VantagePoint: Download and install VantagePoint software from www.magellangps. -
Page 15: Hunting
Select HUNT from the Main Menu. Select TRACK ME. The Map screen is displayed and the eXplorist 350H will begin tracking your movements. Track Lines. As you travel, the eXplorist 350H will begin recording your movements on the screen. This visual record of your movement is called the “Track Line”. -
Page 16: Marking A Location On The Map
Highlight the icon that best describes the waypoint you are saving and press ENTER. Select if you want to add a FIELD NOTE to this waypoint and press ENTER. If you chose to add a FIELD NOTE, use the keyboard to enter the text. The waypoint is saved as part of this trip and is displayed on the Map. -
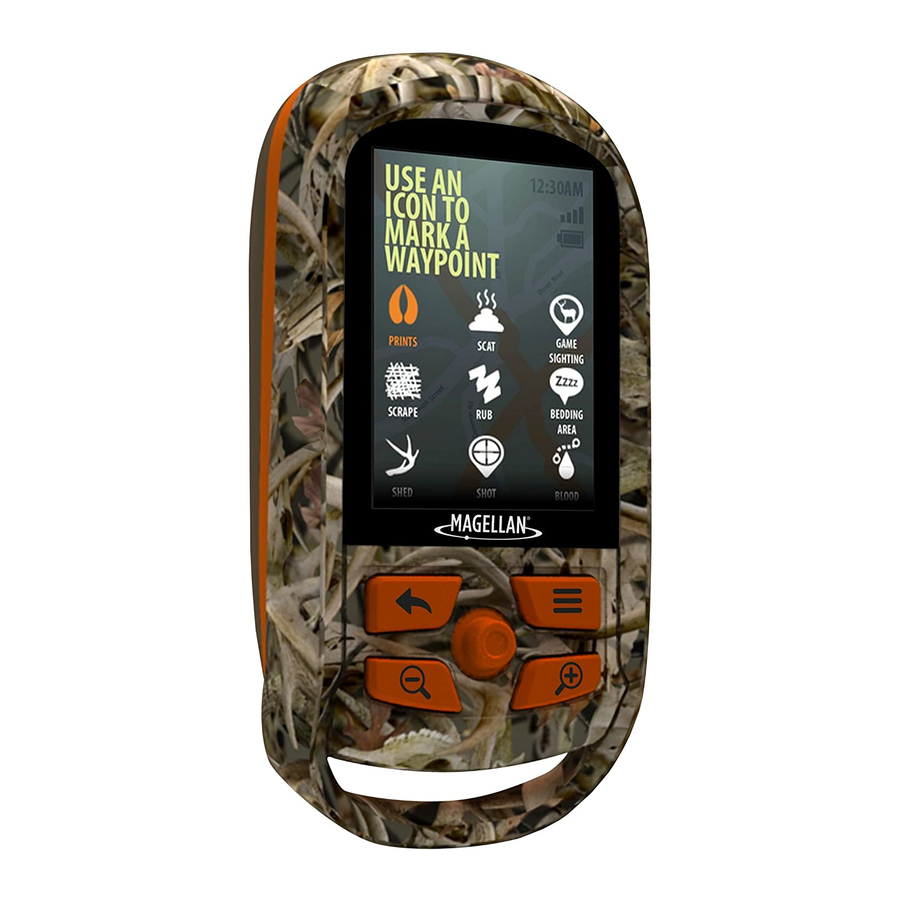
Page 17: Waypoint Icon Types Available - Prey Tracking
Waypoint Icon Types Available - PREY TRACKING ANTELOPE BEAR BEDDING AREA BLOOD TRAIL BOAR DEER SCAT GAME SIGHTING MOOSE PREDATOR SIGHTING PRINTS SCRAPE SHED SHEEP SHOT SMALL GAME TURKEY UNKNOWN UPLAND FOWL WATER FOWL Location Information. While scouting, hunting, or planning your next trip, one important thing you may want to know about a particular location is what the GMU or WMU zone is for that area.. -
Page 18: Getting Quick Information On Your Location
Getting Quick Information on your Location While viewing the Map screen, press ENTER twice. The QUICK INFORMATION popup is displayed. Map Views. If the Map screen doesn’t suit your needs and you would like to view a compass or a dashboard view;... -
Page 19: Adding A Field Note To A Trip
While viewing the Map screen, press BACK. With GO TO SETTINGS highlighted, press ENTER. All of the Settings available in the eXplorist 350H can be accessed and changed. Press BACK to return to the map screen. Backtrack. When you are done scouting or setting up your cameras, you can use the eXplorist 350H to return to the starting point of the trip. -
Page 20: Saving The Trip
Saving a Trip. When your TRACK ME trip is done you need to save the trip. This adds the trip to your MY TRIPS listing, providing access to this trip to resume or review the trip at a later date. There are two ways of saving the trip. -
Page 21: Deleting The Trip
Deleting the Trip While viewing the TRIP DETAILS screen, press the MENU button. Highlight DELETE TRIP and press ENTER. Confirm : Highlight DELETE and press ENTER to confirm the deletion. WARNING Deleting a trip also deletes any waypoints that were created during the trip. -
Page 22: My Trips
NOTES Planned Trips behave differently from trips created from TRACK ME. It is recommended that you assign a name to any planned trip so it can be easily distingished from a TRACK ME trip. Highlight the green arrow and press ENTER. The trip is saved and the HUNT menu displayed. -
Page 23: Viewing The Waypoint Details For The Trip
Viewing the Waypoint Details for the Trip While viewing the TRIP DETAILS screen, use the joystick to highlight the WP DETAILS icon (displayed in the center portion of the screen). Press ENTER. Details for the first waypoint in the trip is shown. Use the joystick left/right to step through the other waypoints in the trip. -
Page 24: Hiking
Select HIKE from the Main Menu. Select TRACK ME. The Map screen is displayed and the eXplorist 350H will begin tracking your movements. Track Lines. As you travel, the eXplorist 350H will begin recording your movements on the screen. This visual record of your movement is called the “Track Line”. -
Page 25: Marking A Location On The Map
Select if you want to add a FIELD NOTE to this waypoint and press ENTER. If you chose to add a FIELD NOTE, use the keyboard to enter the text. The waypoint is saved as part of this trip and is displayed on the Map. Marking a Locaton on the Map. -
Page 26: Getting Information On Your Location
Location Information Getting Information on your Location While viewing the Map screen, press MENU. With LOCATION INFO highlighted, press ENTER. Use the joystick to scroll through the various details available. Press the BACK button when done. Getting Quick Information on your Location While viewing the Map screen, press ENTER twice. -
Page 27: Adding A Field Note To A Trip
All of the Settings available in the eXplorist 350H can be accessed and changed. Press BACK to return to the map screen. Backtrack. When you are done hiking you can use the eXplorist 350H to return to the starting point of the trip. -
Page 28: Saving The Trip
Saving a Trip. When your TRACK ME trip is done you need to save the trip. This adds the trip to your MY TRIPS listing, providing access to this trip to resume or review the trip at a later date. There are two ways of saving the trip. -
Page 29: Deleting The Trip
Deleting the Trip While viewing the TRIP DETAILS screen, press the MENU button. Highlight DELETE TRIP and press ENTER. Confirm : Highlight DELETE and press ENTER to confirm the deletion. WARNING Deleting a trip also deletes any waypoints that were created during the trip. -
Page 30: My Trips
NOTES Planned Trips behave differently from trips created from TRACK ME. It is recommended that you assign a name to any planned trip so it can be easily distingished from a TRACK ME trip. Highlight the green arrow and press ENTER. The trip is saved and the HIKE menu displayed. -
Page 31: Viewing The Waypoint Details For The Trip
Viewing the Waypoint Details for the Trip While viewing the TRIP DETAILS screen, use the joystick to highlight the WP DETAILS icon (displayed in the center portion of the screen). Press ENTER. Details for the first waypoint in the trip is shown. Use the joystick left/right to step through the other waypoints in the trip. -
Page 32: Settings
Management Units) or WMU (Wildlife Management Units) that you are hunting in. The Magellan eXplorist 350H receiver can give you a visual indication of the GMU/WMU boundary displayed on the map as well as provide you with alerts when you are approaching or leaving a GMU/WMU area. -
Page 33: Turning On Specific Gmu/Wmu Area Boundaries
Use the joystick to highlight the state or province that the GMU/WMU is in. NOTES Not all states or provinces are available in the Magellan eXplorist 350H. 10. Use the joystick to highlight the boundary you want displayed and press ENTER. The status of the area will change from OFF to ON. -
Page 34: Power Settings
POWER Settings Extending the battery life of your device is important so you don’t have to carry extra batteries around and aren’t interrupted with changing batteries while you are out on your trek. Active Suspend Timer The device can be set to automatically go into sleep mode whenever a defined length of time passes without a keypress. -
Page 35: Time Settings
Highlight the desired unit of measure and press ENTER. Speed Units of Measure You can set the units of measure for speed displayed in the Magellan eXplorist 350H. You can select miles per hour (MPH) or kilometers per hour (KPH). -
Page 36: Setting Arrival Alert
Setting ARRIVAL Alert The ARRIVAL alert can be turned on or off. When on, the alert will beep when you have arrived at the trip destination or at the end of one of the legs in the trip. From the SETTINGS menu, highlight ALERTS and press ENTER. Highlight ARRIVAL and press ENTER. -
Page 37: Maps
MAPS The MAPS portion of settings is where you can turn overlay maps on or off, set various options as to how the map is displayed, as well as view the details of the maps that are loaded into your device. Selecting Maps Turn the preloaded Hunting Areas or GMU overlay maps on or off. -
Page 38: Displaying Shaded Relief
Highlight SHOW TRACKS and press ENTER. Select ON or OFF and press ENTER. Displaying Shaded Relief You can set the map to be displayed using shaded relief. From the SETTINGS menu, highlight MAPS and press ENTER. Highlight MAP OPTIONS and press ENTER. Highlight SHADED RELIEF and press ENTER. -
Page 39: Display Field Note Icons On Map
Highlight WAYPOINTS ON MAP and press ENTER. Select OFF, ICONS ONLY or ICONS & TEXT and press ENTER. Display Field Note Icons on Map From the SETTINGS menu, highlight MAPS and press ENTER. Highlight MAP OPTIONS and press ENTER. Highlight NOTES ON MAP and press ENTER. Select ON or OFF and press ENTER. -
Page 40: Volume & Brightness
MEMORY MEMORY is used to display the amount of memory being used in the Magellan eXplorist 350H. It also provides access to clearing all the user-input data on the device as well as a way to restore the device to factory defaults. -
Page 41: Language Selection
LANGUAGE SELECTION Set the Magellan eXplorist 350H receiver to use English, Spanish or French when displaying text. From the SETTINGS menu, highlight VOLUME & BRIGHTNESS and press ENTER. Highlight LANGUAGE SELECTION and press ENTER. Highlight the desired language (AMERICAN ENGLISH, FRENCH CANADIAN, or MEXICAN SPANISH) and press ENTER.
Need help?
Do you have a question about the eXplorist 350H and is the answer not in the manual?
Questions and answers