Table of Contents
Advertisement
Available languages
Available languages
Advertisement
Chapters
Table of Contents

Subscribe to Our Youtube Channel
Related Manuals for Ativa PD6250

Summary of Contents for Ativa PD6250
- Page 2 PREFACE Congratulations on purchasing ATIVA PD6250 portable audio & video Player. Before using this device, please read carefully all the instructions in this manual and keep it for future reference. FEATURES AND HIGHLIGHTS Internal memory: 2GB 1.5” Color display (128 x 128 pixel) Support MP3, WMA playback USB 2.0 High speed...
-
Page 3: Regulatory Information
REGULATORY INFORMATION: Declaration of Conformity Trade Name: ATIVA Model: PD6250 For customers in USA or Canada This device complies with part 15 of FCC rules. Operation is subject to the following two conditions: (1) This device may not cause harmful interference. -
Page 4: Disposal Of Your Old Product
DISPOSAL OF YOUR OLD PRODUCT Your product is designed and manufactured with high quality materials and components, which can be recycled and reused. When this crossed-out wheeled bin symbol is attached to a product, it means the product is covered by the European Directive 2002/96/EC. Please inform yourself about the local separate collection system for electrical and electronic products. - Page 5 Swinton Avenue Trading, Inc. Limited One Year Product Warranty This limited warranty covers the original purchase of new product used for normal commercial, personal or household use. Swinton Avenue Trading, Inc. (SAT) warrants its products will be free from defects in materials and workmanship (normal wear and tear excepted), for one (1) year from the date of purchase, except as provided below.
-
Page 6: Table Of Contents
CONTENTS Liability exemption statement---------------------------------------------------------------------------------------7 Overview of controls and connections-----------------------------------------------------------------------------8 Description of LCD Display-----------------------------------------------------------------------------------------9 Contents in the package--------------------------------------------------------------------------------------------10 Minimum PC system requirements-------------------------------------------------------------------------------10 Battery charging-----------------------------------------------------------------------------------------------------11 Connected to the computer-----------------------------------------------------------------------------------------12 File Transfer----------------------------------------------------------------------------------------------------------12 Disconnect the player from PC------------------------------------------------------------------------------------13 Format hard disk-----------------------------------------------------------------------------------------------------14 Basic operation------------------------------------------------------------------------------------------------------15 Power on/off-----------------------------------------------------------------------------------------------------15 Key lock----------------------------------------------------------------------------------------------------------15 Main menu-----------------------------------------------------------------------------------------------------------15 Navigate the menu---------------------------------------------------------------------------------------------------15... -
Page 7: Liability Exemption Statement
LIABILITY EXEMPTION STATEMENT All the information included in this manual was produced with our great caution, but there may still be some errors and mistakes. We will not be held responsible for those errors and mistakes. As we can’t control users’ understanding of this manual, we will not be held responsible for any accident or other loss caused by misunderstanding of this manual. -
Page 8: Overview Of Controls And Connections
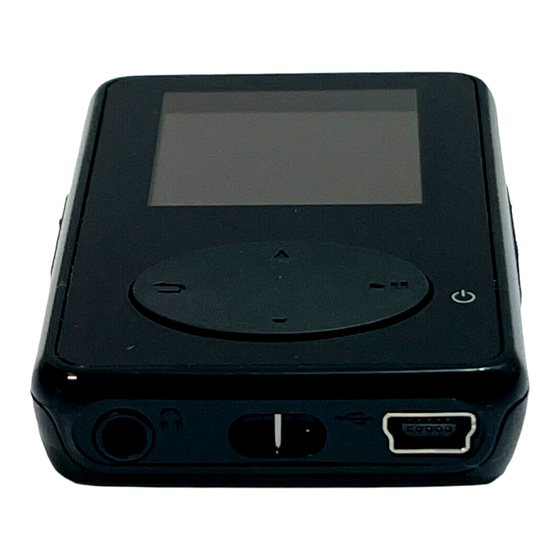
OVERVIEW OF CONTROLS AND CONNECTIONS Shows previous/last view/root display Hold slider to lock/unlock all keys 3 RESET Scroll up (hold to quick scroll) skips backwards/Fast backward (hold to quick scroll) Increases/decreases volume (hold to increase/decreases fast) Scroll down (hold to quick scroll) skips forwards/Fast forward (hold to quick scroll) 7 Earphones Jack USB connector On/Off/Play/Pause/Confirm selection... -
Page 9: Description Of Lcd Display
DESCRIPTION OF LCD DISPLAY 1 Hold icon 2 Song name 3 Artist name 4 Album name 5 playmode indicator 6 playback status 7 playback progress bar 8 Mode indicator 9 Current track no./Total track no. 10 Battery indicator 11 Equalizer mode indicator 12 Total play back time of current track 13 Elapsed playback time of current track... -
Page 10: Contents In The Package
CONTENTS IN THE PACKAGE Main unit Quick start guide Headphones USB cable Note: Recommended to keep all packing materials for future use to safely transport the device. MINIMUM PC SYSTEM REQUIREMENTS A computer with: Windows XP (SP2) or Vista Pentium III 800MHz processor or higher CD-ROM drive 128MB RAM 500MB Hard Disk space... -
Page 11: Battery Charging
BATTERY CHARGING Charge the battery with the supplied USB2.0 cable. When connecting the player to your PC via the USB cable your player will begin to charge automatically. It will take approximately 5 hours to fully charge the player. Screen display as follow: Note: 1. -
Page 12: Connected To The Computer
CONNECTED TO THE COMPUTER Connect PD6250 to PC Connect the smaller end of the USB cable to the USB 2.0 port on the device and bigger end to a free USB port on your computer as illustrated below: Windows will show "Found New Hardware" when the device is first attached. The device will be recognized as a new device under “My Computer”. -
Page 13: Disconnect The Player From Pc
Note: To transfer music CDs to the player use software such as Musicmatch Jukebox or Windows Media Player, rip (convert) the songs on your music CD into MP3/WMA files. Copy the files into the digital audio player via Windows Explorer. Free version of these programs can be downloaded from the internet. -
Page 14: Format Hard Disk
USB cable from the computer. Note: 1. You can also upload the files from PD6250 to your computer. 2. During uploading or downloading, the USB cable must remain connected to the computer. Unplug the USB cable from the computer after file transfer is completed. -
Page 15: Basic Operation
BASIC OPERATION Power on/off To turn on, press until “ ” icon appears on the screen. To turn off, press and hold until the player is off. Key Lock Slide the “Lock” key upward to lock keys and slide the “Lock” key downward to unlock. MAIN MENU NAVIGATE THE MENU Your player has an intuitive menu navigation system to guide you through various settings and... -
Page 16: Music Mode
Before playing a video clip in the player, converts the video clips into suitable formats using the Media converter. 1. Connect the PD6250 with PC and find the folder named: “AMVConverter” inside the unit. 2. Double click folder: “AMVConverter”, find “amvtransform.exe” file and double click it. -
Page 17: Play Videos
3. Click to select the video files you want to convert. 4. Click to select the destination of storing the converted video files. 5. Click to review the selected video file before conversion. 6. Click to stop reviewing the selected video file before conversion. 7. -
Page 18: Radio Mode
3. Double click the “RdiskUpdate.exe” file. 4. Click "Begin upgrading" to start upgrading the device. 5. Click "confirm" after the upgrading success. 6. Wait till "OK to disconnect!" displays on screen of PD6250. 7. Disconnect the PD6250 with PC and the Firmware will be upgraded... -
Page 19: Trouble Shooting
TROUBLE SHOOTING 1. How do I reset my player? Insert a small pin or other sharp object into the reset hole located at the left of the player. Hold until the player shuts down. 2. The video file cannot be played Make sure that the video file can be played in Windows Media Player. -
Page 20: Technical Specification
TECHNICAL SPECIFICATION Item Specification Size 44x13x67mm Net weight Display 1.5" 128x128 pixel color display Frequency range 80 Hz - 20K Hz Audio format supported MP3, WMA Video format supported Power Supply Lithium Battery 3.7V 290mAh 15 hours of audio playtime Battery life per full charge 4 hours of audio + video playtime Charging mode... - Page 21 PREFACIO Felicitaciones por la compra de su Reproductor portátil de audio & video ATIVA PD6250. Antes de usar este dispositivo, favor de leer con atención todas las indicaciones de este manual y de conservarlo para futura referencia. CARACTERÍSTICAS Y COMPONENTES DESTACADOS Memoria Interna: 2GB Pantalla a Color de 1.5”...
- Page 22 INFORMACIÓN REGLAMENTARIA: Declaración de conformidad Marca comercial:: ATIVA Modelo: PD6250 Para clientes en Estados Unidos o Canadá Este dispositivo cumple con las estipulaciones de la Sección 15 establecidas en las normas FCC. El funcionamiento se encuentra sujeto a las dos condiciones siguientes: (1) Este dispositivo no causará...
- Page 23 CÓMO DESECHAR EL PRODUCTO El producto se diseñó y fabricó con materiales y componentes de alta calidad que se pueden reciclar y reutilizar. El uso del símbolo de un contenedor con ruedas tachado en un producto indica que está sujeto a la directiva europea 2002/96/EC. Favor de consultar el sistema local de recolección de piezas separadas para productos eléctricos y electrónicos.
- Page 24 Swinton Avenue Trading, Inc. Garantía limitada de un año para el producto Esta garantía limitada cubre la compra original de un nuevo producto para su uso normal comercial, personal o doméstico. Swinton Avenue Trading, Inc. (SAT) garantiza que sus productos están libres de defectos en cuanto a materiales y fabricación (exceptuando el deterioro normal por su uso), por un período de (1) año a partir de la fecha de compra, excepto como se estipula a continuación.
- Page 25 CONTENIDOS Declaración de exención de responsabilidad ---------------------------------------------------------------------7 Generalidades de los controles y las conexiones-----------------------------------------------------------------8 Descripción de la pantalla LCD ------------------------------------------------------------------------------------9 Contenido del empacado -------------------------------------------------------------------------------------------10 Requisitos mínimos del sistema ----------------------------------------------------------------------------------10 Carga de la batería --------------------------------------------------------------------------------------------------11 Conexión al computador -------------------------------------------------------------------------------------------12 Transferencia de archivos--------------------------------------------------------------------------------------12-13 Desconexión del reproductor----------------------------------------------------------------------------------13-14 Formateo el disco duro --------------------------------------------------------------------------------------------14 Funcionamiento básico --------------------------------------------------------------------------------------------15...
-
Page 26: Declaración De Exención De Responsabilidad
DECLARACIÓN DE EXENCIÓN DE RESPONSABILIDAD Toda la información incluida en este manual fue creada con gran cuidado, pero es posible que existan fallos o errores. No nos haremos responsables de dichos fallos o errores. Puesto que nosotros no podemos controlar el entendimiento de este manual por parte de sus usuarios, nosotros tampoco nos haremos responsables de ningún accidente u otro suceso causado por una mala interpretación de este manual. -
Page 27: Generalidades De Los Controles Y Las Conexiones
GENERALIDADES DE LOS CONTROLES Y LAS CONEXIONES Muestra la pantalla previa/principal/vista por vez última Mantenga pulsado el botón para bloquear/desbloquear todos los botones 3 Botón de RESET Desplazamiento hacia arriba (mantener pulsado para un desplazamiento rápido), salto hacia atrás/Rebobinado rápido (mantener pulsado para desplazamiento rápido) Aumenta/reduce el volumen (mantener para aumento/reducción rápidos) Desplazamiento hacia abajo (mantener pulsado para un desplazamiento rápido), salto hacia adelante/Adelantado rápido (mantener pulsado para desplazamiento más rápido) -
Page 28: Descripción De La Pantalla Lcd
DESCRIPCIÓN DE LA PANTALLA LCD 1 Icono de bloqueo 2 Título de la canción 3 Nombre del artista 4 Título del álbum 5 Indicador del modo de reproducción 6 Estado de reproducción 7 Barra de progreso de reproducción 8 Indicador de modo 9 N.º... -
Page 29: Contenido Del Empacado
CONTENIDO DEL EMPACADO Unidad principal Guía rápida Auriculares Cable USB Nota: Conserve todo el material de empaquetado para su utilización en el futuro en el caso de que fuera necesario transportar o reparar el dispositivo. REQUISITOS MÍNIMOS DEL SISTEMA Un computador con: Windows XP (SP2) o Vista Un procesador Pentium III a 800MHz o superior Una unidad de CD-ROM... -
Page 30: Carga De La Batería
CARGA DE LA BATERÍA Cargue la batería con el cable USB2.0 suministrado. Al conectar el reproductor a su PC por medio del cable USB, su reproductor comenzará a cargarse de forma automática. El reproductor tardará aproximadamente 5 horas para cargarse completamente. Durante el proceso de carga de la batería aparece la siguiente pantalla: Nota: 1. -
Page 31: Conexión Al Computador
CONEXIÓN AL COMPUTADOR Conectar el reproductor PD6250 al computador Conectar el extremo pequeño del cable USB incluido al puerto USB 2.0 del dispositivo y el extremo grande a un puerto USB libre del computador como se indica a continuación: Windows mostrará el mensaje "Nuevo hardware encontrado" la primera vez que se conecte el dispositivo. -
Page 32: Desconexión Del Reproductor
Nota: Para transferir sus CDs de música al reproductor, sírvase de programas de software como Musicmatch Jukebox o Windows Media Player, convierta las canciones de su CD musical en archivos MP3/WMA. Copie los archivos en su reproductor digital de audio por medio de Windows Explorer. La versión gratuita de estos programas puede descargarse de internet. -
Page 33: Formateo El Disco Duro
USB del computador. Nota: 1. También se pueden pasar los archivos del reproductor PD6250 al computador. 2. Mientras se realice una carga o descarga de archivos, el cable USB suministrado debe permanecer conectado al computador. Desconecte el cable USB del computador cuando se haya completado la transferencia de archivos. -
Page 34: Funcionamiento Básico
FUNCIONAMIENTO BÁSICO Encendido / apagado Para encender la unidad, presione hasta que el icono de “ ” aparezca en pantalla. Para apagarla, presione y mantenga hasta que su reproductor se apague. Bloqueo Deslice el botón de “Bloqueo” hacia arriba para bloquear los botones y deslícelo hacia abajo para desbloquearlos. -
Page 35: Modo De Música
Antes de reproducir un video clip en el reproductor, convierta los video clips en formatos apropiados usando el convertidor Media. 1. Conecte el PD6250 a su PC y localice la carpeta llamada: “AMVConverter” dentro de la unidad. 2. Haga un doble clic sobre la carpeta: “AMVConverter”, localice el archivo “amvtransform.exe” y haga un clic sobre el mismo. - Page 36 3. Haga clic sobre para seleccionar los archivos de video que usted desee convertir. 4. Haga clic sobre para seleccionar el destino de almacenaje de los archivos de video convertidos. 5. Haga clic sobre para revisar el archivo de video seleccionado antes de cada conversión.
-
Page 37: Reproducir Videos
Reproducir Videos El reproductor ofrece las siguientes opciones de modo de video: MODO DE RADIO Conectar los auriculares Los auriculares suministrados sirven de antena de radio. Asegúrese de conectar los auriculares de forma apropiada para una recepción óptima. Bajo el Menú principal, 1. -
Page 38: Actualización Del Firmware
4. Haga clic sobre "Comenzar a actualizar" para iniciar la actualización del dispositivo. 5. Haga clic sobre "confirmar" tras la actualización exitosa. 6. Espere hasta que la frase "OK para desconectar!" se muestre en la pantalla del PD6250. 7. Desconecte el PD6250 de su PC y el Firmware quedará actualizado RESOLUCIÓN DE PROBLEMAS... -
Page 39: Especificaciones Técnicas
Compruebe el volumen del dispositivo. Asegúrese de que los auriculares estén bien conectados. 8. Los caracteres parecen corruptos. Asegúrese de seleccionar el idioma correcto. Descargue algunas canciones y realice el proceso de creación automática de la biblioteca de música. 9. No se pudo reproducir el archivo de música. Puede que el archivo no sea compatible con el reproductor.
Need help?
Do you have a question about the PD6250 and is the answer not in the manual?
Questions and answers