Table of Contents
Advertisement
Advertisement
Table of Contents

Summary of Contents for Schwinn Force Home Gym
- Page 1 Assembly Instructions...
- Page 2 Get To Know Your Machine Assembly Guide How to Use Your Machine Strength Training Equipment Safety Warnings Schwinn® Force™ Home Gym Warranty Card Schwinn® Force™ Home Gym Warranty CAUTION! Before beginning any exercise program, consult your physician or health care professional. Only he or she can determine the exercise program that is appropriate for your particular age and condition.
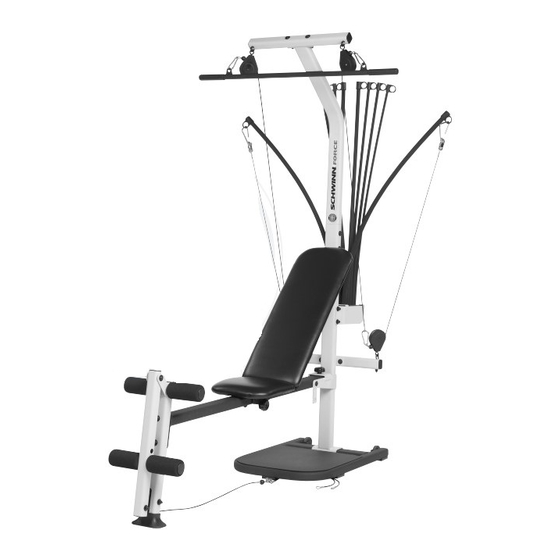
- Page 3 THE SCHWINN Force Home Gym ® Upper Lat Rod Caps Tower Resistance Rod Pack Rod Hook Rod Box Frame Cable Seat/Bench Assembly Rail Base Assembly...
- Page 4 Get To Know Your Machine SCHWINN Force Home Gym ® Parts Reference Guide...
- Page 5 You can also lift gently and look between the pieces to help guide the bolt through the holes. 4. As a general rule, and for all bolts and nuts on your Schwinn® Force™ home gym, turn bolts or nuts toward the right to tighten and left to loosen.
- Page 6 Assembly Guide Before You Assemble Select where you are going to put your Schwinn® Force™ home gym carefully. The best place for the Schwinn® Force™ home gym is on a hard, level surface. Additionally, hardware should only be securely tightened where indicated in the Assembly Instructions. Unless otherwise instructed, keep all nuts, bolts and screws loose until the final tightening instructions in Step 13.
- Page 7 Assembly Guide Step 1: Attach Lower Lat Tower to the Base Assembly Locate the following items: • Item #1 - Base Assembly • Item #2 - Lower Lat Tower • Item #D - (2) 3/8" X 3/4" Button Head Screws •...
- Page 8 Assembly Guide Step 3: Attach the Rail Assembly to the Lat Tower Locate the following items: • From Step 1 - Lower Lat Tower and Base Frame Assembly • From Step 2 - Rail Assembly • Item #5 - Rail Knob •...
- Page 9 Assembly Guide Step 5: Attach Lat Cross Bar to the Upper Lat Tower Figure 5 Locate the following items: • Item #7 - Lat Cross Bar with Pulleys • Item #8 - Upper Lat Tower • Item #F - (2) 3/8" X 2 3/4" Button Head Screws •...
- Page 10 Assembly Guide Step 7: Attach Resistance Rods to the Rod Bracket Figure 7 Locate the following items: • Item #9 - Resistance Rod Pack • Item #10 - Rod Bottom Plate • Item #B - (3) #10 X 1" Self Threading Screws •...
- Page 11 Assembly Guide Step 9: Attach Rod Pack Bottom Plate to Rod Pack Frame Figure 9 Locate the following items: • From Step 7 - Rod Pack Bottom Plate with Resistance Rods • From Step 8 - Main Assembly • Item #C - (4) 5/16" 3/4" Button Head Screws (from Step 7) •...
- Page 12 • Item #19 - Foam Roller End Caps There are two sets of holes for the lower (short) chrome roller tube. In order to receive the most benefit from Schwinn Force home gym Leg Exercises, you will need to assess which holes in the Leg Attachment fit your height.
- Page 13 Figure 13c. WARNING: Carefully go over the entire Schwinn® Force™ home gym assembly, tightening all screws, nuts and other hardware securely before using your Schwinn Force home gym. ® CONGRATULATIONS! You have completed assembly of your Schwinn...
- Page 14 How to Use Your Machine Using the Resistance Rods Storage of the Schwinn® Force™ Home The Schwinn® Force™ home gym uses Resistance Rods that are made from a special composite Disconnect the material. Your rods are sheathed with a protective cables from the black rubber coating.
- Page 15 5. Replace the Seat Rail Knob Slip your hand through the cuff so that the foam pad rests on Once it’s folded, it’s simple to tilt the Schwinn® the back of your hand. Grasp Force™ home gym back on its transport wheels the remainder of the grip that and roll to any location.
- Page 16 Maximum user weight for the Schwinn® Force™ home gym is 300 lbs. For your safety, do not use or allow others to use the Schwinn® Force™ home gym if you or they weigh in excess of 300 lbs.
- Page 17 © 2004, Schwinn Fitness 1400 NE 136th Ave. Vancouver, WA 98684. Schwinn and the Schwinn logos are registered trademarks of Schwinn Fitness. 17238 Rev AA (03/04)
- Page 18 What Is Covered What We Will Do Nautilus Health and Fitness Group warrants to the original purchaser of the Schwinn ® During your Warranty Coverage Period, Nautilus Health and Fitness Group will Force home gym that the Schwinn ® Force...
- Page 19 During your Warranty Coverage Period, Nautilus Health and Fitness Group will repair any Schwinn® Force home gym that proves to be defective in materials or workmanship. In the event repair is not possible, Schwinn Fitness will either replace your Schwinn® Force home gym or refund your purchase price, less shipping and handling.
- Page 20 1-800-655-8443 for assistance. © 2004, Schwinn Fitness 1400 NE 136th Ave. Vancouver, WA 98684. Schwinn and the Schwinn logos are registered trademarks of Schwinn Fitness. 17238 Rev AA (03/04) Nautilus Inc., All Rights Reserved. Schwinn Force is a Trademark of Nautilus Inc. Schwinn and the Schwinn Quality Seal are Registered Trademarks.
Need help?
Do you have a question about the Force Home Gym and is the answer not in the manual?
Questions and answers