Table of Contents
Advertisement
Quick Links
Advertisement
Table of Contents

Summary of Contents for Kramer AVDS
- Page 1 USER MANUAL MODEL: AVDS CAT 5 Audio/Video Display System P/N: 2900-300281 Rev 2...
-
Page 2: Table Of Contents
Connecting the CAT 5 Cables Connecting the Remote Long Unit Connecting the Screens Connecting the Power Supply Expanding the AVDS System The AVDS Configuration for a CBT Application AVDS Detailed Connections Operating the AVDS System The Control Unit Technical Specifications... -
Page 3: Introduction
Scan Converters and Scalers; GROUP 8: Cables and Connectors; GROUP 9: Room Connectivity; GROUP 10: Accessories and Rack Adapters and GROUP 11: Sierra Products. Congratulations on purchasing your Kramer AVDS CAT 5 Audio/Video Display System, which is ideal for the following typical applications: •... -
Page 4: Getting Started
Place cables away from fluorescent lights, air conditioners, and machines that are likely to generate electrical noise. Note! In the AVDS system the CAT 5 cables carry electrical power. Therefore do NOT connect them to any other device. To avoid this we recommend you attach the stickers provided to the ends of each CAT 5 cable. -
Page 5: Safety Instructions
Kramer Electronics has made arrangements with the European Advanced Recycling Network (EARN) and will cover any costs of treatment, recycling and recovery of waste Kramer Electronics branded equipment on arrival at the EARN facility. For details of Kramer’s recycling arrangements in your particular country go to our recycling pages at http://www.kramerelectronics.com... -
Page 6: Overview
Damage will occur. The Multi-Functional AVDS System You can use the AVDS system in the following ways: Without the Control Unit The AVDS system constantly broadcasts a computer screen with audio to all remote monitors/speakers. With the Control Unit •... -
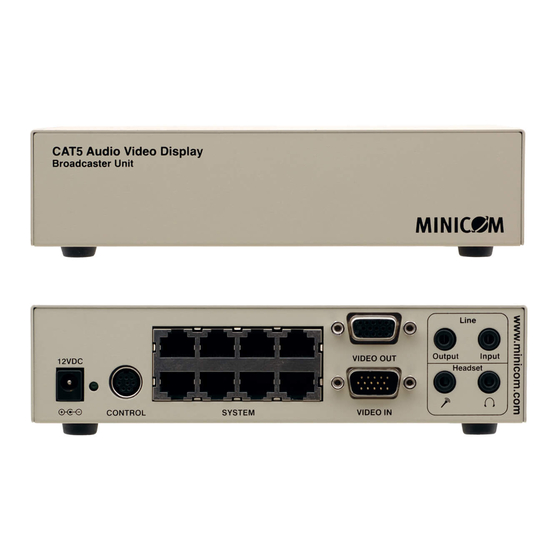
Page 7: Figure 1 Broadcaster Unit
Headset CONTROL SYSTEM VIDEO IN Video Microphone & Control Unit cable speaker Figure 1 Broadcaster Unit Power connector System cables SYSTEM OUT 12VDC SYSTEM IN System cable from Broadcaster or previous Line Splitter Figure 2 Line Splitter AVDS - Overview... -
Page 8: Remote And Power Remote Units
The Power Remote units: • Need a separate power supply (provided) • Can be connected with shielded CAT 5 FTP or CAT 5 UTP cables • Produce high-quality audio signals Figure 3 System Diagram AVDS - Overview... -
Page 9: Remote Long Units
Remote Long Units AVDS RL transmits full HD video and mono audio to a plasma/LCD screen located up to 250m (825ft) away over CAT 5/6/7 cable. The AVDS RL displays rich multimedia content to a single screen in real-time, over a long distance (with skew correction capability), without degradation to video or sound quality. -
Page 10: Figure 6 Power Remote Unit
Figure 7 Remote Long – Side 1 Figure 8 Remote Long – Side 2 The Remote Long system port LEDS indicate the following: System Port Indication when lit The Remote Long detects a video signal from the Broadcaster/Transmitter Power AVDS - Overview... -
Page 11: Connecting The Avds Cables
Audio cables are available for order. Connecting the CAT 5 Cables AVDS works with CAT 5/5e/6/7 data solid wire cabling. Note! Connect the CAT 5 cables to the Broadcaster and Line Splitter units when the units are powered off. We recommend that you connect the CAT 5 cables BEFORE connecting the power supply. -
Page 12: Connecting The Power Supply
Broadcaster or Line Splitter Remote Long • Connect the Remote Long to the power supply with the 5V DC Power adapter provided Once connected, the system is ready to transmit the video and audio signals. AVDS - Connecting the AVDS Cables... -
Page 13: Expanding The Avds System
Expanding the AVDS System You can expand the AVDS system to 512 Remote units by having up to two levels of Line Splitters. Each Line Splitter on level 1 can have eight Remote units or Line Splitters connected to it. Each Line Splitter on level 2 can connect to eight Remote units. -
Page 14: Figure 10 Expanded Avds
Figure 10 Expanded AVDS AVDS - Expanding the AVDS System... -
Page 15: The Avds Configuration For A Cbt Application
The AVDS Configuration for a CBT Application Figure 11 illustrates the AVDS configuration for computer based training with the Control unit and the optional remote computers. VDS Control Unit Broadcaster Unit Audio cables CAT5 cables to Remotes or Line Video cable... -
Page 16: Avds Detailed Connections
AVDS Detailed Connections Figure 12 illustrates the detailed connections of the AVDS units. Figure 12 AVDS Detailed Connection AVDS - Expanding the AVDS System... -
Page 17: Operating The Avds System
Operating the AVDS System Once connected the AVDS system broadcasts to all remote monitors/speakers. The Control Unit Figure 13 illustrates the Control unit. VDS Control Unit To Broadcaster Unit’s Control port Master Dark to all MINICOM Figure 13 Control Unit... - Page 18 The unit automatically exits the tuning mode either at the end of the color cycle - after pressing and saving the orange color adjustment - or (as already mentioned) at any point in the process after not touching the knob for approximately 13 seconds. The LED turns off. AVDS - Operating the AVDS System...
-
Page 19: Technical Specifications
1.3”) 1.26” x 5.6”) WEIGHT: ACCESSORIES: Power supply Power supply Power supply Power supply 12V DC, 2A 12V DC, 2A 6V DC, 5V DC, 2.5A 800mA Specifications are subject to change without notice at http://www.kramerelectronics.com AVDS - Technical Specifications... - Page 20 AVDS - Technical Specifications...
- Page 21 For the latest information on our products and a list of Kramer distributors, visit our Web site where updates to this user manual may be found. We welcome your questions, comments, and feedback. Web site: www.kramerelectronics.com E-mail: info@kramerel.com SAFETY WARNING...
Need help?
Do you have a question about the AVDS and is the answer not in the manual?
Questions and answers