Garmin GPS 12 MAP Owner's Manual
Marine gps navigator
Hide thumbs
Also See for GPS 12 MAP:
- Owner's manual & reference (66 pages) ,
- Specifications (2 pages) ,
- Quick manual (2 pages)
Table of Contents
Advertisement
Advertisement
Table of Contents

Related Manuals for Garmin GPS 12 MAP


Summary of Contents for Garmin GPS 12 MAP
- Page 1 GPS 12 MAP owner’s manual reference guide...
- Page 2 GARMIN. GARMIN Corporation hereby grants permission to download a single copy of this manual and of any revision to this manual onto a hard drive or other electronic storage medium to be viewed...
-
Page 3: Thank You
GPS 12 MAP. Section Two (Simulator Tour) provides a step-by-step lesson in how your new GPS 12 MAP would operate in the real world by uti- lizing the built-in simulator mode. - Page 4 Do not mount the GPS 12 MAP over airbag panels or in the field of airbag deployment. Airbags expand with a rapid force that can propel objects in their path towards the vehicle driver or passengers causing possible injury.
-
Page 5: Fcc Compliance
The GPS 12 MAP does not contain any user-serviceable parts. Repairs should only be made by an authorized GARMIN service center. Unautho- rized repairs or modifications could void your warranty and authority to operate this device under Part 15 regulations. -
Page 6: Limited Warranty
GARMIN Corporation warrants this product to be free from defects in materials and workmanship for one year from the date of purchase. GARMIN will, at its sole option, repair or replace any components which fail in normal use. Such repairs or replacement will be made at no charge to the customer for parts or labor. -
Page 7: Table Of Contents
FCC Compliance ... iii Limited Warranty ... iv “How To” Index ... vi Glossary of Terminology ... vii GPS 12 Map Unit Features..viii GETTING STARTED Battery Installation ... 1 Keypad Usage & Data Entry..2 What is GPS? ... 3 Initialization ... - Page 8 “How To” Index TO DO THIS: Install batteries...1 Turn the unit on or off...4, 15 Learn how to operate the unit’s function keys...vii, 2 Initialize the receiver (first time use)...4 Learn about the six main GPS pages...6 Enter data using the rocker keypad...44 Use menus...2, 7, 35 Access the Main Menu...11, 65, 70 Adjust screen contrast or backlighting...28...
- Page 9 The GPS 12 MAP is a powerful navigation tool that can guide you anywhere in the world. To better understand its operation and capabilities, it may be helpful to review the basic terms and concepts briefly explained below. Other navigation and GPS definitions used in this manual are defined in the appropriate refer- ence sections of this manual.
-
Page 10: Gps 12 Map Unit Features
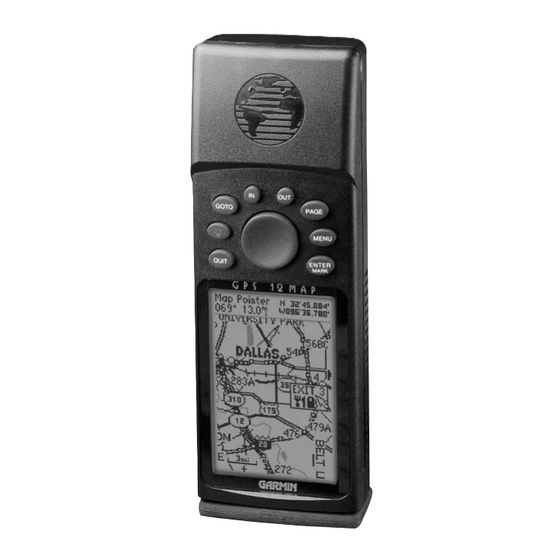
GPS 12 MAP Unit GOTO POWER QUIT Display Battery Compartment v iii Internal GPS Antenna PAGE MENU ENTER/ MARK Key ROCKER... -
Page 11: Battery Installation
Battery Installation The GPS 12 MAP operates on 4 AA batteries, which are installed a the base of the unit. These batteries provide up to 36 hours of use in “Power Saver” mode. To install the batteries: 1. Remove the battery cover by turning the D-ring at the bottom of the unit 1/4 turn counter-clockwise. -
Page 12: Keypad Usage & Data Entry
Keypad Usage Power/Backlighting Page Key Menu Key GOTO Key Enter/Mark Key Quit Key IN/OUT Keys Rocker Key The POWER Key turns the unit on and off, activates screen backlighting and contrast adjustment. The PAGE Key scrolls through the main data pages in sequence and returns from a submenu page to a primary page. -
Page 13: What Is Gps
• If the receiver’s memory has been cleared and all internally stored data has been lost. Because the GPS 12 MAP relies on satellite signals to provide you with navigation guidance, the GPS receiver’s view of the sky will generally determine how fast you get a position fix—or if you get a fix at... -
Page 14: Initialization
(Likewise, when you use your GPS 12 MAP in a vehicle, make sure the antenna is pointing up.) To turn the GPS 12 MAP on, press and hold the red power key. The Welcome Page will be displayed while the unit conducts a self test. -
Page 15: Troubleshooting
Also, if you’re using the GPS 12 MAP on a car dash, make sure the unit is placed so that it has the clearest possible view of the sky. -
Page 16: Main
‘Poor Coverage’ receiver status and message. The GPS 12 MAP features six main pages which are linked together in a chain. You can quickly scroll through the pages in either direction using the PAGE or QUIT keys. Let’s... -
Page 17: Position Page
The Position Page shows you where you are, what direction you’re heading, and how fast you’re going—and it’s the page you’ll want to use when you don’t have a destination selected. A graphic compass display at the top of the page shows your direction of travel (track) while you’re moving, while six user-selectable data fields below display your current speed,... -
Page 18: Map Page
Map Page With the map oriented to ‘track up’, the pointer always points up and the map rotates to your cur- rent direction of travel (track). Note the north indicator on the map. You can also select a full- screen map from the Map Page Options. -
Page 19: Compass Page
The GPS 12 MAP features two different navigation pages: Compass and Highway. The Compass Page is first. This page provides graphic steering guidance to a destination waypoint, with an emphasis on the bearing to your destination and current direction of travel. -
Page 20: Highway Page
You have arrived when the waypoint is at the bot- tom center of the display. The GPS 12 MAP’s Highway Page also provides graphic steering guidance to a destina- tion waypoint. As you head toward your destination, the middle of the screen provides visual guidance to your waypoint on a moving graphic “highway.”... -
Page 21: Main Menu
The GPS 12 MAP’s Main Menu provides access to additional pages (submenus) that are used to create or edit waypoints, create routes, list nearby waypoints, review trip information and timers or make changes to system settings. These six pages are divided into categories by function. -
Page 22: Marking Waypoint Positions
GPS is really about marking and going to places called ‘waypoints’. Before we can use the GPS 12 MAP to guide us somewhere, we have to mark a position as a waypoint. Your GPS 12 MAP can hold up to 500 waypoints. -
Page 23: Going To A Waypoint
Once you’ve stored a waypoint in memory, you can use the GPS 12 MAP to guide you to it by using the GOTO feature. A GOTO is really nothing more than a straight-line course from your present position to the destination you’ve selected. -
Page 24: Cancel Goto/ Active Route
Cancel GOTO/ Active Route To cancel the current GOTO destination, select ‘Cancel GOTO’ from the GOTO Options Page. Use the LEFT/RIGHT keys on the rocker key- pad to select the desired data item. Available items include course, dis- tance, fuel, and sunrise/ sunset times. -
Page 25: Reference
Once you’re familiar with the primary functions of the GPS 12 MAP, you’ll be ready to use your new receiver on a real trip to a destination of your choice. The Reference... - Page 26 2. Press QUIT to sequence through the main pages in reverse order. In normal mode operation, the GPS 12 MAP would automatically sequence from Satellite Status Page to Map Page once enough satellites were received to determine your position. At that point the receiver is ready to use for navigation.
-
Page 27: Using The Map Page
The GPS 12 MAP’s Map Page combines digital charting with a number of user-selectable features. Before we select our destination and begin navigating toward it, let’s take a look at some of those features. Background Roads & Railways Nearby Waypoints... -
Page 28: Creating A Waypoint
Creating a Waypoint Use the rocker keypad to pan to other areas on the map display. When pan- ning, an arrow appears as a reference along with a data field above the map. Place the panning arrow over an on-screen item to display a descriptive name. -
Page 29: To Select The Goto Destination
ENTER. Now that we’ve created our new waypoint, let’s see how the GPS 12 MAP is used to navigate to it. The reference arrow can also be used to GOTO any point on the map—even without a waypoint already at that location—by... -
Page 30: Marking Present Position
Let’s call our present position ‘HOME’. (If you were at home when you initialized your GPS 12 MAP, you might want to keep this waypoint in memory for future use!) To rename the waypoint and change its symbol: 1. - Page 31 Compass and Highway pages, with the Com- pass Page appearing first in the sequence of main pages. To view the Compass Page, press PAGE. The GPS 12 MAP’s Compass Page provides graphic steering guidance to a destination waypoint. The middle of the page features a rotating ‘compass ring’...
- Page 32 That’s it! You’ve covered the basics and you’re ready to venture off on your own. Operating the GPS 12 MAP is just as simple as you’ve seen here in the Simulator Tour, but in real applications you won’t need to change speed and track with the rocker keypad.
-
Page 33: Satellite Status Page
(solid bar status). Once a fix has been calcu- lated, the GPS 12 MAP will then update your position, track, and speed by selecting and using the best satellites in view. You can also access the GPS 12 MAP’s backlight and contrast... - Page 34 The satellite number in the sky view will appear highlighted. As soon as the GPS 12 MAP has collected the necessary data to calculate a fix, the status field will indicate a 2D or 3D status.
-
Page 35: Battery Level Indicator
To display battery level accurately select the appropriate type, as described on page 73. The GPS 12 MAP features an internal 10-year lithium battery that will maintain the unit’s memory when the receiver is not running off batteries or external power. - Page 36 Satellite Status Page Options Many features of the GPS 12 MAP are menu driven. Each of the main pages has an options menu, allowing you to custom tailor the corresponding page to your preferences and/or select special features which specifically relate to that page.
-
Page 37: Sat Status
This option is useful if you’ve relocated a long distance (>500 miles) from the last location the GPS 12 MAP was used. To select AutoLocate, highlight ‘AutoLocate’ and press ENTER. -
Page 38: Contrast And Backlighting
Press POWER to return to the last-used setting. Position Page The second page in the GPS 12 MAP’s main page sequence is the Position Page. This page shows you where you are, what direction you’re heading, and how fast you’re going, and it’s... -
Page 39: Position
Main Menu, as described on page 70. Many features of the GPS 12 MAP are menu driven. Each of the main pages has an options menu, allowing you to custom tailor the... -
Page 40: Map Page
To restore the factory default settings, highlight ‘Restore Defaults’ and press ENTER. The GPS 12 MAP features a powerful real-time moving map that can do much more than just plot your course and route. The Map Page also displays background detail, including geographic names, lakes, rivers, coastlines and highways. - Page 41 Zooming and Panning There are three main functions you can perform from the Map Page: zooming, panning, and pointing. The map has 24 map scales (from 120 feet to 500 miles, or 30 meters to 800 km) which are selected by pressing the IN and OUT zoom keys.
-
Page 42: Panning Arrow
Page By placing the panning arrow over an on-screen waypoint and pressing GOTO, you don’t need to manually select your destination from the GOTO page. For a selected highway exit, the Exit Info Page displays the number of available services and icons depicting the type of available services To select an on-screen waypoint with the... -
Page 43: Map Page: Exits
If you continue to press QUIT, you will return to the Map Page. Many features of the GPS 12 MAP are menu driven. Options menus are available from the exit services pages, allowing you to select special features which specifically relate to that page. - Page 44 Map Page: Exits Options window for the Exit Info Page ‘Save As Waypoint’ allows you to create a waypoint at a highway exit location Options window for the Services Near Exit List ‘Services Setup’ allows you to designate which service types you’d like to have displayed on the exit service pages.
-
Page 45: Map
Many GPS 12 MAP features are menu driven. Each of the main pages has an options menu, allowing you to custom tailor the correspond- ing page to your preferences and/or select special features which specifically relate to that page. To display the Map Page Options, press MENU (with the Map Page displayed). - Page 46 Map page Options The MapSource Info page lists detailed maps that have been down- loaded from the optional MapSource software package. When using the ‘Mea- sure Dist’ option, the ar- row includes an ‘Enter Reference’ prompt and the arrow position ap- pears at the top of the map display.
- Page 47 Map Setup — allows you to configure the map display to your preferences, including map detail, map orientation, automatic zoom, lat/lon grid, track and route lines, exits and waypoint names. The map setup option uses a ‘file tab’ feature, making it easier to organize the various settings and easier for you to use.
- Page 48 Map Page Options Select the ‘North Up’ op- tion to keep the top of the map display fixed on North. ‘TrackUp’ will cause the map to rotate so the top of the map is the direction you’re heading. The ‘Zoom’ setting lets you set the maximum scale at which the feature will appear.
-
Page 49: Compass Page
Whenever a destination waypoint(s) has been selected, the GPS 12 MAP’s Compass Page will guide you to your destination with digital readouts and a graphic compass display, which includes a bearing pointer. Use this page (instead of the Highway Page) when travelling... -
Page 50: Compass
Compass Page Options ‘Big Numbers’ provides a smaller compass dis- play, a large bearing pointer, and two user- selectable, large charac- ter data fields. The ‘Change Fields’ option allows you to select from a list of available data types. Four different items may be displayed on the Compass Page;... -
Page 51: Highway Page
The GPS 12 MAP’s Highway Page also provides graphic steering guidance to your destination, by using a graphic highway display. At the top of the page are four user-selectable data fields that display current speed, distance and time to next waypoint, and a bearing pointer (defaults). - Page 52 Highway Page Options The ‘Sign Posts Off op- tion allows you to re- move the waypoint markers from the high- way display. The ‘Change Fields’ op- tion allows you to choose the type of data to dis- play on four user-select- able data fields.
-
Page 53: Marking Present Position
The GPS 12 MAP stores up to 500 waypoints, with a selectable symbol and comment available for each waypoint. Waypoints can be created using five methods: Mark Present Position— your present position can be captured and saved as a waypoint using the ENTER/MARK key. - Page 54 Creating Waypoints Waypoints can be cre- ated directly from the Map Page, by placing the panning arrow on the desired position and pressing ENTER. User waypoints can also be created by entering the position coordinates for the waypoint. Marking Waypoints on the Map Page Waypoints can also be quickly created from the Map Page, which allows you to “point and shoot”...
-
Page 55: Waypoint List Options
4. Highlight ‘New Waypoint’ and press ENTER. The New Waypoint Page appears. 5. To enter a name for the new waypoint, highlight the waypoint name field and press ENTER. Use the rocker keypad to enter the waypoint name and press ENTER when finished. 6. -
Page 56: Editing Waypoints
To delete a waypoint (or waypoints): 1. Select the desired delete option from the list above and press ENTER. The GPS 12 MAP will delete all waypoints not used in a route, then prompt you to continue before deleting any route waypoints. - Page 57 From the Waypoint Edit Page, highlight the appropriate field to rename a waypoint, change its symbol, edit the comment or edit the position. To rename the waypoint: 1. Highlight the waypoint name field and press ENTER. 2. Use the rocker keypad to enter the new waypoint name and press ENTER.
-
Page 58: Waypoint Edit Options
Waypoint Edit Options ‘Show Map’ allows you to view the area around the waypoint’s position. ‘Display Options’ lets you determine what waypoint information will appear on the map display. The Waypoint Edit Page also features an options page that allows you to delete the waypoint, view the map area around the waypoint position, define how the waypoint will appear on the map display or average the... -
Page 59: Nearest Locations
Another waypoint feature of the GPS 12 MAP is the nearest locations pages, which show up to nine nearest waypoints and 50 nearest cities— within 200 miles of your present position— along with 50 exits on the nearest (interstate) highway. The nearest locations pages are organized by a series of ‘file tabs’... -
Page 60: Nearest Location Options
Nearest Location Options The Nearest Location Option allows you to de- fine the category of exits that will appear on the Nearest Exits List. Start by highlighting the ‘Exits’ tab, then press MENU. Select the exit categories you wish to appear on the Nearest Exits List. -
Page 61: Navigation/Goto
The GPS 12 MAP can navigate to a destina- tion using any of four different methods: GOTO— lets you select a waypoint as your destination and quickly plot a direct course from present position to that waypoint. MOB (man overboard)— captures your... -
Page 62: Goto Options
GOTO / GOTO Options highlighting waypoint name on the a list pressing, GOTO, you won’t have to manually enter the name of your destina- tion waypoint. A GOTO can also be ini- tiated from the map dis- play by placing the pan- ning arrow on the de- sired waypoint. -
Page 63: Goto Options/Mob
‘Cancel GOTO’ and press ENTER. MOB (man overboard) The GPS 12 MAP’s MOB function lets you simultaneously mark and set a course to a position for quick response in an emergency. Once an MOB has been activated, an MOB... -
Page 64: Tracback
A track log is an electronic breadcrumb trail, showing the path you have travelled. Your GPS 12 MAP can be set to automatically record track log points any time the receiver is on and locked onto satellites (see page 70). -
Page 65: Tracback Tips
Once a TracBack has been activated, the GPS 12 MAP will take the track log currently stored in memory and divide it into route segments, called ‘legs’. Up to 30 track log waypoints (labeled ‘T###’, e.g. ‘T001’) will be created to mark the most significant features of the track log in order to duplicate your path as closely as possible. -
Page 66: Routes
The GPS 12 MAP will store up to 20 reversible routes, with up to 30 waypoints in each route. Routes can be created and modified by text... -
Page 67: Creating New Routes
3. Press MENU to display the Route Options. 4. Highlight ‘New Route ’ and press ENTER. The GPS 12 MAP creates a route called ‘EMPTY- 1’. (The name changes as you add waypoints to the route, so make note of the route name for future reference.) -
Page 68: Route List
GPS 12 MAP you want to use this route for guidance. The GPS 12 MAP’s Route List displays all the routes currently stored in memory, along with a descriptive name for each route. Once a route has been created, it can be activated and used for navigation from the Route List. -
Page 69: Route List Editing
Route Editing Once a route is added to memory you can review and/or edit the route from the Route Plan Page. The Route Plan Page shows the sequence of waypoints for the selected route and provides additional options to depict the route layout on the map display, insert waypoints, remove waypoints or perform trip/ fuel planning functions. -
Page 70: Route Editing/Planning
Press QUIT to return to the Route Plan Page. NOTE: Fuel flow rates on your GPS 12 MAP are measured in “units per hour”. System setting changes for units of measure (statute, nautical or metric) do not affect the fuel flow measure. -
Page 71: Route Options
The following options are available: New Route— allows you to create a new route, as described on page 56. Activate — allows you to navigate the route in the same sequence it was originally created, as described on page 58. Copy—... -
Page 72: Active Route Page
Route Options / Active Route The Active Route Page shows the route currently being used for navigation guidance. The next waypoint in the route is denoted by an arrow on the left-hand side of the display Selecting a GOTO desti- nation along the current route will take you di- rectly to that waypoint,... -
Page 73: Active Route
Many features of the GPS 12 MAP are menu driven. Each of the main pages has an options menu, allowing you to custom tailor the corresponding page to your preferences and/or select special features which specifically relate to that page. - Page 74 Active Route Page Options ‘Re-evaluate’ will reac- tivate the current route and select the closest leg. This feature is handy if you stray well off course and later wish to return to the route. To reverse the sequence of waypoints in the ac- tive route, select the ‘In- vert’...
-
Page 75: Main Menu
DOWN to change the highlighted character, and RIGHT to move to the next character. As you spell the name of the desired city, the GPS 12 MAP will display the first entry in the built-in database which corresponds to the characters you have entered. - Page 76 Main Menu: City Options The City Spell ‘n Find Page lets you retrieve in- formation for any city in the built-in database. The ‘Show Map’ Option allows you to view the area around the city lo- cation. Use the IN and OUT zoom keys to view the desired detail.
- Page 77 than 200,000. Medium cities are greater than 50,000 and small cities are greater than 5,000. Small towns include those with approximate populations under 5,000 or towns of unknown size. NOTE: When the ‘Reference’ field is left blank or the size information field is displayed, the ‘Bearing’ and ‘Distance’...
-
Page 78: Track Log Settings
Main Menu: Track Logs The Track Logs Page shows available memory for the active log (the log currently being re- corded) and lists any saved track logs. From the Track Logs Page, press MENU to view the Track Log Options. Track Log—... -
Page 79: Track Logs
To rename a saved log: 1. Highlight the saved log you wish to rename and press ENTER. An information box appears, showing the name of the saved log, the number of points in the track log and the total distance covered. -
Page 80: Main Menu/Setup Menu
Main Menu/ Setup Menu ‘Trip Computer’ provides readouts for the trip odometer, trip timer, av- erage speed and maxi- mum speed. Options are provided to reset these figures. Setup Logging - provides a setup screen to define how track log data will be recorded. The Setup Logging Page provides options for ‘Record Mode’, ‘Interval’... - Page 81 To reset a trip computer readout(s): 1. Press MENU (with the Trip Computer Page displayed). An options list is displayed. 2. To reset all trip computer readouts, highlight ‘Reset All’ and press ENTER. 3. To reset a single readout item, highlight the desired option and press ENTER.
-
Page 82: Simulator
Course Alarm Position—Position Format (latitude/ longitude, UTM/UPS, Maidenhead, regional grids); Map Datum selection Interface—Format (NMEA, RTCM, GARMIN proprietary); Mode setting for use with PC or a second unit The following pages describe, in more detail, the available settings for each Setup file tab item. -
Page 83: System Settings
Power Saver is suitable for most applica- tions and offers position updates which adapt to your needs while extending battery life. The GPS 12 MAP will operate up to 36 hours when using Power Saver mode. To select power saver mode: 1. -
Page 84: Units
WARNING: If ‘User Mag Var’ is selected, you must periodically update the magnetic variation as your position changes. Using this setting, the GPS 12 MAP will not automati- cally calculate and update the magnetic variation at your present position. Failure to... -
Page 85: Timers
ENTER and select ‘Reset’ or ‘Off’ (as appropriate). Press ENTER to confirm. Battery Timer provides a running count of how long the GPS 12 MAP has been in operation with the current batteries. The timer automatically stops when using an external power source. -
Page 86: Time
Setup Menu: Time Enter an offset amount to adjust the time dis- play to your local area. In the United States, all offset amounts will be ‘Behind UTC’. If you’re unsure of the exact offset, select a ‘Lo- cal’ time format, then enter offset values until you arrive at the correct local time. -
Page 87: Alarms Settings
ENTER. Enter the alarm time using the rocker keypad and press ENTER. NOTE: The GPS 12 MAP must be turned on when the alarm time is reached. Otherwise, the message will not occur. Arrival Alarm provides an alarm message once you’re within a set distance from your... -
Page 88: Position
Setup Menu: Position Only the latitude/longi- tude, UTM/UPS and Maidenhead settings ap- ply worldwide. The addi- tional grid settings are only valid for a specific region. Position Settings Position Format is used to change the coordinate system in which a given position reading is displayed. -
Page 89: Interface Settings
MAP to external NMEA devices, a DGPS beacon receiver, a personal computer, etc. Five format settings are available: • GARMIN — the proprietary format used to exchange waypoint, route, track log data with a PC or with another GPS 12 MAP. - Page 90 (e.g. GBR 21) directly from your GPS 12 MAP. You can enter the beacon frequency and bit rate on the GPS 12 MAP and the information will be used to tune the beacon receiver. For more information, refer to the owner’s manual for your GARMIN differential...
-
Page 91: A: Specifications
** Subject to accuracy degradation to 100m 2DRMS under the US DOD-imposed Selective Availability Program. †The termperature rating for the GPS 12 MAP may exceed the usable range of some batter- ies. Alkaline batteries can rupture at high temperatures. ‡Alkaline batteries lose a significant amount of their capacity as temperature decreases. If you’re using the GPS 12 MAP in below freezing temperatures, use lithium batteries for... -
Page 92: Optional Accessories
Swivel Mount Bracket...Part No. 010-10048-00 Mount will swivel at base (360 Bicycle Mount...Part No. 010-10115-00 Allows the GPS 12 MAP to mount on a bicycle handlebar. Carrying Case... Part No. 010-10117-01 Zippered Case is lined and has a belt loop. -
Page 93: C: Wiring/Interfaces
(10-32 VDC) using an optional power/data cable. Consult the wiring diagram to the right for proper connections. (The male connector on the back of the GPS 12 MAP is illustrated.) A cigarette lighter adapter is also available to power your GPS 12 MAP without making permanent connections. -
Page 94: D: Messages
DGPS position. No RTCM Input—Beacon receiver is improperly connected or baud rates do not match. The GPS 12 MAP uses an on-screen message indicator to alert you to important information. Whenever the message appears, press ENTER to acknowledge the message and return to the previous page you were viewing. - Page 95 Enter a different name for the route. Route Full—You have attempted to add more than 30 waypoints to a route. Route Memory Full—Route memory is full and no additional routes can be added from another GPS 12 MAP or uploaded from a PC.
- Page 96 RTCM Input Failed—DGPS data being received has been lost. You are no longer receiving the beacon signal. Searching the Sky—The GPS 12 MAP is searching the sky for almanac data or the unit is in AutoLocate mode. Steep Turn Ahead—(Aviation) This message appears approximately one minute prior to a turn that requires a bank angle in excess of 25 degrees in order to stay on course.
-
Page 97: E: Time Offset Chart
Time Offset Chart The table below gives approximate UTC time offset for various longitu- dinal zones. If you are in daylight savings time, add one hour to the offset. º 0 º 5 º 5 º 5 º 5 º 5 º... -
Page 98: F: Map Datums
The following are the map datums available for the GPS12 MAP. Menu Page abbreviations are listed first, followed by the corresponding map datum name and area. The default map datum for the GPS 12 MAP is WGS 84. Canton Ast ‘66 Cape Cape Canavrl... - Page 99 Gux 1 Astro Gux 1 Astro- Guadalcanal Island Hjorsey 1955 Hjorsey 1955- Iceland Hong Kong ‘63 Hong Kong ‘63- Hong Kong Hu-Tzu-Shan Hu-Tzu-Shan- Taiwan Indian Bngldsh Indian- Bangladesh, India, Nepal Indian Thailand Indian- Thailand, Vietnam Indonesia ‘74 Indonesia 1974- Indonesia Ireland 1965 Ireland 1965- Ireland ISTS 073 Astro...
- Page 100 Map Datums Obsrvtorio ‘66 Observatorio 1966- Corvo and Flores Islands (Azores) Old Egyptian Old Egyptian- Egypt Old Hawaiian Old Hawaiian- Mean Value Oman Oman- Oman Ord Srvy GB Old Survey Grt Britn- England, Isle of Man, Scotland, Shetland Isl., Wales Pico De Las Nv Canary Islands Ptcairn Ast ‘67...
-
Page 101: G: Index
Accessories ... 82 Active Route Options ... 63-64 Active Route Page ... 14, 62 Alarms ... 72, 77 Almanac ... vi, 3 Altitude ... 4 Altitude Entry ... 27 Arrival Alarm ... 77 Arrow, Panning ... 31 AutoLocate Mode ... 27 AutoZoom ... - Page 102 Index Keypage usage ... 2 Lakes, on Map ... 37-38 Lat/Lon Grid ... 37-38 Main Menu ... 12, 67 Main Page Squence ... 7-11 Map Datum List ... 93-95 Map Datum Selection ... 74, 80 Map Orientation ... 9,17, 37-38 Map Page ...
- Page 103 Satellite Status Page ... 7, 23-27 Satellite Status Page Options .. 27 Screen Backlighting ... 28 Screen Contrast ... 28 Scrolling ... 2 Services at Exits ... 50 Setup Options ... 71-80 Sign Posts ... 41-42 Simlator Mode ... 15-22 Sky View Display ...
- Page 104 Use this space to record Landmarks that you want to retain for use in the future, but are deleting from the waypoint list contained in the GPS 12 MAP to make space for new, more active waypoints. Description 9 4 4 Record your unit Serial No.
-
Page 105: Product Registration
Product Registration Help us to better support you by completing our on-line registration today! Have the serial number of your GPS 12 MAP handy and connect to our website (www.garmin.com). Look for the Product Registration link on the Home Page. - Page 106 Messages © 1999-2000 GARMIN Corporation GARMIN International, Inc. 1200 E. 151st Street, Olathe, KS 66062 U.S.A. GARMIN (Europe) Ltd. Unit 5, The Quadrangle, Abbey Park Industrial Estate, Romsey SO51 9AQ U.K. GARMIN Corp. No. 68, Jangshu 2 Road, Shijr, Taipei County, Taiwan www.garmin.com...
Need help?
Do you have a question about the GPS 12 MAP and is the answer not in the manual?
Questions and answers