Table of Contents
Advertisement
Advertisement
Table of Contents

Related Manuals for Optoma WHD100 Receiver


Summary of Contents for Optoma WHD100 Receiver
-
Page 3: Table Of Contents
Table of Contents TABLE OF CONTENTS ......................2 1. IMPORTANT INFORMATION....................3 2. INTRODUCTION ......................... 7 2.1 P ......................7 ACKING ONTENT 2.2 O ........................8 VERVIEW 2.2.1 WHD100T (TX): PC TV T ..............8 RANSMITTER 2.2.2 WHD100R (RX): PC TV R .............. -
Page 4: Important Information
1. Important Information make sure to use the appropriate AC adapters as power supply to the transmitter and the receiver. Please take the time to read this user manual Power cord: Be sure the power cord is before using the WHD100. routed so that it will not be stepped on or It contains important information about pinched by heavy items. - Page 5 EN 301 489-17 DECLARATION OF CONFORMITY Electromagnetic compatibility and This device complies with Part 15 of the Radio spectrum Matters (ERM); Electro FCC Rules. Operation is subject to the magnetic Compatibility (EMC) standard following two conditions: for radio equipment; Part 17: Specific conditions for 2,4 GHz (1) This device may not cause harmful wideband transmission systems, 5GHz interference, and...
- Page 6 point. CAUTION: Using the RF module The following regulatory and Safety in the US notices must be published in Any changes or modifications not documentation supplied to the end expressly approved by the grantee of this user of the product or system device could void the user's authority to incorporating an adapter in compliance operate the equipment.
- Page 7 CAUTION: Using this System in CAUTION: Using the System in Canada the US Industry Canada regulatory information Operation is subject to the following two Any changes or modifications not conditions: expressly approved by the grantee of this This device may not cause device could void the user's authority to interference, operate the equipment.
-
Page 8: Introduction
2. Introduction WHD100 is a Full HD wireless transmission device. This solution delivers uncompressed 1080p full HD video and audio content to your existing HDTV or HD Projector wirelessly. It operates the transmission in 4.9 GHz~ 5.9 GHz frequencies and it can adjust its communication frequency automatically in case of interference from another RF system. -
Page 9: Overview
2.2 Overview 2.2.1 WHD100T (TX): Transmitter LED Status Indicator The LED indicator is lit solid INFO button blue when the power is on The button displayed and wireless link related information on established. the screen. Lateral view ... -
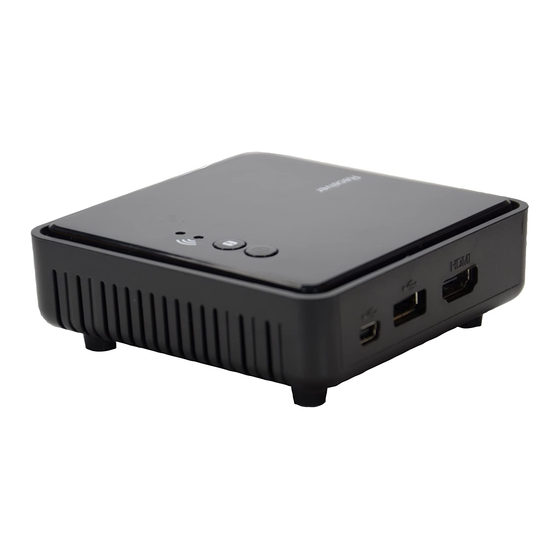
Page 10: Whd100R (Rx): Pc To Tv Receiver
2.2.2 WHD100R (RX): Receiver Top view Power Button with LED indicator Press to turn the receiver on and off. The indicator in the power button lights up in blue when the power is on, and turns red in standby mode. -
Page 11: Installation
3. Installation Step 1: Setup the WHD100T transmitter Connect an HDMI-ready computer to the WHD100T: (1) Plug the transmitter’s HDMI connector to the HDMI-ready computer’s “HDMI OUT” or Source player’s “HDMI OUT” directly. (2) Power supplied by USB port of computer through the USB cable (included on package). Or connect the supplied power adapter to the mini USB port of the WHD100T and a wall socket. -
Page 12: Step 2: Setup The Whd100R Receiver
Step 2: Setup the WHD100R receiver HDTV set Connection with WHD100R: (1) Connect the HDMI cable to the HDMI OUT jack of the receiver and to your HDTV set (or an HD projector). (2) Connect the supplied power adapter to the USB port of the WHD100R and a wall socket. -
Page 13: Step 3: Boot Up The Whd100T And Whd100R
Step 3: Boot up the WHD100T and WHD100R (1) After the power cord is plugged into the electrical outlet, the WHD100 will automatically turn on and establish a link between the transmitter and receiver. (2) If you unplug the power of WHD100T, the WHD100R will search for a signal (POWER LED will flash blue). - Page 14 (4) During the warm-up period, the POWER LED will blink in blue until the signal link between the transmitter and the receiver is established. It will spend around 15 ~ 20 seconds for boot up and link established if the operation is in normal condition. Ensure your TV set or projector is in “HDMI input”...
- Page 15 (5) If all operation is normal, the POWER LED and INFO./CHANNEL LED will glow in solid blue. Please refer to the below form containing detailed LED indicator and OSD description of transmitter / receiver: Item / Status Power LED Status LED OSD Display Mode Description...
- Page 16 If you have more than one pair of WHD100, each transmitter and receiver should be at least 6.5 feet away from one another. If both the transmitter and the receiver exist in the same room, the suggested the distance between the two is 6.5’ (2m) minimum. (6) TRANSMITTER/RECEIVER Status on OSD vs.
-
Page 17: Step 4: Mounting The Whd100R To The Wall
Step 4: Mounting the WHD100R to the Wall (5) Place WHD100R key holes over the (1) Refer the drawing of the bottom page protruding screws and slide down into that have relative position of the key position. holes and attach this paper on wall. (2) Drill pilot holes. -
Page 18: Troubleshooting
4. Troubleshooting Problem Solution Check if the power plugs of transmitter/receiver are properly The WHD100 front inserted into a functioning power outlet. panel power Make sure both POWER LED of transmitter/receiver are lit in the indicator (red LED) doesn't light up. -
Page 19: Windows Os Display Setting Of Laptop For Enables External Display
Check if your video resolution with HDMI input from your PC device is either 1080p, 1080i, 720p, 576p, or 480p. Please refer to the Poor picture quality “Supported Resolution” chapter where the video frame rate from or intermittent video your PC device WHD100 can support is defined. - Page 20 On Windows Vista OS: 1. Click to open Windows Mobility Center from Start to open New display 2. On the External Display title, click Connect display Detected 3. Choose Mirrored or Extended mode to enable external display. ...
-
Page 21: Mac Os Display Setting Of Laptop For Enables External Display
4.2 MAC OS Display setting of Laptop for enables external display MAC OS will detect external display equipment automatically and switch to a better video resolution when user plugs in the display cable to Apple Mac series. If MAC OS do not detect external display automatically, please check below : 1. - Page 22 On the Volume title, click the Change Audio setting icon to open Sound page Select HDMI output and press OK On Windows XP OS : 1. Click to open Audio setting from Control panel 2. Select HDMI Output and Press OK Note: For more information, please type “change audio settings”...
-
Page 23: Supported Resolution
5. Supported Resolution If the SOURCE LED continues to blink in blue (slower than “no signal” mode); OSD display: “ “, and there is no video displayed or the video quality suffers, it indicates that the video frame rate from your A/V source device is not supported. -
Page 24: Audio Bit Rate Support
6. Audio Bit Rate Support Digital Audio from HDMI inputs: Up to 6Mbit/s bit-rate support. Support AC3 and DTS. 2-channel PCM audio : 16~24 bits audio sample with 32~48KHz sampling rate 2channel PCM 32KHz 44.1KHz 48KHz 96KHz 16 bits 24 bits... -
Page 25: Product Specification
7. Product Specification General Specifications Supported Video HDMI Input 1080p, 1080i, 720p, 576p, 480p Resolutions Supported Audio Digital Audio up to 6 Mbps AC3 and DTS Formats The maximum transmission range is 20’ (7m) The optimum performance range is 15’ (5m) Transmission Distance The minimum range is 6.5’...
Need help?
Do you have a question about the WHD100 Receiver and is the answer not in the manual?
Questions and answers