Table of Contents
Advertisement
Advertisement
Table of Contents

Subscribe to Our Youtube Channel
Related Manuals for Entone Amulet 400

Summary of Contents for Entone Amulet 400
- Page 1 400 & 450 SERIES QUICK START GUIDE ®...
- Page 2 The material in this document is for information only and is subject to change without notice. While reasonable e orts have been made in the preparation of this document to assure its accuracy, Entone, Inc. assumes no liability resulting from the use of the information contained herein.
-
Page 3: Table Of Contents
TABLE OF CONTENTS OVERVIEW Safety Instructions What’s Included Front Panel Back Panel Remote Control CONNECTING VIDEO High-De nition TVs Standard De nition TVs CONNECTING TV SOURCE Cable or ATSC Antenna CONNECTING AUDIO TV (Stereo) A/V Receiver (Surround Sound) CONNECTING NETWORK Wired Wireless POWERING UP... -
Page 4: Safety Instructions
IMPORTANT SAFETY INSTRUCTIONS • WARNING: To reduce the risk of re or electric shock, do not expose this apparatus to rain or moisture. • The apparatus shall not be exposed to dripping or splashing and that no objects lled with liquids, such as vases, shall be placed on the apparatus. - Page 5 IMPORTANT SAFETY INSTRUCTIONS CONTINUED • To help prevent electric shock, plug the power cable into properly grounded sources. Use only properly grounded extension cords and adaptors, if they are needed. • The AC main plug is used as the disconnect device, the disconnect device shall remain readily operable.
-
Page 6: What's Included
WHAT'S INCLUDED Amulet Hybrid DVR Universal IR Remote Control 2xAA Batteries for Remote Control URC Quick Reference Guide Amulet Quick Start Guide... - Page 7 Composite Audio/Video Cable (For SD Video and Stereo Audio) Ethernet Cable (For Wired Networking) AC Power Adapter + Power Cord (100-240V, Output 12V/5A) ADDITIONAL ITEMS THAT MAY BE REQUIRED NOT INCLUDED : • HDMI Cable • Component Video Cable • Coaxial Cable •...
-
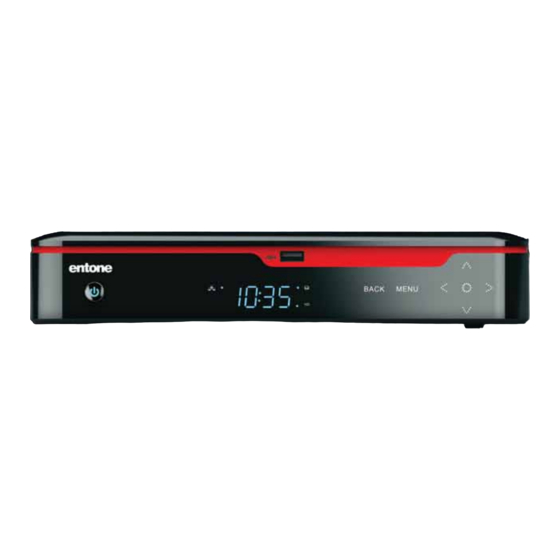
Page 8: Front Panel
AMULET HYBRID DVR FRONT PANEL POWER Button Solid Blue indicates the unit is on Solid Red indicates the unit is in standby mode Flashing Blue indicates the unit is starting up Press button once to put unit in standby mode, press again to resume To restart the device, press and hold button for at least 5 seconds or longer... -
Page 9: Back Panel
AMULET HYBRID DVR BACK PANEL 1 2 3 Name Description eSATA External Serial ATA Connector (May supports future upgrades). CABLE/ANT IN For Clear QAM Cable TV Source and ATSC Antenna TV OUT Connection to RF TV Output Wi-Fi (Optional) Provide extended range and coverage to wireless network VIDEO Composite Video for SD Video... -
Page 10: Remote Control
REMOTE CONTROL... - Page 11 Button(s) Description Switches the power on/o for the currently selected device POWER Switches STB to power on or standby mode TV: Select to control TV DEVICE CONTROL (if programmed) STB: This button is pre-programmed to control the Amulet Hybrid DVR AUX: Select to control another device (if programmed) Controls video program for LIVE TV / DVR / VOD TRANSPORT KEYS...
-
Page 12: Connecting Video
CONNECTING VIDEO HDTV High-De nition Select only one Video option, then proceed to TV Source OPTION #1 (Recommended) Connect via HDMI* Delivers the best video & audio quality via a single cable S-VIDEO Cable not included *This connection provides both Video and Multi-Channel Audio. If you have selected HDMI for your Video then proceed to page 14. - Page 13 OPTION #2 Connect via Component Video Component Video Delivers excellent picture quality S-VIDEO Cable not included...
- Page 14 CONNECTING VIDEO SDTV Standard-De nition Select only one Video option, then proceed to TV Source OPTION #1 Connect via Composite Video Composite Video Use yellow cable for Video Connection Delivers good picture quality (If you selected HDMI, do not use this cable) S-VIDEO Cable included...
- Page 15 CONNECTING VIDEO SDTV Standard-De nition Select only one Video option, then proceed to TV Source OPTION #2 Connect via Coaxial Coaxial Cable Delivers good picture quality ANT IN S-VIDEO Cable not included...
-
Page 16: Connecting Tv Source
CONNECTING TV SOURCE CABLE OR ATSC ANTENNA Select only one TV Source option, then proceed to Audio OPTION #1 Connect to Cable TV Source using RF Coaxial Cable OPTION #2 Connect to ATSC Antenna Source (Outdoor or Indoor Antenna) Cable not included... -
Page 17: Connecting Audio
CONNECTING AUDIO TV Stereo Select only one Audio option, then proceed to Networking OPTION #1 Connect to TV's Stereo Audio Use red/white cables for Audio Connection if you selected Component Video, or Composite Video (If you selected HDMI, do not use these cables) S-VIDEO Cable included... -
Page 18: A/V Receiver (Surround Sound
CONNECTING AUDIO A/V RECEIVER Surround Sound OPTION #2 Connect to an A/V Receiver for Digital 5.1 Surround Sound Cable not included... -
Page 19: Connecting Network
CONNECTING NETWORK WIRED Select only one Networking option, then proceed to Powering up OPTION #1 Connect to a Wired Network via DSL, Cable Modem or Network Router Router not included Cable included... -
Page 20: Wireless
CONNECTING NETWORK WIRELESS OPTION #2 Connect to a Wireless Network via a Wireless Network Router or Access Point Wireless Router not included Attaching and adjusting the Antenna angle will help achieve better coverage and range. -
Page 21: Setting Up Remote Control
POWERING UP SETTING UP REMOTE CONTROL Locate the two AA batteries and remote control in the acces- sory box To open the battery cover, press down on the battery cover latch and slide it o Insert the AA batteries, matching the "+" and "-" marks on the batteries to the "+"... -
Page 22: Connecting To Power Source
FINAL SETUP CONNECTING TO POWER SOURCE Connect the power cord to the “POWER” connector on the back of the Amulet Hybrid DVR Connect the AC power adapter to a power outlet Press the power button on the front of the Amulet Hybrid DVR to turn unit ON Follow the on-screen instructions... -
Page 23: Declaration Of Conformity
DECLARATION OF CONFORMITY To ensure proper use of this product, please read this manual carefully and retain it for future reference. Should the unit require maintenance, contact an authorized service location. WARNING: This symbol indicates the presence of uninsulated dangerous voltage within the product's enclosure that constitutes a risk of electric shock. - Page 24 DECLARATION OF CONFORMITY CONTINUED Declaration of Conformity (Europe Only) This product is in conformity with the Council Directives: • EMC Directive 2004/108/EC • Low voltage Directive 2006/95/EC Canada Certi cation Notice ICES-003 Class B Notice This Class B digital apparatus complies with Canadian ICES-003. Avis NMB-003, Classe B Cet appareil numérique de la classe B est conforme à...
- Page 25 NOTES...
- Page 26 NOTES...
- Page 28 All information contained in this document is subject to change without notice. Information contained in this document is provided on an as is basis. In no event will Entone be liable for damages arising directly or indirectly from any use of the information contained in this document. Subject to...
Need help?
Do you have a question about the Amulet 400 and is the answer not in the manual?
Questions and answers