Table of Contents
Advertisement
Quick Links
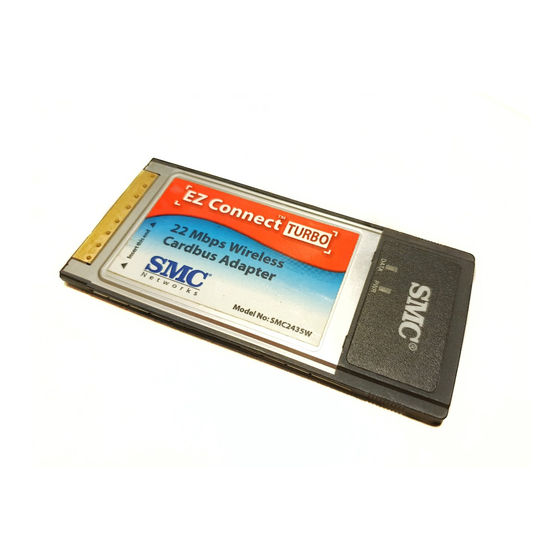
EZ Connect TURBO 11/22 Mbps Wireless
Cardbus Adapter/PCI Cards:
SMC2435W/SMC2402W
The EZ Connect TURBO Cards are IEEE 802.11b - compliant 11/22 Mbps Auto-Sensing wireless network
adapters. They meet the needs of small business and corporate users who require backwards
compatibility with a 11 Mbps wireless connection to an existing LAN. In addition, they provide
exceptional scalability to 22 Mbps through the use of Packet Binary Convolutional Code (PBCC)
technology. These new adapters feature an operating range of up to 1,155 feet and true plug-and play
installation in all notebook computers.
NEXT - System Requirements
Advertisement
Table of Contents

Subscribe to Our Youtube Channel
Related Manuals for SMC Networks EZ Connect SMC2402W


Summary of Contents for SMC Networks EZ Connect SMC2402W
- Page 1 EZ Connect TURBO 11/22 Mbps Wireless Cardbus Adapter/PCI Cards: SMC2435W/SMC2402W The EZ Connect TURBO Cards are IEEE 802.11b - compliant 11/22 Mbps Auto-Sensing wireless network adapters. They meet the needs of small business and corporate users who require backwards compatibility with a 11 Mbps wireless connection to an existing LAN. In addition, they provide exceptional scalability to 22 Mbps through the use of Packet Binary Convolutional Code (PBCC) technology.
-
Page 2: System Requirements
38 Tesla Irvine, California 92618 All rights reserved. Trademarks SMC is a registered trademark; and EZ Connect and EZ Hub are trademarks of SMC Networks, Inc. Other product and company names are trademarks or registered trademarks of their respective holders. -
Page 3: Equipment Checklist
BACK - System Requirements NEXT - Install Instructions Equipment Checklist After unpacking the EZ Connect TURBO 11/22 Mbps Auto-Sensing Wireless Adapter, check the contents of the box to be sure you have received the following components: 1 Wireless Cardbus Adapter (SMC2435W) or 1 Wireless PCI Card (SMC2402W) 1 Driver, Utility, &... - Page 4 Network Configuration: Ad-Hoc (Peer-to-Peer) Infrastructure Radio Signal Type: Direct Sequence Spread Spectrum (DSSS) Media Access Protocol: CSMA/CA (Collision Avoidance) with ACK Security: 64/128/256-bit Wired Equivalent Privacy (WEP) RF Frequency: 2471 MHz - 2497 MHz (Japan Band) 2400 MHz - 2483 MHz (North America, Europe, and extended Japan Band) 2455 MHz - 2475 MHz (Spain) 2446.5 MHz - 2483.5 MHz (France) Operating Channel:...
- Page 5 Not Lit: Power Off Red LED Lit: Power On RF Tx/Rx Not Lit: No Activity Green LED blinking: Tx/Rx activity Power Voltage: 3.3 or 5 Volt + 5% Power Consumption: 650 mA by Tx (max) 350 mA by Rx Dimensions: Type II PCMCIA + Antenna 128 x 54 x 9.6 mm Compliance:...
- Page 6 BACK - Equipment Checklist NEXT - Driver Installation Option #1 SMC2435W: Installation Instructions Warning: Network cards are sensitive to static electricity. To protect the card, avoid touching its electrical components and always touch the metal chassis of your computer before handling the card Turn on your computer and insert the Driver, Utility, and Documentation CD.
- Page 7 SMC2402W: Installation Instructions Turn on your computer and insert the Driver, Utility, and Documentation CD. Run the utility software and then reboot when requested. Switch off the computer, unplug the power cord, and remove the computer's cover. Select an unused PCI bus-master slot and remove its protective bracket.
- Page 8 BACK - Physical Installation NEXT - Driver Installation Option #2 Driver Installation Option #1 (Recommended) Windows 98/Me/2000/XP NOTE: Installation processes such as these usually require the use of your original, licensed copy of Windows. Please have your Windows CD on hand BEFORE proceeding with the installation. This Installation method makes the process as simple and Plug-and-Play as possible.
- Page 9 Step 4: Click [Next >] to continue. Figure 1.1 Step 5: You will be given the option to choose the location where the Configuration Utility will be installed. It is recommended to leave this at the default value. Click [Next >] to continue. Figure 1.2...
- Page 10 Step 6: Please set the selection to [Yes] and click [Finish] to reboot the machine. Then shut down the computer, insert your EZ Connect TURBO Cardbus Adapter or PCI Wireless Card, and boot up your machine again. Figure 1.3 Step 7: Once the OS is booted up, it will find the new hardware and automatically install it. The following are OS specific options that may appear during this installation procedure: Windows 98: If you are using Windows 98, you must have your original Windows CD on hand.
- Page 11 BACK - Driver Installation Option #1 NEXT - Driver Install - Windows 98 Driver Installation Option #2 Click on the link for your OS to view the directions: Windows 98 Windows Me Windows 2000 Windows XP Note: Windows 98, Me, 2000 and XP are registered trademarks of Microsoft.
-
Page 12: Windows 98 - Driver Installation
BACK - Driver Installation Option #2 NEXT - Driver Install - Windows Me Windows 98 - Driver Installation NOTE: Installation processes such as these usually require the use of your original, licensed copy of Windows. Please have your Windows CD on hand BEFORE proceeding with the installation. Step 1: After you have inserted the EZ Connect TURBO 11/22 Mbps Auto-Sensing Wireless Adapter in your machine, the OS will automatically recognize the adapter and prompt you for the appropriate drivers. - Page 13 Step 2: Insert the Driver CD and select the [Search for the best driver for your device] option and click [Next >]. Figure 1.1 Step 3: Clear all checkboxes except for [Specify a location:]. Then press the [Browse] button and look for the drivers on your CD-ROM.
- Page 14 Step 4: The system should find the drivers. Now click the [Next >] button to continue the installation. The wizard will show "SMC2402W 22Mbps Wireless PCI Adapter" if you purchased the PCI card or "SMC2435W 22Mbps Wireless Cardbus Adapter" if you purchased the Cardbus Adapter. (Note: If the system could not find the drivers, click the [<...
- Page 15 Figure 1.4 Step 6: The system will copy the files. Do NOT press [Cancel]. Step 7: Once all the necessary files are copied from the Windows disk, the driver install process will be complete. Click [Finish] to exit the wizard. Figure 1.5 Step 8: You will then be prompted to reboot the machine.
- Page 16 TURBO Wireless Card will be initialized and ready for use. Figure 1.6...
-
Page 17: Windows Me - Driver Installation
BACK - Driver Install - Windows 98 NEXT - Driver Install - Windows 2000 Windows Me - Driver Installation NOTE: Installation processes such as these usually require the use of your original, licensed copy of Windows. Please have your Windows CD on hand BEFORE proceeding with the installation. Step 1: After you have inserted the EZ Connect TURBO 11/22 Mbps Auto-Sensing Wireless Adapter in your machine and turned it back on, the OS will automatically recognize the adapter and prompt you for the appropriate drivers. - Page 18 Step 2: Insert the Driver CD and select the [Specify a location:] option. Clear the [Removable Media] checkbox. Then press the [Browse] button and look for the drivers on your CD. This should be located in ?:\Driver. (Note: The ? equals the letter of your CD-ROM drive. In most cases, this is D.) Then click [Next >]. Figure 1.1 Step 3: The system should find the drivers.
- Page 19 Figure 1.2 Step 4: Once all the necessary files have been copied, the driver installation is complete. Click [Finish] to exit the wizard. Figure 1.3 Step 5: You will then be prompted to reboot the machine. Please press [Yes]. Upon reboot, the EZ Connect TURBO Wireless Card will be initialized and ready for use.
- Page 20 Figure 1.4...
- Page 21 BACK - Driver Install - Windows Me NEXT - Driver Install - Windows XP Windows 2000 - Driver Installation Step 1: After you have inserted the EZ Connect TURBO 11/22 Mbps Auto-Sensing Wireless Adapter in your machine and turned it back on, the OS will automatically recognize the adapter and prompt you for the appropriate drivers.
- Page 22 Step 2: Insert the Driver CD and select the [Search for a suitable driver...] option. Then click [Next >]. Figure 1.1 Step 3: Clear all checkboxes except for [Specify a location]. Then click [Next >]. Figure 1.2 Step 4: You will then be prompted to enter the location of the drivers. This should be ?:\Driver. (Note: The ?
- Page 23 equals the letter of your CD-ROM drive. In most cases, this is D.) Then click [OK]. You can also click [Browse] and browse to the location of the drivers on the CD for further verification. Figure 1.3 Step 5: The system should find the drivers. Now click the [Next >] button to continue the installation. (Note: If the system could not find the drivers, click the [<...
- Page 24 Figure 1.4 Step 6: Click [Yes] to continue the installation. Please do NOT click [No] as this will cancel the driver wizard and the card will not be installed properly. The wizard will show "SMC2402W 22Mbps Wireless PCI Adapter" if you purchased the PCI card or "SMC2435W 22Mbps Wireless Cardbus Adapter"...
- Page 25 Step 7: You have now completed the driver installation. Click [Finish] to initialize the adapter. Figure 1.6...
-
Page 26: Windows Xp - Driver Installation
BACK - Driver Install - Windows 2000 NEXT - Verification - Main Page Windows XP - Driver Installation Step 1: After you have inserted the EZ Connect TURBO 11/22 Mbps Auto-Sensing Wireless Adapter in your machine and turned it back on, the OS will automatically recognize the adapter and prompt you for the appropriate drivers. - Page 27 Step 2: Insert the Driver CD and check the [Include this location in the search] option. Make sure the [Search removable media] option is not checked. Click [Browse] and find the location of the drivers. This should be ?:\Driver. (Note: The ? equals the letter of your CD-ROM drive. In most cases, this is D.) Then click [Next >]. Figure 1.1 Step 3: Click [Continue Anyway] to continue the installation.
- Page 28 Figure 1.2 Step 4: This process will be completed once the drivers are copied to the hard drive and installed. Please click [Finish] to exit the wizard. Figure 1.3...
- Page 29 Figure 1.4 After clicking [Finish], you will see the following message in your system tray: Figure 1.5...
- Page 30 BACK - Driver Install - Windows XP NEXT - Verification - Windows 98 How Do I Know the Card is Installed? This section will help you verify that the adapter is installed properly. Click on the link for your OS to view the directions: Windows 98 Windows Me Windows 2000...
- Page 31 BACK - Verification - Main Page NEXT - Verification - Windows Me Windows 98 - Verification Step 1: Right-click the My Computer icon on your desktop and click [Properties]. Figure 1.0...
- Page 32 Step 2: Then go to the [Device Manager] tab and open the [Network adapters] section. You should see your EZ Connect TURBO Wireless Adapter in this menu. Highlight it and click [Properties]. Figure 1.1 Step 3: The Device Status shows that the "This device is working properly". If there are any error messages displayed here, you will need to click the SMC adapter and click [Remove].
- Page 33 BACK - Verification - Windows 98 NEXT - Verification - Windows 2000 Windows Me - Verification Step 1: Right-click the My Computer icon on your desktop and click [Properties]. Figure 1.0...
- Page 34 Step 2: Then go to the [Device Manager] tab and open the [Network adapters] section. You should see your EZ Connect TURBO Wireless Adapter in this menu. Highlight it and click [Properties]. Figure 1.1 Step 3: The Device Status shows that the "This device is working properly". If there are any error messages displayed here, you will need to click the SMC adapter and click [Remove].
- Page 35 BACK - Verification - Windows Me NEXT - Verification - Windows XP Windows 2000 - Verification Step 1: Right-click the My Computer icon on your desktop and click [Properties]. Figure 1.0...
- Page 36 Step 2: Then go to the Hardware tab and click [Device Manager]. Open the [Network adapters] section. You should see your EZ Connect TURBO Wireless Adapter in this menu. Right-click your adapter and click [Properties]. Figure 1.1...
- Page 37 Figure 1.2 Step 3: The Device Status shows that the "This device is working properly". If there are any error messages displayed here, you will need to right-click the SMC adapter and click [Uninstall]. Then reboot the machine and go through the installation process again.
- Page 38 BACK - Verification - Windows 2000 NEXT - Utility Installation Windows XP - Verification Step 1: Click [Start] and click [Control Panel]. Then click the [Performance and Maintenance] icon and select [System]. Figure 1.0 Figure 1.1...
- Page 39 Figure 1.2 Step 2: Then go to the Hardware tab and click [Device Manager]. Open the [Network adapters] section. You should see your EZ Connect TURBO Wireless Adapter in this menu. Right-click the adapter and click [Properties]. Figure 1.3...
- Page 40 Figure 1.4 Step 3: The Device Status shows that "This device is working properly". If there are any error messages displayed here, you will need to right-click the SMC adapter and click [Uninstall]. Then reboot the machine and go through the installation process again.
-
Page 41: Utility Installation
BACK - Windows XP - Verification NEXT - Utility Configuration Utility Installation NOTE: If you completed [Option #1] to install the drivers, then you have already installed the utility as well. Please skip to the next section. If you completed [Option #2], please complete the steps below to install the utility. - Page 42 Step 4: Click [Next >] to continue. Figure 1.1 Step 5: You will be given the option to choose the location where the Configuration Utility will be installed. It is recommended to leave this at the default value. Click [Next >] to continue. Figure 1.2...
- Page 43 Step 6: Please set the selection to [Yes] and click [Finish] to reboot the machine. Then once the OS is back up and running, you should see a new icon in your system tray that launches the wireless card utility. Figure 1.3 Continue to the Utility Configuration section for documentation on how to use the utility application for your adapter.
-
Page 44: Utility Configuration
BACK - Utility Installation NEXT - Troubleshooting Utility Configuration When the utility program is running, there will be a quick launch icon in the lower right-hand corner of the task bar. The icon will be GREEN if you have a good connection to a wireless network. If it is white, you will need to verify the network settings and check to be sure that the AP is turned on. - Page 45 Figure 1.1 Settings cannot be changed on this tab. This tab gives you the data you need to determine which wireless network you are connected to and your connection speed. It also shows the SSID and Channel of that network, and it gives you throughput and link quality statistics.
- Page 46 Configuration Figure 1.2 To change the settings, simply enter the new desired values and click the [Apply] button. Note that when configured in Infrastructure mode, you cannot change the Channel. The wireless adapter will automatically sync to the same channel that the Access Point is using. The SSID should be configured to the same value as that of the Access Point.
- Page 47 Mbps", "5.5 Mbps PBCC", "5 Mbps", "2 Mbps", and "1 Mbps". To optimize performance and range, it is best to set this value at Auto. Lower speeds will usually allow you to gain more range. When set to Auto, the adapter will auto-sense the speed and provide the highest throughput that your environment allows.
-
Page 48: Site Survey
Format", the security is enabled by entering 5-letter keys for 64-bit WEP, 13-letter keys for 128-bit WEP or 29- letter keys for 256-bit WEP. Site Survey The Site Survey tab scans and displays all Access Points in the wireless LAN. To choose a network, simply highlight it and click the [Connect] button on the right. - Page 49 Figure 1.5...
- Page 50 About The following screen displays the version information. Figure 1.6...
-
Page 51: Troubleshooting
BACK - Utility Configuration NEXT - Glossary Troubleshooting Common Installation Problems Problems are often caused by conflicts with other devices installed in the same computer, or software that has been configured incorrectly. If you encounter a problem with the EZ Connect TURBO 11/22 Mbps Auto-Sensing Wireless Adapters, use the following checklists to identify and correct the problem. - Page 52 The Access Point you are trying to attach to is defective or may not be configured properly to accept your signal. Check with the administrator of your wireless network for more information on connecting to the LAN. Also run the necessary diagnostics on the AP to make sure the unit is fully operational. If you cannot access the Internet, be sure to check with the ISP for further instructions once the drivers for the EZ Connect TURBO Wireless Card are installed properly.
- Page 53 BACK – Troubleshooting NEXT - Featured Products Glossary 10BaseT - Physical Layer Specification for Twisted-Pair Ethernet using Unshielded Twisted Pair wire at 10Mbps. This is the most popular type of LAN cable used today because it is very cheap and easy to install. It uses RJ- 45 connectors and has a cable length span of up to 100 meters.
- Page 54 Ethernet - A standard for computer networks. Ethernet networks are connected by special cables and hubs, and move data around at up to 10 million bits per second (Mbps). ESS - ESS (ESS-ID, SSID) stands for "Extended Service Set". More than one BSS is configured to become an Extended Service Set.
- Page 55 a device that can be toggled between MDI (not crossed) and MDI-X (crossed). Medium Dependent Interface – X (crossed) - A port on a network hub or switch that crosses the transmit lines coming in to the receive lines going out. NAT –...
- Page 56 BACK – Glossary Featured Products Thank you for purchasing SMC products! Users who have purchased the EZ Connect TURBO 11/22 Mbps Wireless Adapters have also purchased the following devices: The Barricade™ Plus Cable/DSL Broadband Router (7004FW) is the ideal networking solution for both the home and business user.
- Page 57 To complement the incorporated SPI firewall functions, the Barricade Plus Router has a built-in VPN tunnel that supports IPSec and PPTP Client/Server connectivity. This VPN functionality is the perfect solution for remotely accessing a network securely by establishing an authenticated and encrypted tunnel over the Internet. No matter what connection you set up, you can be well assured that your data is being transmitted and exchanged in the most secure manner.
- Page 58 SMC’s EZ Switch™ 10/100s are dual-speed desktop network switches that are as easy to install and use as an ordinary hub, with the added dimension of dramatically improving network performance by offering speeds up to 200 Mbps per port. Moreover, the 5 port, SMC-EZ6505TX features Auto MDI/MDI-X on each port, providing added functionality and ease of use.
- Page 59 The Barricade™ Wireless Cable/DSL Broadband Router (SMC7004VWBR) is the ideal networking solution for any home and business user. This platform independent multi-functional router combines a 4-port 10/100 Mbps dual-speed switch, an 802.11b wireless access point, Stateful Packet Inspection (SPI) firewall security, network management, and Virtual Private Network (VPN) pass-through support into one convenient device.
Need help?
Do you have a question about the EZ Connect SMC2402W and is the answer not in the manual?
Questions and answers