Advertisement
Table of Contents
- 1 Safety Information
- 2 Features
- 3 Accessories
- 4 Table of Contents
- 5 Front Panel Description
- 6 Rear Panel Description
- 7 Remote Control Description
- 8 Wire Connection
- 9 Disc Notes
- 10 Disc Operation
- 11 Basic Playback Operations
- 12 DVD Setup Menu
- 13 Specifications
- 14 Requirements
- 15 Trouble Shooting
- Download this manual
Advertisement
Table of Contents

Related Manuals for Power Acoustik PADVD-360


Summary of Contents for Power Acoustik PADVD-360
- Page 1 OWNER’S MANUAL Mobile Video System...
-
Page 2: Safety Information
SAFETY INFORMATION Please read the manual carefully before operating this unit and keep it for future reference. CAUTION: This unit is a class 1 laser product. To prevent direct exposure to the laser system, do not open the unit. The laser beam may hurt your eyes. If the unit requires adjustments, contact an authorized service centre. -
Page 3: Features
FEATURES True DIN Size DVD Player DVD/VCD/CD/CD-R/CD-RW/MP3 Compatible Full Function Remote Control Extra Remote Eye Last Position Memory On Screen Display Built-in Dolby Digital Decoder Digital Anti-Shock NTSC/PAL Switchable FrontAudio, Video Input Audio, Video Output Coaxial Output NOTE: This user's manual is only for reference. Modifying rights are reserved. -
Page 4: Accessories
ACCESSORIES - 3 -... -
Page 5: Table Of Contents
TABLE OF CONTENTS Safety information ............………………..1 Features ................………………..2 Accessories ..............………………..3 Table of Contents..............………………..4 Front Panel Description ...........………………..5 Rear panel Description ..........………………..5 Remote Control Description ...........………………..6 Installation and Removal ..........………………..8 Wire Connection ............…………………1 1 Disc Notes ..............…………………12 Disc Operation ..............…………………13 Basic Playback Operations ..........…………………14 DVD Setup Menu .............…………………17 Specifications ..............…………………22... -
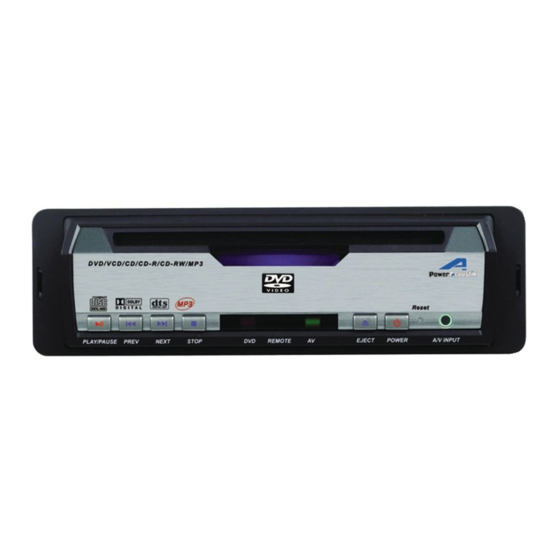
Page 6: Front Panel Description
FRONT PANEL 1. POWER / PAUSE 7. AV LED 2. PREVIOUS 8. EJECT 3. NEXT 9. POWER 4. STOP 10. RESET 5. DVD LED 11. A/V INPUTE 6. REMOTE REAR PANEL 12. DC 12V IN 1 15. AUDEO OUTPUT 13. DC 12V IN2 16. -
Page 7: Remote Control Description
REMOTE CONTROL 1. POWER 13. TITLE 25. VOLUME- 2. SOURCE 14. ZOOM 26. DOWN 3. MUTE 15. SUBTITLE 27. STOP 4. GOTO 16. AUDIO 28. PLAY/PAUSE 5. MENU 17. EJECT 29. A - B 6. UP 18. NUMBER BUTTONS 30.ANGLE 7. - Page 8 Replacing the Batteries If the remote control has no function or if the operating range is reduced, replace the old battery with new one. 1. Remove the battery cover. Follow the arrow (1) slide the tab to the right while pulling the cover away at the same time. 2.
- Page 9 UNIT INSTALLATION Installation Method 1: 1. Tighten mounting bracket 2(accessory 11) to the side of the unit: 2. Mount the frame (accessory 12)and check that it is hooked to the unit. 3. Hitch the mounting box(accessory 1) to the unit from rear to front. - 8 -...
- Page 10 Installation Method 2: 1. Select a position where the screw holes of the main unit become aligned with the mounting bracket 1 's (accessory 3) tighten the screws on each side. Removal Method 1: 1. Insert the keys(accessory 7) into the holes at both sides of the unit until the mounting box can be removed.
- Page 11 UNIT REMOVAL 1 1. Insert the keys(accessory 7) into the holes at both sides of the unit until the mounting box can be removed. 2. Remove the frame with the keys. 3. Remove mounting bracket 2 with screwdriver. - 10 -...
- Page 12 UNIT REMOVAL 2 1. Loosen the screws with screwdriver until mounting bracket 1 can be removed from the unit. - 11 -...
-
Page 13: Wire Connection
WIRE CONNECTION NOTE: 1. If you want to extend the operational range of remote control, you can insert the remote control receiver in the rear panel - 12 -... -
Page 14: Disc Notes
DISC NOTES ■ Disc formats supported by this player Handling and cleaning • Dirty, dusty, scratched or warped discs may not play properly. • Do not place stickers or make scratches on discs • Do not warp discs. • Store discs in their cases when not in use. •... -
Page 15: Disc Operation
DISC OPERATIONS Repairing New Discs with Rough Spots A new disc may have rough edges on its inside and outside edges. If a disc with rough edges is used, the proper setting will not be performed and the player will not play the disc. -
Page 16: Basic Playback Operations
BASIC OPERATIONS POWER Press the POWER button to turn the unit ON or press the same button to turn the unit OFF. SOURCE Press this button to select the display mode as follows: DVD-AV IN-DVD PLAY/PAUSE Press the button to play or pause. EJECT Press this button to load or eject disc. - Page 17 AUDIO When playing a DVD disc, press the button to select audio language. When playing other kinds of disc, press the button to select audio channel. PAL/NTSC Press the button to select video output model(NTSC/PAL/PAL60/AUTO). DISPLAY Press this button to display the current playback information on the screen. VOL+/VOL- Press the button to adjust sound volume.
-
Page 18: Dvd Setup Menu
DVD SETUP MENU SETUP MENU OPERATION Press the [SETUP] button of remote control to enter the DVD SETUP Menu. Press the [<] / [>] buttons to switch the main menus as following: SYSTEM – LANGUAGE – AUDIO – VIDEO – SPEAKER – DIGITAL Press the [∧] / [∨] buttons to enter the submenus from main menus. - Page 19 VIDEO Following options are available for the TV Display: INTERLACE-YUV TV-RGB P-SCAN YPBPR S-VIDEO TV TYPE Following options are available for the TV Display: 4 : 3 PS 4 : 3 LB 16 : 9 PASSWORD Setup the password for Parental Ratings change. The default password is 0000. RATING Following options are available for the Parental Ratings: 1 KID SAFE...
- Page 20 MENU LANGUAGE Following options are available for the MENU LANGUAGE: ENGLISH GERMAN SPANISH FRENCH PORTUGUESE ITALIAN RUSSIAN DUTCH SWEDISH KOREAN DANISH NORWEGIAN POLISH HUNGARIAN DIVX LANGUAGE Following options are available for the DIVX LANGUAGE: CENTRAL WESTERN KOREAN AUDIO SETUP AUDIO OUT Following options are available for the AUDIO OUT: SPDIF / OFF SPDIF / RAW...
- Page 21 VIDEO SETUP BRIGHTNESS Following options are available for the BRIGHTNESS: CONTRAST Following options are available for the CONTRAST: Following options are available for the HUE: SATURATION Following options are available for the SATURATION: - 20 -...
- Page 22 SPEAKER SETUP DOWNMIX Following options are available for the DOWNMIX: LT / RT Stereo BASS MODE Following options are available for the BASS MODE: ALL LG SPK ALL SM SPK MIXED SPK DIGITAL SETUP OP MODE Following options are available for the OP MODE: LINE OUT RF REMOD DYNAMIC RANGE...
-
Page 23: Specifications
SPECIFICATIONS Supply voltage : 12V DC (10.8V-16V), negative ground Current consumption : Less than 900mA Signal system : Composite video 1.0Vp-p 75 Q Disc compatible : 1) DVD-VIDEO Disc 5" (12cm) single-sided, single-layer 5" (12cm) :single-sided, double-layer Compact disc (CD-DA) 5"... -
Page 24: Requirements
REQUIREMENTS 1) Do not use and store the loader in dusty, high temperature and high Humidity environments. 2) Do ground all equipments and works in order to avoid causing damage to The loader by electrostatic discharges. 3) The user who handles this product should take all necessary precautions To avoid ESD (Electro-Static Discharge) failures. -
Page 25: Trouble Shooting
TROUBLE SHOOTING SYMPTOM CAUSE / SOLUTION No sound Cancel the mute function. Adjust the volume. The memory contents are lost Disconnect the power wire or battery. Press the reset button. The disc does not play The disc might be dirty or damaged. The disc comes out The temperature is outside the range of the automatically...
Need help?
Do you have a question about the PADVD-360 and is the answer not in the manual?
Questions and answers